Microsoft Office 2016 Secrets? (Tips & Tricks)

Microsoft Office 2016 is now using artificial intelligence to make your life easier. MS has added AI to their platforms with their new Smart Lookup feature. This makes fact-finding much easier as you can look up what you need right from within the document you’re working on.

Do you know how to use the Smart Lookup Feature Office 2016? You don’t? Well, we’re going to change that right now. And, by the way, feel free to share these “secrets” with your co-workers.

What Is Smart Lookup?

It’s a cool new feature in the Office 2016 Suite that lets you look up information quickly from the document you’re working on using the Bing Search Engine. Smart Lookup automatically finds the information you need.

To get going, open a document in your Office 2016 program of choice (Word, Excel, or PowerPoint).

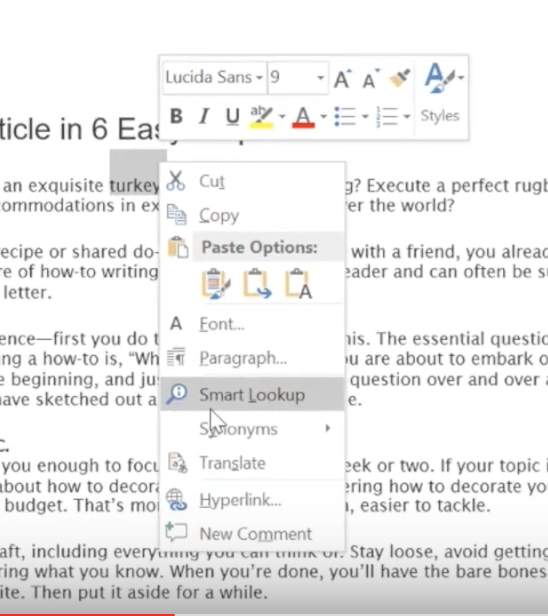
Then, highlight a term or phrase in the document that you’d like to search for.

Here we’ve selected “turkey.”


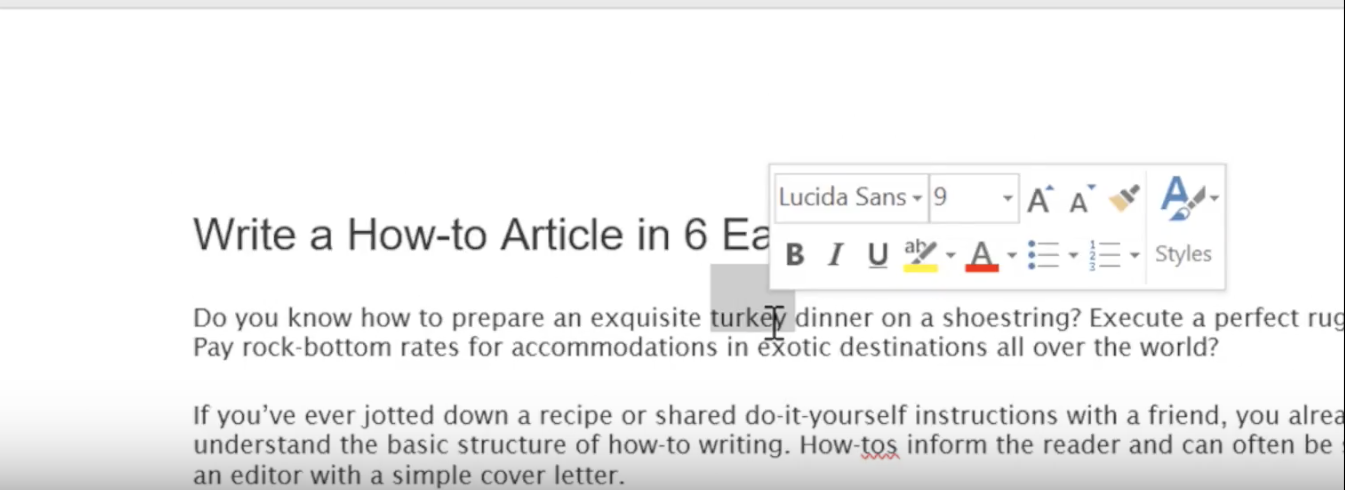
Leaving the word highlighted, go to the Ribbon at the top of the window and select REVIEW > SMART LOOKUP.

Note: You can only do this once you’ve read through and acknowledged the Privacy Policy.

Microsoft will post the Privacy Policy on the right side of your screen. Read it and click “Got It” and you can proceed. You’ll only need to do this one time to activate Smart Lookup throughout your entire Office Suite of tools.

Since Microsoft sends your data to Bing, it doesn’t turn Smart Lookup on by default. You may need to contact your IT department for assistance.

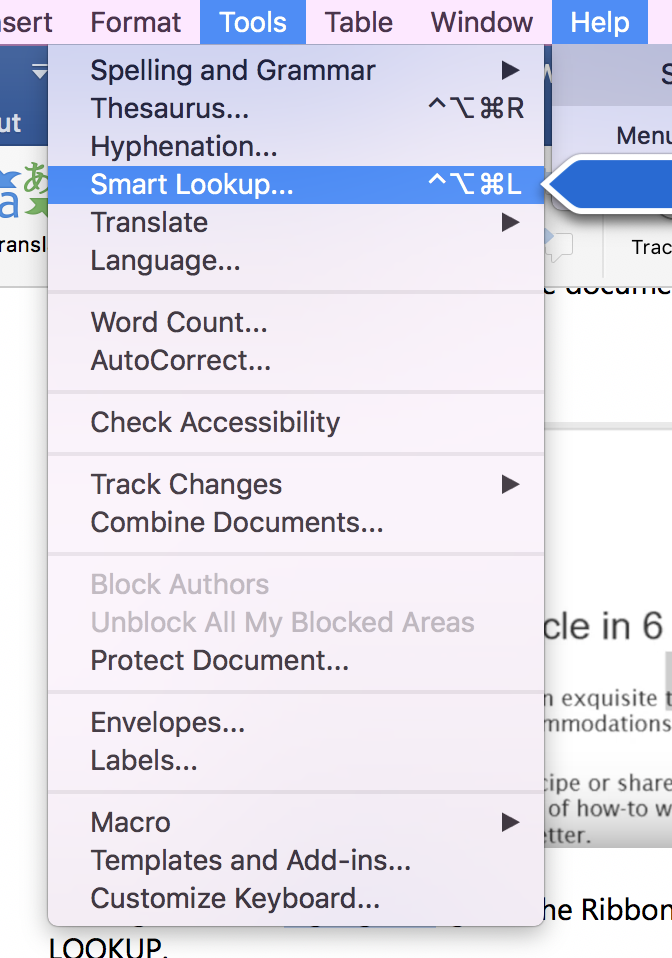
If you use a Mac as I do, it’s a bit different. Instead, go to Tools at the top of your screen, and you’ll find Smart Lookup here.

The Bing search results will appear in the panel to the right. (The Insights Task Pane)

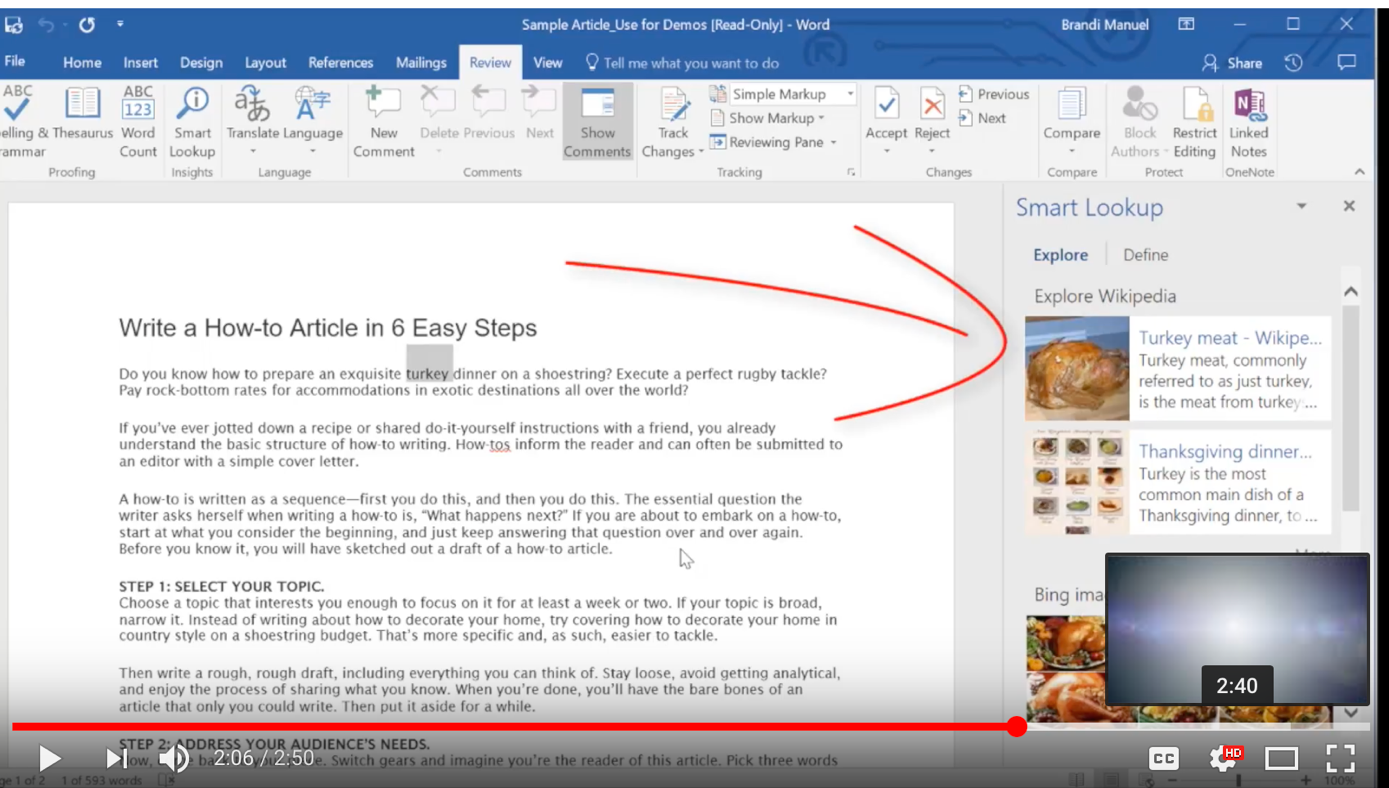
Now, take a close look at the Insight Task Pane. You’ll see two options: Explore and Define

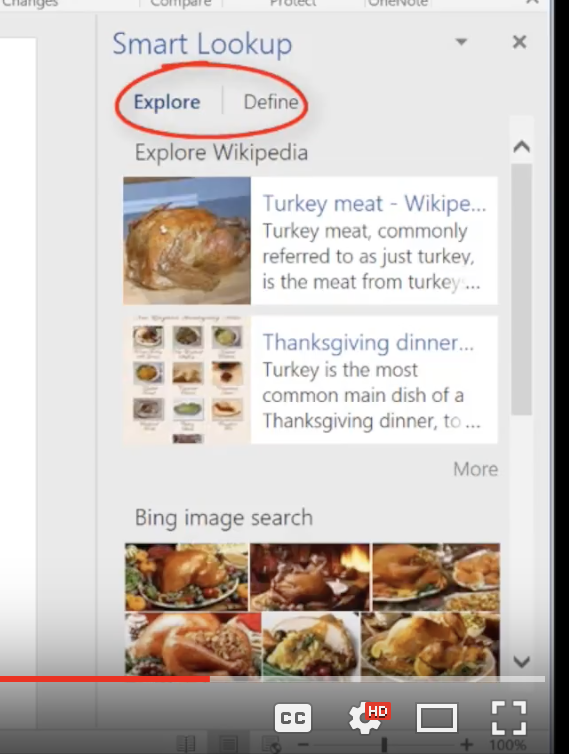
Explore contains search results like photos and articles. Define provides a definition of the word.

Easy right? I hope this helped!

Would You Like To Learn More Office 2016 Tips?

Keep reading!

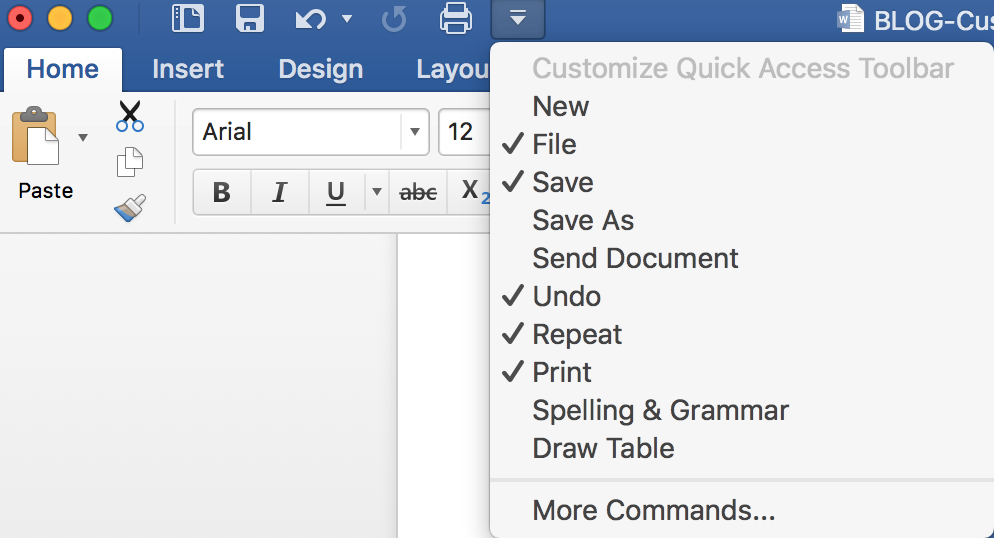
Do You Know How To Customize The Ribbon And Quick Access Toolbar?

Doing this can save you tons of time. You’ll have your favorite tools lined up in your Ribbon for easy access.

To get going, right-click on the ribbon itself and select “Customize the Ribbon.” (You can also do this from your Quick Access Toolbar which you can find in the upper left corner of your computer screen.)

Screen%20Shot%202018-01-08%20at%2012.45.44%20PM.png

creen%20Shot%202017-12-18%20at%209.29.44%20AM.png

Click the View Menu to open the Ribbon.

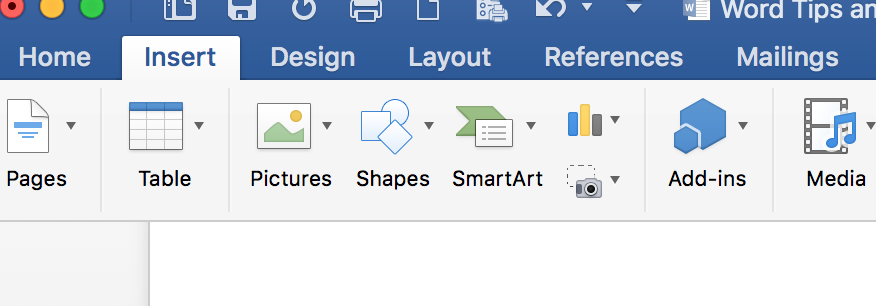
Most of the commands you’ll want to add can be found under Insert Menu. Choose the Layout tab and click the command you want for your Page Setup.

Screen%20Shot%202018-01-08%20at%201.01.19%20PM.png

Do You Know About The “Tell Me What You Want to Do” Feature?

Actually, Word 2016 will do the work for you. In the past, you had to type in an entire phrase like: “How do I add a hyperlink?” Now, all you have to do is type the word “link” and Word will bring up options for you. Word is much smarter than it used to be!


As a matter of fact, this feature works in all of Microsoft’s solutions.

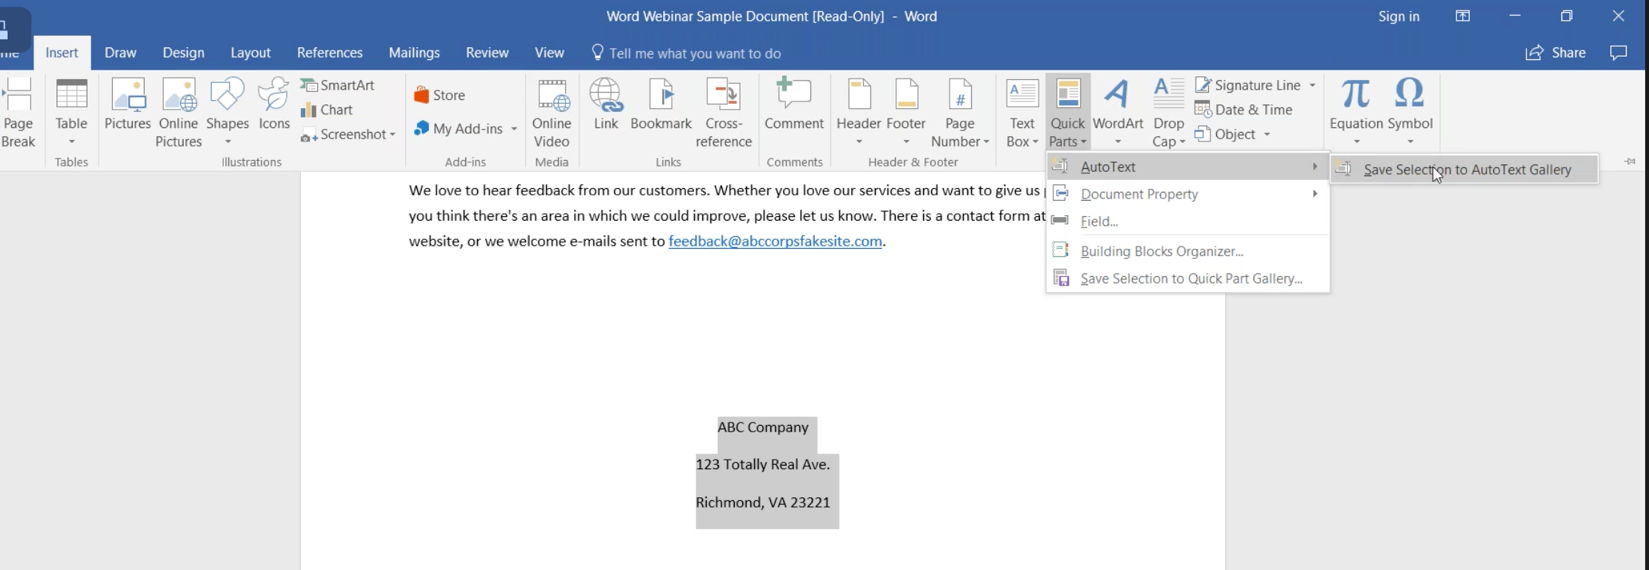
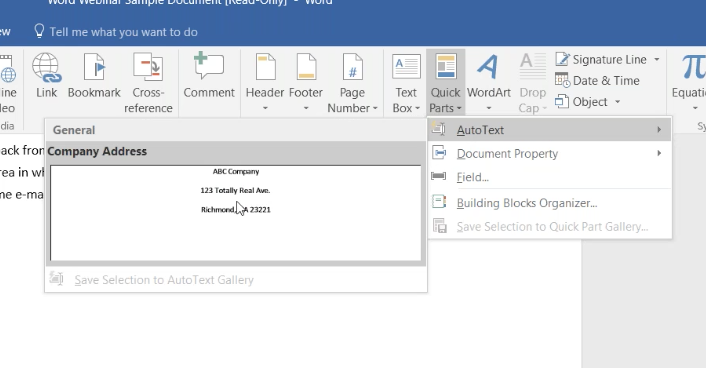
Are You Familiar With Quick Parts?

These are much like miniature macros that save content you use often (like your company’s information).

It’s easy to create a Quick Part.

  • Key in the phrase, sentence, or word you want to save. Highlight it and click the Insert tab in the Text group, then click Quick Parts.
  • Now save it to the Auto Text Gallery.
  • Next, you’ll need to create a New Building Block. The data is stored for you to use in the future.

Screen%20Shot%202018-01-08%20at%202.12.49%20PM.png

Screen%20Shot%202018-01-08%20at%202.14.12%20PM.png

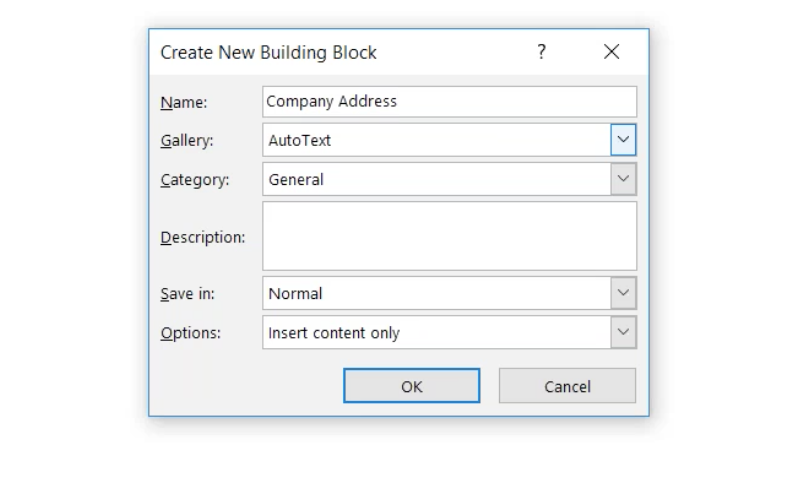
Create building block names that are unique, or they won’t show up when you type the text. If you create a lot of building blocks, you can organize them in Galleries and Categories.

When you need to use your text, put your cursor where you want to insert the text and go to Quick Part>AutoText. Your text will appear.

Screen%20Shot%202018-01-08%20at%202.28.56%20PM.png

Screen%20Shot%202018-01-08%20at%202.30.53%20PM.png

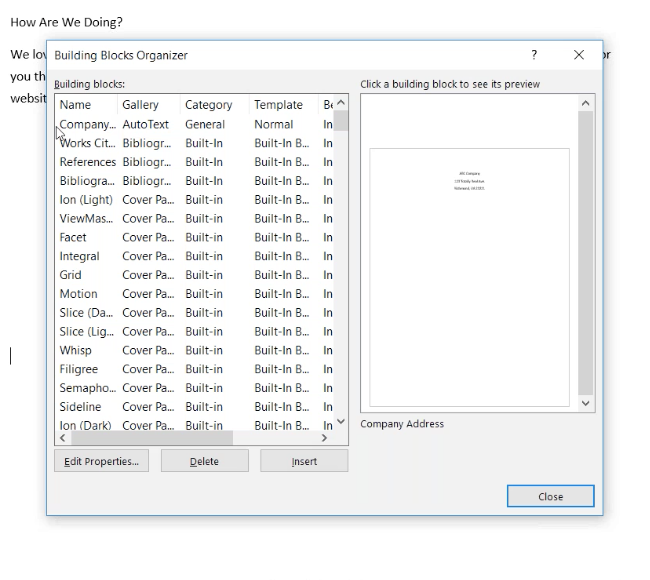
The Building Block Organizer stores Quick Parts Auto Texts in alphabetical order. If you want to change this, go to Edit Properties. Here you’ll find pre-designed blocks of text you can insert into your document.

These Building Block galleries can be found throughout Word. They have preformatted:

  • Page Numbers
  • Text Boxes
  • Cover Pages
  • Headers
  • Footers
  • Quick Tables
  • Tables of Contents
  • Watermarks
  • Bibliographies
  • Equations

You can customize each Building Block to suit your needs. And, as mentioned, you can create custom Building Blocks and add them to their relevant galleries.

We’ve revealed quite a few Office 2016 secrets now. But there are plenty more that we’ll share in future articles.


How Can I Extend My iPhone’s Battery Life?

6 Tips To Better Battery Life In iOS 11.4

Are you frustrated because your iPhone’s battery isn’t lasting as long since you upgraded to iOS 11.4? You’re not the only one. A lot of people are contacting Apple to complain about this. It doesn’t matter if you have an old iPhone 6 or the new iPhone X. It seems that everyone using the newest operating system has discovered that the battery drains more rapidly than it did before.

So, what can you do? We’ve included six easy tips below that should help keep your iPhone battery charged longer.

Tip 1–Enable Low Power Mode

To do this, go to Settings > Battery and activate the “Low Power Mode” slider. The battery indicator in the status bar will be yellow while Low Power Mode is enabled.

This Suspends:

  • Hey Siri –This is the intelligent personal assistant that helps you get things done. Siri can send your messages, place calls, check your calendar, and more.
  • Background App Refresh –This feature allows any app for your iPhone to appear to be multitasking all the time. What’s really happening is that they’re multitasking “just in time” by updating in the background whenever they have the opportunity, or right before they determine that you’ll be launching them.
  • Automatic Downloads – It’s important to note that in order to keep all your devices in sync, you need to keep this on. It automatically downloads any song, app, or book you buy from iTunes to all of your compatible devices that have Automatic Downloads turned on.
  • Mail Fetching – If you’re worried about your battery usage, you can limit how often your iPhone checks for new email. By default, the iOS mail application is set to “Push” so it can download new email as soon as it arrives on the server.
  • Some Visual Effects

In Addition:

  • Auto-Lock defaults to 30 seconds.
  • The iCloud Photo Library is temporarily paused.

To re-enable each of these manually go to: Settings>Battery

Your iPhone will always automatically disable the Low Power Mode when it’s charged up to 80% or higher. Low Power Mode is temporary and only lasts until the next proper charge. There’s no way to permanently enable it.

Plus, whenever your iPhone reaches the 20 percent battery mark, the “Low Power Mode” prompt will appear. At this point, your iPhone will show you what features are temporarily disabled. You can choose to “Continue” and enable Low Power Mode or “Cancel” and not enable it. However, Low Power Mode can provide anywhere from one to three hours more time before your iPhone loses power.

Tip 2–Turn On Auto Brightness

Increased screen brightness can eat up a lot of battery power. With Auto Brightness your iPhone will automatically set the brightness according to the ambient light around you.

Turn on Auto-Brightness by going to Settings>General>Accessibility>Display Accommodations

Tip 3–Turn Off Background App Refresh

With this on, your iPhone has to use energy to predict when and how often you’ll be using applications, and it aims to re-load information by refreshing the app in the background.

You can save battery life by turning Background App Refresh off globally or for individual apps. You can also limit the refresh to Wi-Fi only.

Go to Settings>General>Background App Refresh to make adjustments.

Tip 4–Turn Off App Location Services

Location Services allow applications to know where you are based on your GPS or Wi-Fi triangulation. This is handy for a number of things but it drains battery power. Some apps request your location information but you get very few benefits from this. They often use App Location Services for targeted ads.

To save your battery, go to Settings>Privacy>Location Services and toggle the switch to off. A better idea is to set individual apps to “While Using,” “Always,” or “Never.”

Tip 5– Disable Raise To Wake

Raise to Wake tells your iPhone to turn on when you raise it. This is helpful, but it also uses up needed battery power each time you pick up your iPhone.

To disable Raise to Wake, go to Settings >Display & Brightness and toggle the switch to the off position.

Tip 6–Disable Motion Effects And Dynamic Wallpapers

The parallax effect is the name given to the slightly moving icons and notifications in iOS when you move your iPhone around. Apple created the parallax effect to give some depth to their icons.

You probably won’t notice when the parallax effect is turned off. As with any process on the iPhone that requires movement, the graphics capabilities needed to run motion effects eat up battery life.

To disable this effect, go to Settings>General>Accessibility>Reduce Motion and toggle the switch to On.

Disable Dynamic Wallpapers

These are wallpapers that include a subtle movement. They look cool, but the movement drains your iPhone battery. For this reason, it’s best to use a still image for your wallpaper.

To get rid of dynamic images, go to Settings>Wallpaper>Choose and select a wallpaper from the Stills selections.

iphone battery

We hope this helped. Keep these tips handy. You’ll need them when the power goes out, or you don’t have access to a place where you can charge your iPhone.

Microsoft Office Lens (How-To Article)

What is Microsoft Office Lens?

Have you ever found yourself in a situation where you needed to send someone a handwritten piece of paper or an illustration on a whiteboard? Microsoft has developed an app called Office Lens that works like a portable scanner, taking pictures of hard copy documents and then converting them to digital files. Once you take the photo, you can crop it, rotate it, or give it a sharper focus so that it looks just like a scanned image. The app uses Optical Character Recognition (OCR) technology, which has been around a long time and is very reliable.

Click here to learn more

This application is available for Android, iOS, and Windows Phones. It integrates with other Microsoft applications such as OneNote and relies heavily on the camera. This App can even convert your images into other formats such as Word, PDF, and PowerPoint files. That makes it even more convenient to use.

Scenarios

You are in a corporate meeting and your boss or colleagues need detailed explanations of things discussed in another recent meeting. The problem is that most of the things accomplished in the meeting were done on a whiteboard. In the past, it’s been hard to share information like this with colleagues. With the Office Lens App, you would take a photo of the whiteboard, then edit it appropriately, convert it, and share it with others.

It works for receipts too. Keeping a pile of receipts is no longer tidy nor reliable and they can easily be misplaced. Lay the receipts out on a flat surface and take a picture of them. You can do this for each receipt or group several together. You might have five receipts from where you bought party supplies for an upcoming birthday at work. Take a photo of all of them at once, then you can forward that file to the accounting department for reimbursement. Files can also be saved to OneDrive for future reference.

How many business cards have you collected over time from different people? These are always hard to keep up with and some of them may be important. With Office Lens, you can take a snapshot of the card and save it to your mobile phone. Now you can throw the paper card away. You don’t need it anymore.

Keeping track of items in this manner prevents spelling and typing errors. Everything is photographed exactly as is so there are no worries about copying down the wrong email address.

Office Lens is a good program for use at home as well. For those who are parents, your kid’s childhood is important. Their very first writings and drawings can be stored in your device and even forwarded to grandparents or friends.

Sticky notes are used a lot around an office. They often contain important information but they are easy to lose. With Office Lens, you can take snapshots of the most important sticky notes so you’ll have them for future reference.

How does it work?

  1. Make sure you install the Office Lens product that is compatible with your device: iOS, Android, or Windows. Follow the instructions to set it up properly. Be sure to allow the program to access your camera.
  2. The camera will open and then a default “view” option will allow you to choose options such as whiteboard or document.
  3. As you focus and move the camera, it will try to frame the object. Once you get a clear focus, just press the button to capture your image.
  4. Office Lens will take a few minutes to process the image and then give you a preview of it. If you think you should trim it a bit, use the crop option in the upper right corner. Once you achieve your desired results, tap Done.
  5. Finally, you will need to save the image. You have options such as OneNote or OneDrive. These are good places to store all documents like this. Sign in to your OneNote account, create a name for your image, and then save it in the notebook file of your choice. If you wish to store your image online, you can upload it to OneDrive, Word, your photo library, or even PowerPoint. You can also email the photo.

Why Office Lens?

This app is a great way to organize all your stuff. It’s easy to use and it integrates well with other Office applications. It can help you keep track of everything from sticky notes and business cards to receipts. Since it uses Optical Character Recognition, it provides better clarity than normal photo-taking programs and cameras. It can even give you a good image of bad handwriting.

Office Lens allows you to edit directly from the image. If you feel that your content needs more explaining or has omitted something important, you can add it on the image from your device and then save it in the most suitable mode.

The fact that you can convert your image into different file formats, such as Word, PDF, and PowerPoint ensures that the image can be opened from any user device, especially if you are sharing it in a group forum.

Wrap Up

Office Lens is one App that is user-friendly and can be applied to different situations. Whiteboard presentations, bills, and receipts from home, restaurant receipts or even the menu, can be saved for future reference. This is a helpful app that definitely makes life a lot easier.

How to Set Up a Microsoft Bookings Site (Questions/Answers)

If you own a small business that deals in offering services to the public, scheduling appointments is often part of your daily routine. You may find yourself playing phone tag so much that you sometimes lose focus on your clients. Being a small business, you may have to double up as the chief administrator and financial officer, as well as the inventory supervisor and janitor on some days.

Microsoft Bookings

Microsoft Bookings: empowering clients to handle the appointments part

Microsoft has a solution – Microsoft Bookings – designed to alleviate the burden of booking appointments. Microsoft Bookings is a new online and mobile scheduling tool that is available with the premium subscriptions of Office 365. It provides your business with a unique web page where customers can schedule appointments themselves. First, the customer selects the service they want, chooses a day and time based on the availability you’ve provided, then enters their contact information and proceeds to book the appointment.

First things first: set up your Microsoft Bookings portal

The first step is to sign up for an Office 365 plan that includes the Microsoft Bookings service. Once you do this, the Bookings portal is turned on by default. It’s available as a tile in the MS app launcher. If you check the app launcher page and do not see “Bookings” listed there, then you may not have the right plan.

Bookings are available with an Office 365 Business Premium subscription, as well as for customers with the Office 365 A3 and A5 subscriptions. However, enterprise customers with Office 365 Enterprise E3 and E5 subscriptions can now turn it on and set it up for their clients.

To turn on the Bookings app for Office 365 Enterprise E3 and E5 subscriptions, simply follow these steps:

Step 1: Login to the administrator portal

To configure Microsoft Bookings, start by logging in to the admin center of your subscription by clicking on the Admin icon and entering your administrator username and password. This gives you the admin rights to acquire new services from Office 365.

Step 2: Adding Bookings to your Office 365 Enterprise subscription

Once you’re logged on, select the Billing tab and navigate to the Purchase Services option under it. You should be able to see a whole selection of options that include a Business App (free) with a Buy Now button that shows up when you hover over it. Click on this button to add the app to your subscription free of charge.

You will then have the option to add the amount corresponding to the licenses that you want. Ensure that this amount matches the total number of users in your organization (preferably). You will want to enable this service for these users during setup.

When this is complete and you have assigned licences to the users that you want the service enabled for, the users will now see the Bookings app as a new addition to the multiple apps on Office 365.

Moving onto setup

To set up the Microsoft Bookings site for your small business, click on the Bookings icon to open the Microsoft Bookings app. This action should open the welcome screen on the Microsoft Bookings website.

Tap the “Get it now” button to begin the setup process. This should lead you to a new window where you can enter your new Bookings calendar name and add it by clicking the “Add a booking calendar” tab.

You will then see a new window that requests more information about your business. This is where you enter your business name and type (from a predefined list). Ensure that the name you provide is unique since it is what will be used as the email address from which meeting notifications are sent.

When you’re done, select the “Continue” button and give it a moment to build the site. Your new Microsoft Bookings site eventually appears, ready for customizing.

Click on the different options to add more details about your business, staff, and services. Take your time to explore the various settings, one by one to ensure that you customize everything correctly. Of course, you can go back and tweak things if you need to.

At the end, you’ll have a Home Page from which you can monitor Bookings, add activities, modify the services you offer, manage your staff by adding, removing, and/or setting them up in terms of, say, working hours and days of the week – with respective color codes for each staff member.

Wrap-up

With Microsoft Bookings, you can spend far less time scheduling appointments with your customers and instead concentrate more on actually serving them. The tool simplifies how customers schedule and manage appointments. It takes care of the appointment-booking side of your business management so you can focus on the service side.

This tool was built for small businesses that depend on scheduling appointments with customers. It’s great for companies such as an auto mechanic shop, insurance agent, accounting office, a dog groomer, hair stylist, a dentist’s office, and many more. Now customers can set up their own appointments and do it at their convenience. This frees up your staff for other tasks. Microsoft Bookings boosts customer satisfaction, plus it reduces the number of missed appointments.

Creating A Macro in Microsoft Excel (Tutorial)

A foolproof guide for increasing efficiency in Excel

Microsoft Excel Macros

Excel often gets a bad rap. It is misunderstood as the groan-inducing, spreadsheet monster with tricky-to-navigate features. However, the truth about Excel lies in the user’s commitment to making the most out of the feature-rich platform. If we put aside Excel’s tedious reputation, creating step-by-step guides for mastering Excel efficiency really is a no-brainer.

The Marvelous Macro: How Macros Make Your Life Easier

What better place to start than by creating a macro in Excel. Creating a macro is hands-down the best possible way for users to automate repetitive tasks and get tedious work done more efficiently. Can you think of something that you or one of your team members does repeatedly in Excel? Whether it’s data entry or calculations, creating a macro can help streamline team processes and seriously boost productivity.

Basically, a macro lets you record an action or series of actions that can then be run repeatedly as needed. The creation of a macro is essentially a duplication of some specific set of mouse clicks and keystrokes, which gets recorded and saved to help you work smarter not harder. The best part about macros? They’re completely customizable. Once you’ve created your macro, you can make tweaks and edits to ensure they work just the way you want them to.

Productivity Game Changer: Working Smarter Not Harder with Excel

When you think about it, this is a game-changer that’s super easy to implement. Consider this. Perhaps one of your team members creates daily, weekly or monthly reports for managers, customers or other staff members. The creation of these reports, on a repetitive basis, can be extremely tedious when done manually each time. This results in long completion times and a huge decline in morale for your tied-up workers.

Creating an Excel macro for projects like these helps keep your team moving forward while still staying on top of boring, yet mission-critical reports. An Excel macro can be tailored to help workers format names, color-coded report data, and customize formatting and presentation. The macro can then be run and applied to any selected cells, meaning monotonous tasks really do become as easy as the click-of-a-mouse.

How to Create a Macro in Excel – A Fool-Proof Guide

Alright, ready to cut to the chase? How exactly can you and your team start taking advantage of the Excel macro feature in hopes of improving productivity, efficiency, and morale? Check out the fool-proof step-by-step guide below.

Creating a Macro in Excel

Initial Steps

Before you record a macro, you must ensure the Developer tab is visible on the ribbon. As a default, Excel keeps the Developer tab hidden. In order to get it front and center, complete the following steps:

  • Go to Excel > Preferences > Ribbon & Toolbar
  • Under the Main Tabs list, select the Customize the Ribbon
  • Then, select the check box beside Developer and then click

Record Your Macro

You’re now ready to record your series of actions to create your macro. With your desired keystrokes and mouse-clicks in mind, follow these steps to record your macro:

  • Under the Developer tab, select Record Macro.
  • If you wish, enter a name for the macro in the Macro Name
  • Enter a shortcut key in the Shortcut Key
  • Enter a description in the Description
  • Select OK to start recording.
  • Carefully perform the series of actions you wish to automate.
  • Once you’ve finished the sequential actions, select the Developer tab from the Code group and select Stop Recording.

Fine Tuning Your Macro

In order to make the most out of your creation, be sure to check out the different ways you can customize and edit your macro. To edit a recorded macro, follow these steps:

  • Under the Developer tab, click
  • Select the name of the macro you wish to customize and choose
  • This will open the Visual Basic Editor. Here, you can witness how your recorded actions play out as macro code.
  • This is where the creativity comes in. Experiment with your code, then close the editor to run your macro again. Tweak and customize as much as you wish until the macro is running just as you envisioned.

Back to Basics: Reaping the Productivity Benefits Already Built into Your Infrastructure

It’s that simple! Suddenly, your team members have a more streamlined and efficient way of completing even the most tedious of Excel tasks. This means increased productivity, a boost in morale and a more efficient team overall. By keeping your team moving and productive, you keep your team occupied and happy, which can only have positive impacts on your day-to-day operations and ultimately, on your bottom line.

In an increasingly crowded marketplace of digital productivity solutions, it can become easy to get lost in the shuffle and postpone the mastering of your operational pains. However, when professionals remember to get back to basics, a world of difference can be discovered.

Excel has been on the scene for decades and Microsoft is working all the time to optimize features and prioritize user experience.

By paying attention to what your existing digital infrastructure can do for your business, professionals can save time, money, and frustration. Good leaders understand the trials their employees endure each day. Any organization can make solid improvements without subscribing to new or trending efficiency solutions.

IT experts know that helping professionals make better use of their existing infrastructure is a core part of the managed-service mission. Professionals don’t need all the very latest tools and gadgets to help their team navigate technology more productively. They simply need to learn how to maximize those tools they’re already using.

With a humble and level-headed approach, a strategic IT partner will be committed to helping every client make better use of what they have and become the masters of their own tech infrastructure.

If you’re looking to get a better handle on the tech resources your team uses daily, don’t hesitate to reach out to a team of IT experts for advice and consultation. One phone call can put your company on the path to revamping your existing infrastructure and mastering operational needs.

4 Tips for Working Securely On Wi-Fi

Have you ever used public Wi-Fi in a coffee shop? – In a hotel? – While sitting at an airport waiting for your flight?

We’ve yet to meet a remote worker who can say “no” to all of these questions. Running a business means being a road warrior and using public Wi-Fi from time to time.

However, there are precautions you should take when using public Wi-Fi. Just a single visit online in a coffee shop or airport terminal can put your confidential data at risk. “Free” doesn’t always mean safe. With viruses, malware, and hackers just waiting to infect your laptop, working remotely can be like navigating a minefield.

The following are four tips to help you work securely when using public Wi-Fi.

Tip 1 – Avoid Crowded Cafés

We’re in the midst of a workforce revolution. People no longer want to be tied to their desks. And if you need help finding a space that offers fast Wi-Fi, plentiful workspace, and outlets, there are a number of new sites and applications that rate businesses on these things and more.

Try Google’s Popular Times Feature – Plug in the name and location of your café, and the hours you’d like to visit, and Google will let you know how busy it is. Since introducing the Popular Times feature in Google Search and Maps in 2015, we can now determine how busy a particular site is during different times of the day, and days of the week.

Even better – Google updated this “popular” app to add a real-time look at how crowded a café is. This is a great tool if you want to lessen the chance that someone sitting at a table too close to you will eavesdrop on your email messages and browsing.

Tip 2 – Find New Places To Work Online

If your local café is too crowded, you may want to find another place to work. However, you need one with adequate space, power outlets, and Wi-Fi bandwidth. There are a number of new sites and apps you can use to help you find just the right place for you.

WorkFrom.com

WorkFrom’s mission is for work/life betterment in an office-optional economy. They want to help people everywhere find and share trusted spaces to work remotely. It’s the world’s largest recommendation website for trusted spaces to work remotely. Its database spans more than 300 cities and towns. You can download it from the Apple App Store or from Google Play.

WHA by Work Hard Anywhere

This is an iOS app that you can download to your iPhone from the Apple App Store. It uses your iPhone to give you nearby, work-friendly spots where you can use your laptop. You can apply filters to rate Wi-Fi speeds, the number of outlets, workspace size, parking, bathrooms and more.

Tip 3 – Stay Secure

Hackers take advantage of your thirst for Wi-Fi by creating networks that have legitimate-sounding names so you’ll be fooled into logging on. These are called rogue hotspots. They are typically located in airports and other busy locations. Always double check with a manager to determine if the Wi-Fi you choose is a safe hotspot.

Take note: Even official public Wi-Fi’s can be compromised. So, it’s always best not to do any banking, bill paying or shopping over public Wi-Fi.

Always look for websites that have “https” before sending any personal information. Also look for a small lock icon in your web browser that indicates the website is safe. You can use a virtual private network (VPN) to add an encrypted layer of protection for your data to pass through. You can try free ones like CyberGhost VPN, or paid ones which tend to be faster like HotSpot Shield Elite or proXPN.

  • CyberGhost VPN is mostly free and totally safe. Some of the aspects are free; others aren’t. It’s also very easy to use. With it, you can surf anonymously, unblock streaming and other websites, and protect your Internet connection from being tampered with while using public Wi-Fi. Although a VPN isn’t appropriate for time-sensitive gaming, it can figure out if and where it can direct you to stream services such as news or movies. Many other VPNs can’t do this.
  • HotSpot Shield Elite is a subscription-based service that allows you not only to secure your connection while surfing on public Wi-Fi, but it also lets you access sites not normally available when you’re outside of the U.S. (such as Pandora and Hulu). It’s the paid version of Hotspot Shield with faster and more stable streaming.
  • proXPN VPN lets you surf the web securely via public Wi-Fi or when you’re at work or home. They offer a lifetime premium subscription that provides unlimited bandwidth via their ultra-private global server network. You can surf with complete anonymity. proXPN will even unblock geo-locked content so you can browse freely from anywhere in the world with an Internet Wi-Fi connection. And they say it never logs your online movements so others can’t track or steal your confidential data. proXPN VPN got a 4-Star Rating from PC Magazine.

Tip 4 – Stay Private

It can be difficult to remember that when working online in public, your screen and everything you do can be seen within eyeshot of strangers. There’s a term for this – it’s called “Shoulder Surfing.” Always pay attention to where you sit and who’s nearby.

One way to protect yourself is by using a laptop privacy filter. You simply slide it over your screen. It limits the viewing angle to only straight on. Also, be sure to dim your screen’s brightness setting. The lower the brightness, the more effective the privacy filter will be at narrowing the viewing angle.

Do you feel like you can’t win when security risks are coming at you from all directions? We understand, and we can help. We’ll do all we can to protect your confidential data and your business. Partner with our cybersecurity experts for the safeguards you need.


What’s New in Microsoft Teams for 2018?

Celebrating its one-year anniversary, Microsoft reports that over 200,000 organizations have downloaded the Teams App. This chat-based workspace is part of Office 365 and developers consistently add new features to make the Teams App even more useful to businesses of every size across all industries.

Microsoft Teams is a great solution for meetings of any complexity and it’s available for all mobile devices, PCs and Mac computers.

Over the years, Microsoft has been successful by listening to their users. That means they stay up to date on the corporate culture all over the world. One of their strengths is to incorporate numerous useful tools into one app while integrating all their programs into an easy-to-access platform.

The painless way to hold a meeting

One of the big changes to the way companies do business these days includes the manner in which their employees meet each week. Whether you run a small business or an enterprise organization, you’ve no doubt got lots of people in different departments with a strong need to get together on a regular basis. In fact, companies in every industry can’t function anymore without the ability to meet up and discuss their work. This has become crucial to a project’s success.

You may be building a new robot that can perform delicate medical procedures or you may be building an incredible concept car. But often, businesses are just involved in ordinary day-to-day activities like selling products and providing good customer service. No matter what your job, your teams will be more productive and more efficient when they can collaborate. And that’s one of the strong points of the Teams App.

New changes in the MS Teams App for 2018

One of the more popular features, Chat Message, has been improved to make communicating simpler. Any team member, including guests, can use the instant message feature. This is a great way to say hello to a new team member or ask someone a quick question. It works much the same as other popular instant messaging apps.

Now teams can have guests, as well as external members. These participants will have access to any features that the team leader permits them to have. And, they only have access to teams that they’ve received an invitation from. Microsoft makes it easy for team leaders to control the guest experience.

SaaS integration

There are a number of SaaS services that can be integrated for use into the Teams App. Go to the “Add a Tab” page and there you’ll find a list of useful apps that can be added at the top of the channel so that all team members can access them.

For instance, click on “Survey Monkey” to add this app and then instruct team members to complete a survey about a current project or other relevant topics. There are dozens of helpful apps that most users are already familiar with including Hootsuite, Jira, Quizlet, and Zendesk.

Another fun feature just added to MS Teams is the Bot. There are all types of bots available in Teams. Growbot lets the team leader give kudos to a team member who has done an exceptional job. This is a unique way to build camaraderie in any team.

Microsoft has made it easier for users to locate the many helpful features in Teams by adding a link called “Store.” Click on Store to view all the available apps. You can also search for an app by name or category. You may want to find an app that deals with analytics, Adobe, or your calendar. Type a word in the search bar and all the apps related to this topic will show up.

The Teams app allows users to view a personalized version of the app so they can see exactly what tasks have been assigned directly to them.  Completed tasks are shown as well.

The instant chat space now has the ability for users to include information from other apps. You may be chatting with a colleague and want to open a project from Visual Studio. Do this by clicking on the “More” dots located on the far right side of the icons at the bottom of the chat box. Once you click on More, this will open up all the apps, tasks, documents, and other items in your customized Teams app. Now you can attach these to your message. This feature is available for the channel or chat space.

Exciting Features

The developers at Microsoft understand the importance of creating a space where team members from all over the world can collaborate.  Though they originally designed Teams for business, this helpful app has found its way into classrooms and colleges, as well as casual get-togethers. Even individuals have discovered how easy it is to plan a birthday party or anniversary celebration using the Teams app. There’s really no limit to its usefulness.

Are virtual meetings the way of the future?

With so many companies now utilizing the power of remote workers, the Teams App can streamline meetings so it feels like everyone is “in the room.”  Whether employees are just down the street or on the other side of the world, they can participate. Virtual meetings have become the preferred way for teams and organizations to get together.

In the past, an organization’s employees would often go to great lengths to attend important meetings. But this is no longer necessary. Most companies have accepted the fact that it’s quicker and less expensive to host virtual meetings. Much research[1] has been completed to learn whether virtual meetings are just as effective as real meetings and the findings show that a virtual meeting can be even more effective than a real one.

Pros and cons of virtual meetings

In real meetings, people often feel uncomfortable. Maybe their chair isn’t set right or they should have dropped by a bathroom on the way to the meeting. When people can meet from their own location, they feel more energized and creative. This results in better meetings where important tasks are accomplished.

Virtual meetings save time and money and they reduce our overall carbon footprint, making them a big plus for the environment. It’s very simple to record a meeting so the contents are saved for later reference. And of course, you don’t have to worry about catching a cold from the guy sitting next to you.

If you need help with any of the new updates for MS Teams 2018, you can find that by searching online or navigating to the Microsoft website.

Microsoft Teams

[1] https://meetingking.com/face-to-face-meetings-vs-virtual-meetings/

How to Use Keyboard Shortcuts in Quickbooks Pro

Quickbooks offers users at every level, an enterprise-grade accounting program to track income and expenses. This software package was designed to enable businesses to track financial expenditures and income with the level of detail necessary for complete control of company finances. It is somewhat like a soft copy of accounting book. Some people may find it a bit hard to navigate using the mouse or the navigation pad of a computer while working on a given document. The good news is that there are alternatives to achieving the same results by using the keyboard.

Tune into our free Quickbooks Training
CLICK HERE

You may find that your mouse gets lost under a heap of paperwork. Wireless mice are great for today’s busy professionals but they often fall off a table and land in the floor. You may have urgent financial reports due and need a quick fix for these issues. You don’t need to worry because there’s a way to get your accounting work done using some keyboard shortcuts.

Below are a few Control key combinations to make your work not only easier but more efficient while working in QuickBooks Online:

To do this in QuickBooks: Press these keys together:
View a list of Shortcuts CTRL + ALT +?
Create an Invoice CTRL+ ALT + I
Create a check CTRL + ALT + W
Enter an expense CTRL + ALT + X
Open the Customer list CTRL + ALT + C
Open the Vendor list CTRL + ALT + V
Open the Help window CTRL + ALT + H
Find transactions CTRL+ ALT + F
Save and go to a new transaction CTRL+ ALT + S
To close any window Click Esc
Create an Invoice CTRL+ I
Create a check CTRL + W
Display Help in context F1
Open the Customer list CTRL + J
Find the History of any transaction CTRL +H (with transaction open)
Open the Memorized transaction list CTRL+T
Find Transactions CTRL+F
Delete Transactions or list Items CTRL+D
Create new list item CTRL+N (with list open)

Some of these shortcuts will work differently when using various browsers as explained below.

To open the second window in:

Internet Express: Press Ctrl + N (You will be logged into existing company on both windows.)

Firefox: Press Ctrl + N (You won’t be logged into the second window, but will remain logged into the first one. The second window will allow you to log into the existing company so that you may work using both screens.)

Chrome: Press Ctrl + N (If you go to QBO in that window, you will be logged into the existing company.)

Split Your Screen

There is a way to split your screen by using shortcut keys on your keyboard. This allows you to have all your information on one page for easy reference while working. Just press the windows key and the left arrow for the screen you want on the left, plus the windows key and the right arrow for the screen you want to appear on the right side. If you want to resume normal screen view, simply press the windows key and the up arrow.

Duplicate Your Screen Tabs

Press the Alt+D to copy the address then press Alt+Enter to open a new tab with the URL. All you need to remember is to keep your thumb on the Alt key. Press Alt key down and then hit D and Enter almost simultaneously in order to duplicate the current tab. This works almost like magic! You get to open your tab twice instead of going back to the browser.

Sending Reminders

You can send invoices reminding clients to pay their bills using your QuickBooks Online and the Navigation Bar. Select Overdue Invoices to view and then finally click on the Send Reminders. You can even track the sent invoices and learn whether the client has viewed them. This also allows you to see how many times the customer has viewed them and whether they have ever viewed your email. If not, you may want to check to make sure you have the right email address for this customer.

Choose items in drop-down lists:

  • Press Tab until you reach the field.
  • Press Alt + down arrow to open the list.
  • Press up arrow or down arrow to move through the items in the list.
  • Press Tab to select the item you want and move to the next field.

If you don’t want to open the whole list, but just want to scroll through the items in the text box, press Ctrl + down arrow or Ctrl + up arrow.

Wrap up

Using Shortcuts in QuickBooks Online can be less time consuming because navigating through your accounting books is much easier when you use simple clicks on your keyboard. Plus, you never have to search around under a table for your mouse again. Shortcuts are a quick, easy method of accomplishing any task. That can help you shave valuable time off your workday so you can get home a bit faster and who doesn’t like the sound of that?

Quickbooks Training

June 2018 Update for Office 365

This article will cover a quick overview of the Microsoft Office 365 for June 2018 updates. The first step to making use of monthly or periodical updates is knowing that they exist. Updates simply provide new capabilities to your software or make improvements on the already existing ones. The challenge is thus having the knowledge on how they work. In a business organization, it would be an expensive affair to conduct employee training every time there is an update. The good news is that Microsoft has already taken care of that. On May 21st it launched the Microsoft Training Service, which is basically a digital customized service for Office 365 and Windows 10.

The classes are designed to help customers learn about the new updates without having a financial impact on management. The pre-pilot phase of this program has been undertaken by twenty-five organizations to help leverage training which includes customizable up-to-date content, right-sized experiences to an organization’s needs, and consumption tracking. These new services by Microsoft will be available as a pilot program in late July 2018. Be on the lookout. Those interested need to register at Microsoft Training Services Pilot.

New Outlook Features.

Outlook features across MAC, Windows, Web, and mobile devices help you manage your time better. Finding a location for your meeting is made easy. When you go to Outlook, before typing your location, it gives you a list of suggestions such as the last meeting, recently used conference rooms, and also common locations. Once you start to type in the location field, Outlook brings up a list of suggestions that are powered by Bing and then finally completes your location with necessary information including full addresses for public locations.

This Outlook service is even better if you are using an iPhone Operating System because it will use your current location, your destination address, and traffic updates to send you notifications on when you should be ready to leave for your next meeting. This amazing feature will soon be coming to windows.

Meeting Invitation Made Accessible

It is now possible to know who has been invited and who is attending a certain meeting. Outlook allows you to see the tracked responses and RSVPs for meetings that you have been invited to. This way, it is easy for you to decide whether or not to go. Sometimes two meetings may overlap. Someone else in your organization may already be going. You can choose to attend the other meeting and then sync up with your colleague later. This is very important as it makes time management a much easier task.

Time Zone

Outlook has added more features on the Time Zone functionality that will help you plan meetings at optimal times across different time zones. It is now possible to display up to three time zones on your Windows calendar. This way you are able to see what is happening in other locations.

New Features in SharePoint and OneDrive

Several features were launched at the May SharePoint Conference in Las Vegas for both SharePoint and OneDrive. There were new improvements on the built-in scan feature in OneDrive for both iOS and Android mobiles. These are accessed through the dedicated icon in the tab bar. That makes it easy to add images, annotations, and even multiple pages to your OneDrive.

Now it is possible to automatically upload videos and photos captured on your camera roll in upload for Business OneDrive. There is also another great improvement that gives users the ability to require and set a password when you share a folder with other people. This feature basically prevents others from accessing your files if your intended recipient accidentally forwards a link. These new features now give you the ability to stop other users from downloading files or documents shared through the view-only links.

Microsoft SharePoint Spaces

These are basically immersive, mixed reality experiences that enable users to view and interact with content from every angle. In addition, users can visualize and manipulate data and product models in real-time.

The Title Bar

It is now easy to quickly change your current document’s title, open the document’s location, share the document through an invitation link, and even access the document’s version history by simply clicking on the title bar and selecting the functions from a drop-down menu.

Security

Office 365 solutions ensure that you identify and manage personal data such as the prevention of data loss and advanced data governance. The New Office 365 is able to detect and protect against security threats. It helps users comply with the European Union Privacy law recently enforced, the General Data Protection and Regulation (GDPR).

To learn more about these helpful new changes, please visit: The Microsoft Blog.

Office 365 June Updates

Why Your Company Should Switch to Office 365

Undoubtedly, Office 365 has taken the business world as we know it by storm. With each update that Microsoft makes to Office 365, more and more companies are jumping on the Office 365 bandwagon, and for good reason. This enterprise software has something to offer for just about every business. Some business owners have even identified Office 365 as a major factor behind the success they’ve experienced.

Microsoft Office 365

If you’re thinking about making the switch to Office 365, here is some information about the features of this enterprise software that should help you make a concrete decision.

Available on the Cloud

As a business owner, your primary concern should be perfecting your products and services. Unless your business operates within the IT industry, you and your employees shouldn’t have to worry about servers and maintenance. Fortunately, if you decide to switch to Office 365, you and your employees won’t have to.

Office 365 is a cloud-based software. Therefore, you and your employees can use this software primarily on the cloud. However, if needed, you also have the option of integrating Office 365 with the on-premises solutions of your company. Not only will you save money on maintenance costs by using Office 365 on the cloud, but you will also enjoy peace of mind knowing that your data is safe and secure.

Scalability

If you foresee your business growing significantly in the near future, it is in your best interest to consider switching to Office 365. Scalability is one of the most lauded features of Office 365. With Office 365, you only need to pay for the features that you get.

Therefore, in the early stages of your business, you don’t need to worry about wasting money on features that you won’t use. As your business grows, you won’t be forced to switch to another enterprise software to ensure your growing needs are met. Instead, all you will need to do is pay for more services and data storage. By choosing Office 365 from the beginning, you will save yourself a lot of time and trouble.

Access Anywhere and Anytime

In many organizations, the productivity of employees is limited significantly by the lack of access to documents and data anytime and anywhere. If you want your employees to be able to access anything required for work from home, coffee shops, and elsewhere, you should consider getting Office 365. Since Office 365 is available on the cloud, this software will make it possible for your employees to be productive hundreds of miles away from their desk in the workplace. Also, your employees won’t be forced to work from a laptop or desktop computer. Office 365 makes it possible to be productive working from a tablet or even an iPhone.

Simplified Migration

One concern that many business owners have when it comes to switching to Office 365 is the migration process. If you also have this concern, you will be happy to know that Microsoft has made migrating to Office 365 incredibly easy. This is true no matter what storage tools your business is using currently. Also, once you make the switch to Office 365, you will never need to worry about migrating your data once more in the future because Microsoft is constantly making updates to Office 365. Microsoft strives to make timely updates to Office 365 to ensure this enterprise software continues to meet the needs of businesses across the world.

Unification of Your UI

Another issue that many businesses have is needing to use a plethora of software and apps to accomplish various tasks. If you want your employees to be able to enjoy a more unified UI, you should consider switching to Office 365. Office 365 has a business app for just about everything your employees need to do. Microsoft regularly releases new business apps on the Windows Store and quite a few of these apps are free. If you don’t want your employees to have to deal with a crowded home screen, you can pick and choose the apps you know your employees will need to use and add them to the Office 365 home screen. That way, your employees will be able to access these apps easily.

Another advantage of having your employees use Office 365 for all their needs is that they don’t need to worry about compatibility between apps. Since all of these apps are developed and/or managed by Microsoft, these apps will be compatible with each other. Not having to deal with compatibility issues on a regular basis will boost the productivity of your employees.

New Bug Updates and Features

If you’ve used other enterprise software in the past, chances are you’ve been frustrated with the lack of bug updates or new features. In some cases, you may have had to wait a few years for the release of a new product or update. Fortunately, if you switch to Office 365, you won’t have to deal with this frustrations anymore. As stated above, Microsoft releases updates and bug fixes regularly and you will have access to these updates as soon as they’re released.

Data Loss Prevention

As you probably know, data is the lifeline of most businesses. Accordingly, most businesses do everything in their power to secure their data and prevent data loss. One reason many businesses are switching to Office 365 is that this enterprise software makes data loss prevention so easy. Office 365 comes with a multitude of backup and data protection features that will allow you to enjoy peace of mind.

With each passing day, more and more companies make the switch to Office 365, an enterprise software that is frequently lauded as an all-in-one package. Switching to Microsoft’s Office 365 can put your business on the path to success and prosperity in the near future. For more information about why your company should switch to Office 365, don’t hesitate to contact us.