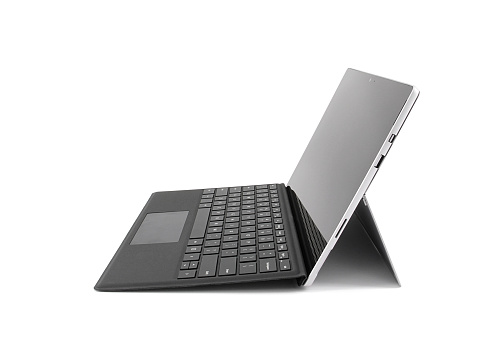
Microsoft introduced the Surface Pro 4 Tablet some time back in 2015. It replaced an older model called the Surface Pro. Soon after the release of the Surface Pro 4, Microsoft’s social media pages were flooded with complaints about a flickering screen. The Redmond Washington-based company responded to these complaints by promising that they would replace some Surface Pro 4 devices with this problem.
Trouble for the tech giant
This is good news especially since the company is making the replacements for free, but for only those devices experiencing the mishap within three years of purchase. In their web page called Surface Pro 4 screen flickers [https://support.microsoft.com/en-us/help/4230448/surface-pro-4-screen-flicker], Microsoft said that their top priority is to create the best products and experiences for their customers. Further, the company noted that they have heard their customer’s complaints and that’s why they have come on board to address these issues. After some investigation, Microsoft determined that some of the affected Surface Pro 4 devices could not be repaired with driver updates or new firmware.
Surface Pro 4 users who are experiencing the flicker are advised to first install the latest Surface and Windows programs to ensure that this is not the cause of the flickering. Surface and Windows updates are designed to keep any device running in an optimal state. If the issue persists, consumers should contact Microsoft Support. Once they verify that the device is certified as one of those that will require a replacement, the exchange process is set in motion.
Getting your Surface Pro 4 replaced or repaired
For those shipping their devices out to Microsoft for repair or replacement, it typically takes about 5-8 business days for the tech giant to get your broken device. The time to repair or replace it can vary depending upon several different factors. Microsoft has also promised to refund the warranty fee to customers who paid for a warranty fee to repair their device. In order to get a refund, customers must contact Customer Support for validation. Microsoft is committed to delivering great products and services to their customers.
Consumer complaints
Information about the flickering screen issue came to the attention of Microsoft after Consumer Reports, a non-profit organization that offers product ratings, said that they could no longer recommend Microsoft Surface products because the device did not perform as expected. As any serious service provider would do, Microsoft did a thorough examination, made their own findings, and came up with a resolution to have the screen replacement performed for free.
Further, Consumer Reports learned about the flickering screen from surveyed electronic owners who said that their Surface Pro had too many problems and that they would not recommend it. Experts have been concerned that the Surface Book Laptop may be more likely to have screen failures as compared to other competing brands. To date, this has not been the case, but it has caused sales of these products to decline.
Mitigating the damages
Microsoft’s decision to replace the flickering screens for free might not be the immediate solution that will stop future damage, but they are hoping to mitigate the harm caused by negative reviews of the Surface Pro devices. Nothing raises the spirits of a devoted customer or consumer than a company that acknowledges fault on their part and gives a remedy with no strings attached.
Many companies, especially those in the business of electronic devices, handle these types of issues poorly. They often spend months denying that anything is wrong. Then, later they make the method of repair and replacement so complicated that users get frustrated. Some warranties are felt to be useless due to these and other problems that people have experienced over the years. Consumers often complain that no one seems to qualify for the free repair services.
However, with the Microsoft Surface Pro 4, the steps were purposely made simple and straightforward. This encouraged those affected to give the company a second chance to do it right. Often, this type of issue can turn off consumers to a product or even an entire brand, but Microsoft has made every attempt to do the right thing.
Future Microsoft designs
The Microsoft design team has taken these problems into consideration when developing new versions of the Surface Pro. For the future, Microsoft products should have very clear and reliable screens that will last for years with no problems. The company seems to have learned an important lesson throughout this ordeal.
Developing brand loyalty
What Microsoft has done by launching the Surface Pro 4 Replacement Program is not only a wise corporate decision, but a show of gratitude and humility to their consumers. This is probably a major reason why Microsoft customers are loyal to this brand. They expect perfection from the company and do not accept anything less.
At nearly $1 Trillion in earnings a year, hacking is now at record proportions. Your data is a valuable asset, not only to you but to criminals as well. Don’t get hacked.
Here’s what you need to know.
1 in 3 Americans has been hacked.
A hacker attacks someone every 39 seconds.
61% of small businesses experienced a cyber-attack within the past year.
The average cost of a data breach in the U.S. is $7.35 Million.
$5 Billion was lost due to hacking in 2017. This is more than 15 times the total losses in 2016. Most of this cost was due to data breach fines, downtime, and productivity losses.
54% of breaches are caused by negligent employees who click on suspicious websites and emails.
20% of businesses experienced downtime of over 100 hours due to ransomware attacks.
64% of businesses paid ransoms even though paying doesn’t guarantee that data will be returned.
The anticipated cost of cybercrime in the next 3 years is$6 Trillion.
The pool of cybersecurity experts is shrinking. By 2021 there will be 3.5 Millionjobs that can’t be filled. The demand for security experts is increasing and is outpacing the supply.
5 THINGS TO DO RIGHT NOW
Ignore Ransomware Threat Popups and Don’t Fall for Phishing Attacks.
These attacks say that your data will be encrypted so you can’t access it, but in many cases, this isn’t true; it’s just a ploy to get you to click on something harmful. Once you click on the link, then you’re in trouble. You may have to pay a ransom to get your files unlocked.
Ransomware is a type of malicious software (malware) that blocks access to a computer. It infects, locks, or takes control of a system and demands a ransom to unlock it. It’s also referred to as a crypto-virus, crypto-Trojan or crypto-worm. It then threatens that your data will be gone forever if you don’t pay using a form of anonymous online currency such as Bitcoin.
Phishing is when a scammer uses fraudulent emails, texts, or copycat websites to get you to click a link so they can steal your confidential information. Thieves are looking for information like social security numbers, account numbers, login IDs, and passwords. They use this information to rob you of your money and your identity. The odds are good that phishing will work. A campaign of 10 messages has a better than 90% chance of getting clicked on. The majority of account takeovers come from simple phishing attacks where you or someone in your organization gets tricked into releasing private credentials and information.
Use Hard-to-Guess Passwords and Two-Factor Authentication.
Use complex passwords with 9+ characters and don’t reuse passwords across your different accounts. Consider using a password manager like LastPass. For accounts that support this, two-factor authentication is an extra step worth taking to ensure the privacy of your data. It requires both your password and an additional piece of information to log in to an account. The second piece could be a code the company sends to your phone or a random number generated by an application or token. Two-factor authentication will protect your account even if your password is compromised.
Secure Wi-Fi With a Virtual Private Network (VPN).
Hackers now emulate free open Wi-Fi to steal your IDs and passwords. You can be fooled when you try to login to free Wi-Fi in airports, restaurants, and other public areas. When this happens, everything that you type is copied and archived by these criminals and used against you. Using a VPN encrypts your Internet connection and protects your privacy. When you connect to the Wi-Fi over your Virtual Private Network, no one can see the information you send, and your privacy is safeguarded at all times.
Back Up Your Data.
Store data both onsite and offsite in a secure Enterprise-Based Cloud System. Back up your files regularly to ensure you have a duplicate of all your files and applications if your network is compromised. Traditional data backups can’t always restore all of an IT system’s data and settings. This is why you need both an onsite backup and a reliable backup via the Cloud. An enterprise-based cloud backup solution safeguards your data and ensures that it’s recoverable under any circumstance.
Hire a Reputable Technology Solutions Provider to Help.
A reputable Technology Solutions Provider can deploy a layered security protocol with regular software patches, vulnerability management, and continuously-updated endpoint protection. They can also provide Security Awareness Training for your employees to help them recognize potential threats. With the right provider, you’ll boost your defense posture and decrease the likelihood that a data breach will take down your business.
Don’t get hacked. Contact us, and we’ll keep your data secure.
This is the final of a three-part series about using Microsoft Excel 2016. It will cover some of the more advanced topics. If you aren’t great with numbers, don’t worry. Excel does the work for you. With the 2016 version of Excel, Microsoft really upped its game. Excel’s easy one-click access can be customized to provide the functionality you need.
If you haven’t read Part I and Part II of this series, it’s suggested that you do so. The webinar versions can also be found on our site or on YouTube.
This session will discuss the following:
More with Functions and Formulas
Naming Cells and Cell Ranges
Statistical Functions
Lookup and Reference Functions
Text Functions
Documenting and Auditing
Commenting
Auditing Features
Protection
Using Templates
Built-In Templates
Creating and Managing Templates
More With Functions And Formulas
Naming Cells And Cell Ranges
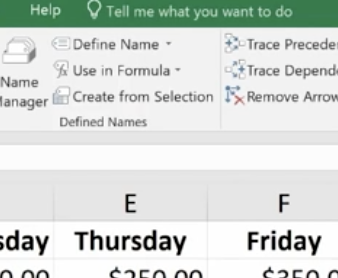
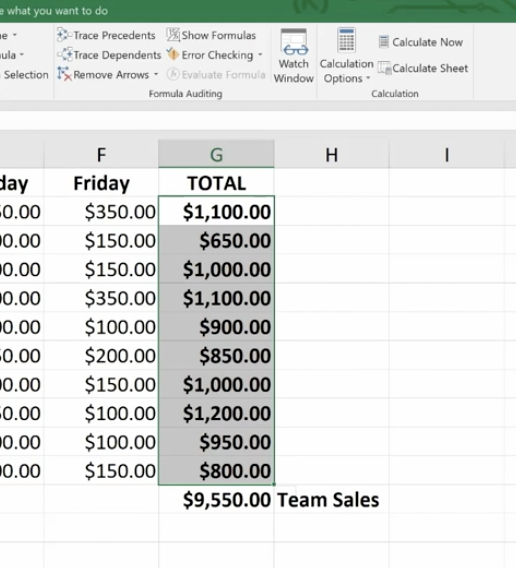
How do you name a cell? You do so by the cell’s coordinates, such as A2 or B3, etc. When you write formulas using Excel’s coordinates and ranges you are “speaking” Excel’s language. However, this can be cumbersome. For example, here G12 is significant because it refers to our Team Sales.
You can teach Excel to speak your language by naming the G12 cell Team Sales. This will have more meaning to you and your teammates. The benefits of naming cells in this fashion are that they are easier to remember, reduce the likelihood of errors, and use absolute references (by default).
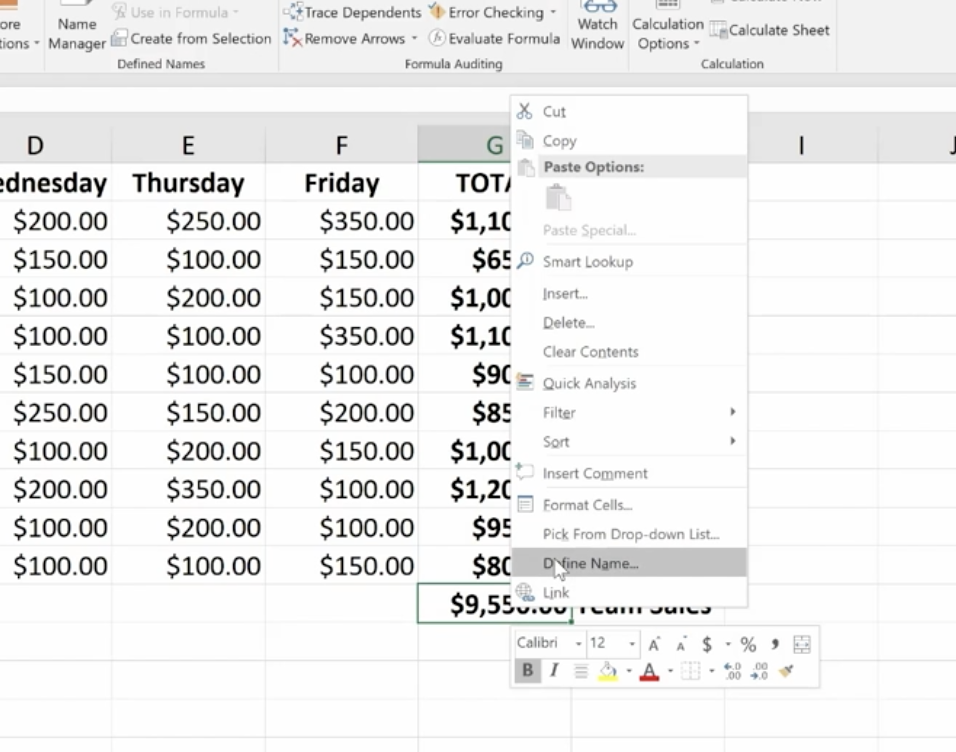
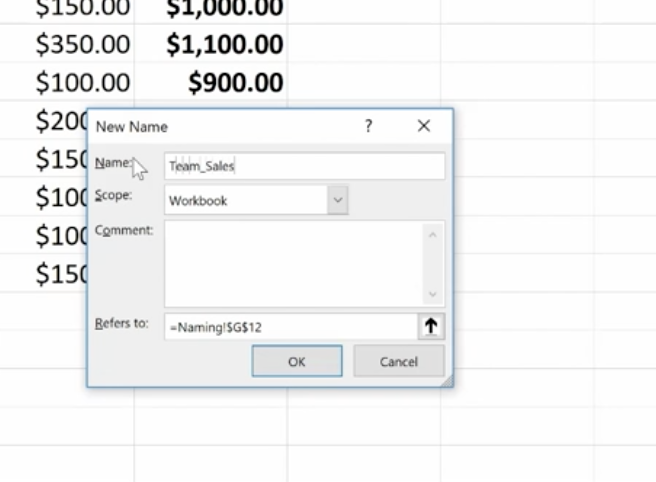
To name our G12 cell Team Sales, right-click on the cell, choose Define Name, and type “Team Sales” into the dialog box. You can also add any comments you want here. Then click Ok.
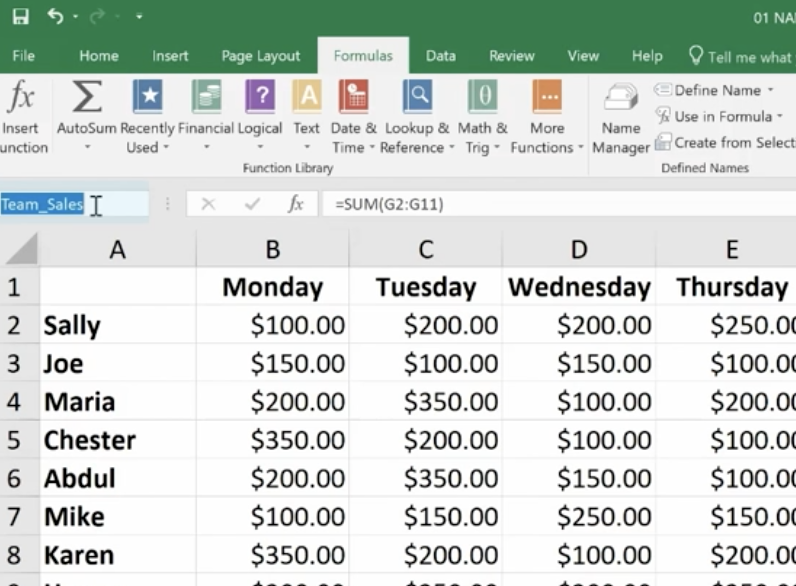
Another way to do this is to click on the G12 cell and go up to the Name Box next to the Formula Bar, then type your name there.
And, there’s a third option at the top of the page called “Define Cells” that you can use.
Notice that there’s an underscore between Team and Sales (Team_Sales). There are some rules around naming cells:
You’re capped at 255 characters.
The names must start with a letter, underscore or a backslash (\).
You can only use letters, numbers, underscores or periods.
Strings that are the same as a cell reference, for example B1, or have any of the following single letters (C,c,R,r) cannot be used as names.
How To Name A Range
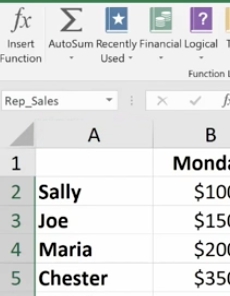
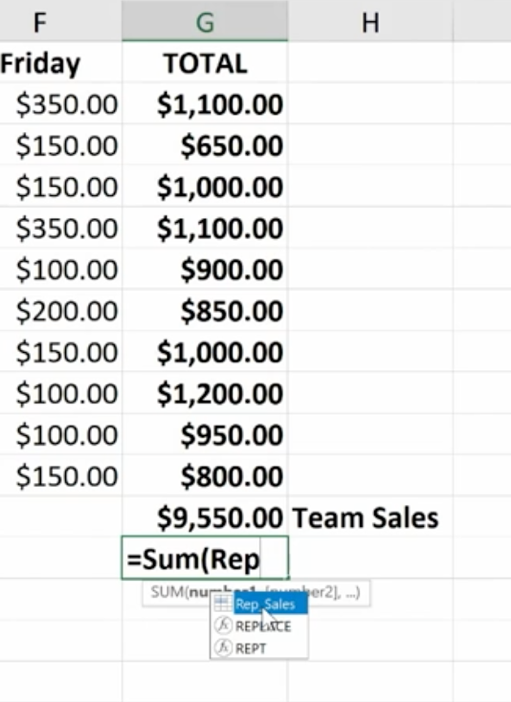
Highlight an entire range of cells and name your range (we’re doing this in the upper left-hand corner).
Then you can easily use the name to produce the sum you need:
You won’t have to go back and forth from spreadsheet to spreadsheet clicking on specific cells to calculate your formula. You simply key in the name of the cell range you want to add. Just be sure to remember the names as you build your spreadsheets over time.
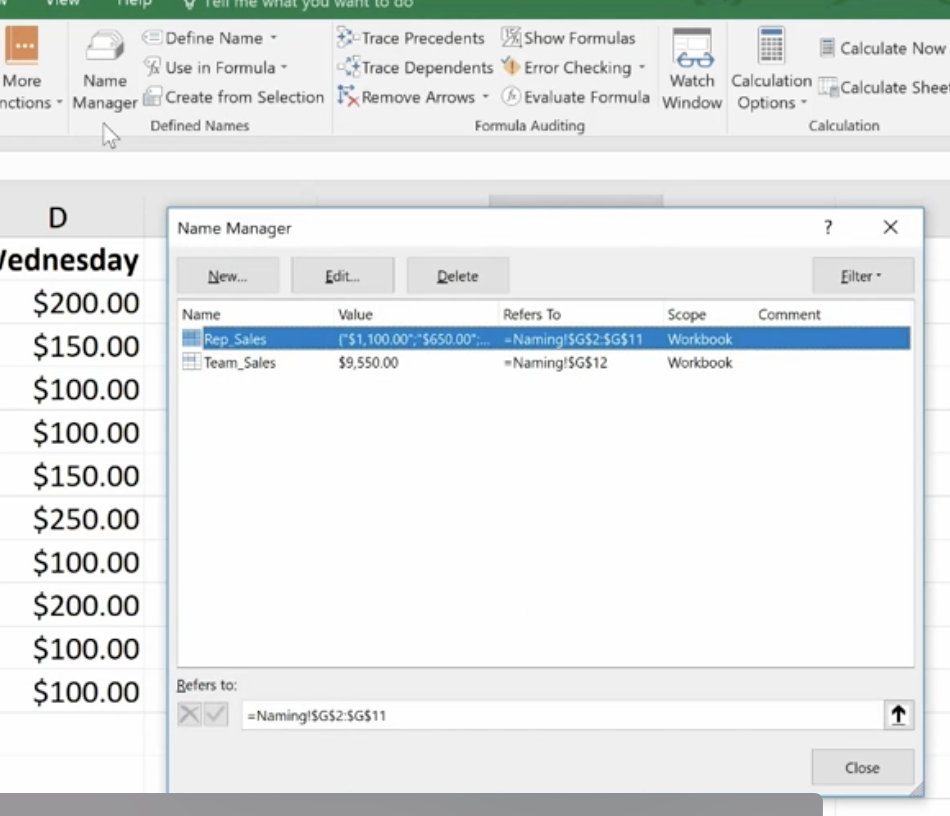
If you ever make a mistake or want to change names, you can go to Name Manager to do this.
Remember that if you move the cells, the name goes with it.
Statistical Functions
The three statistical functions are:
Average If
Count If
Sum If
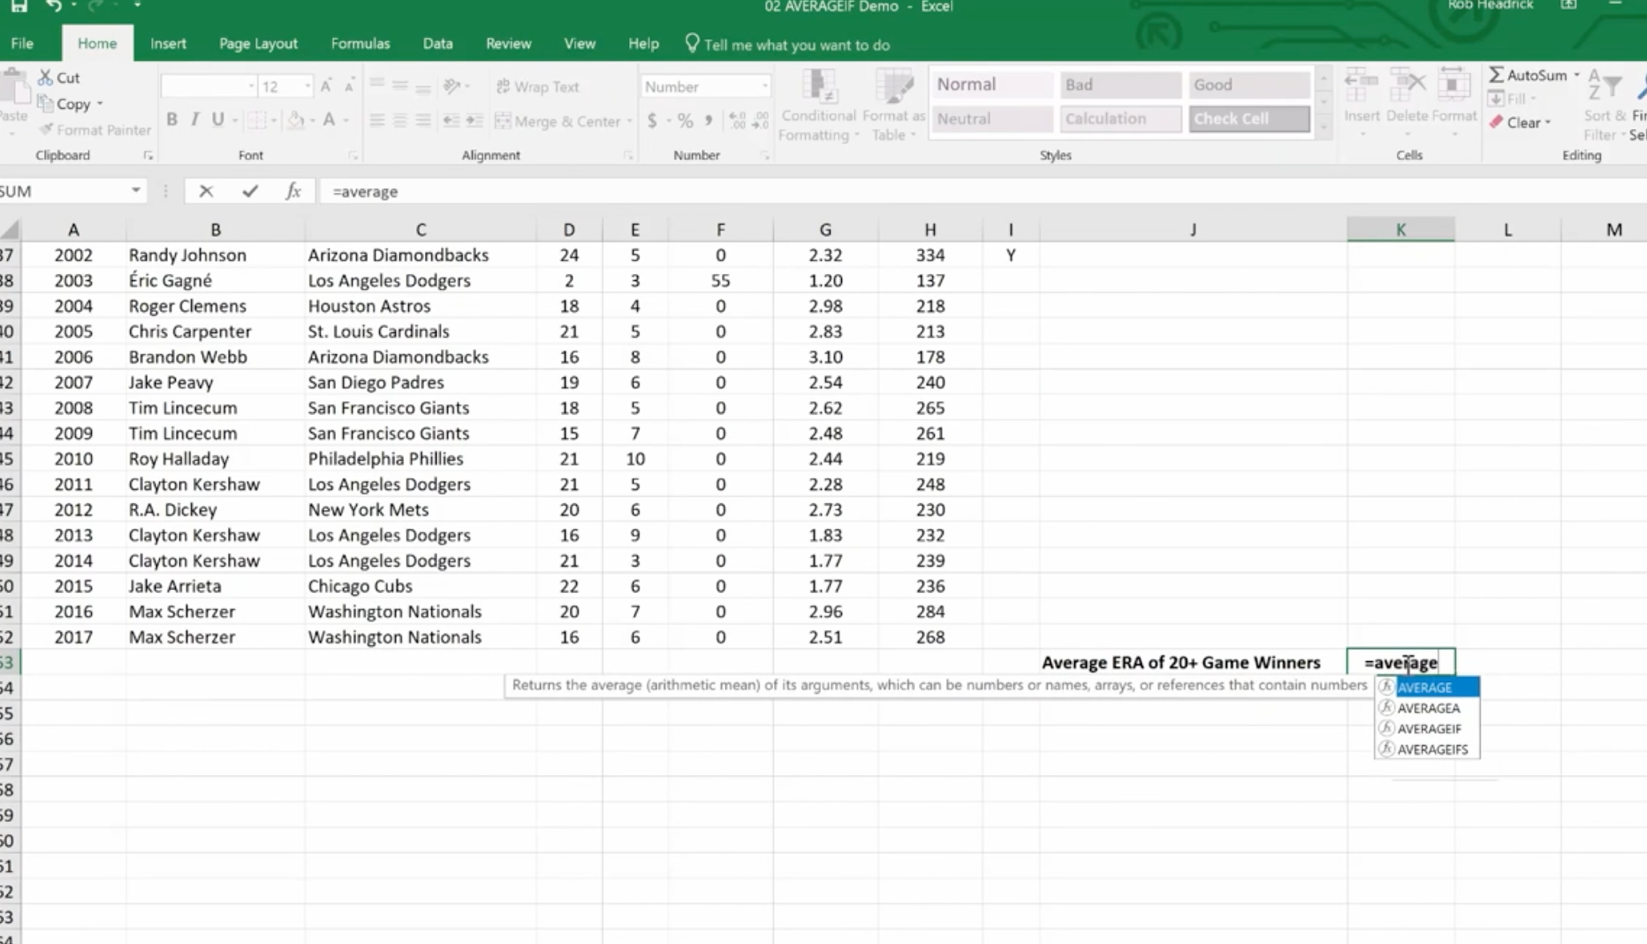
The Average If can be used to figure out the average of a range based on certain criteria. Here we’re going calculate the Average If of the ERA of 20+ Game Winners from the spreadsheet we developed in our last session.
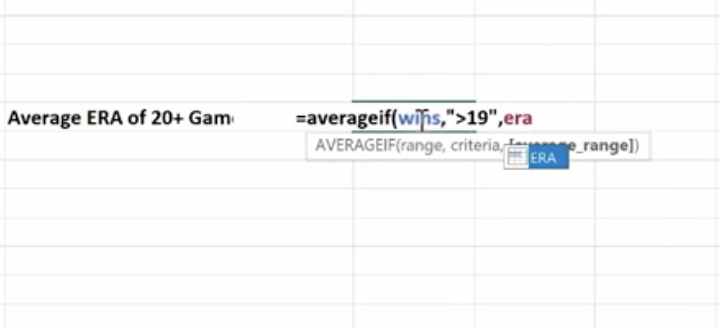
We’ve already named some of our cell ranges (wins, era). And we want to know the average greater than 19.
Hit Enter and you have the average.
You can use this feature across a wide variety of scenarios. For example, if you wanted to know the average sales of orders above a certain quantity – or units sold by a particular region, or the average profit by a distinct quarter.
Count If is used for finding answers to questions like, “How many orders did client x place?” “How many sales reps had sales of $1,000 or more this week?” or “How many times have the pitchers of the Philadelphia Phillies won the Cy Young Award?”
As you can imagine, it’s essential that you type in the text exactly the way you named that particular cell.
Hit Enter and you get your answer
Now we’re going to use the Sum If function to calculate the number of strikeouts by the pitchers on this list who are in the Baseball Hall of Fame.
Sum If is a good way to perform a number of real-world statistical analyses. For example, total commissions on sales above a certain price, or total bonuses due to reps who met a target goal, or total earnings in a particular quarter year-over-year.
Lookup and Reference Functions
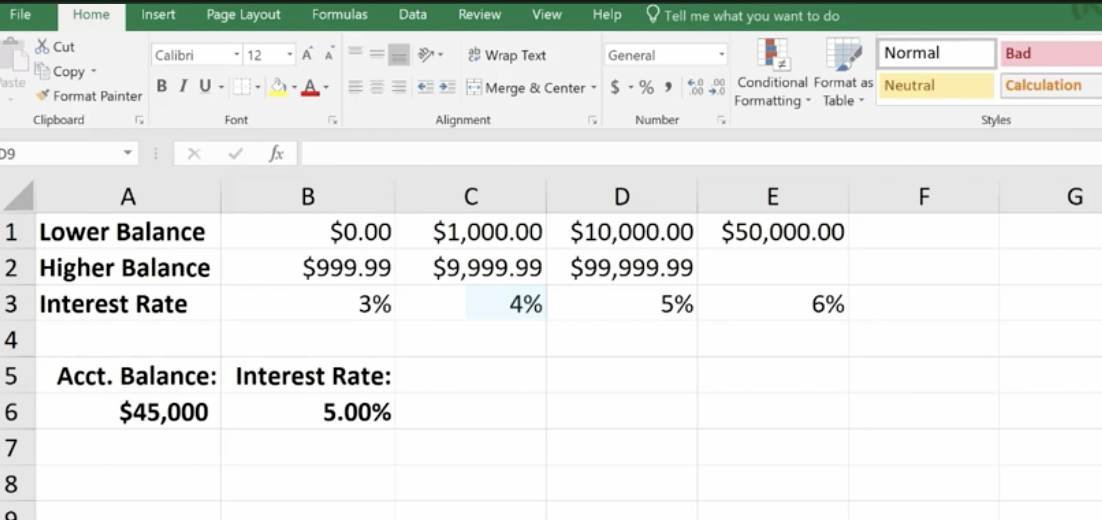
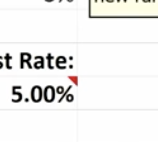
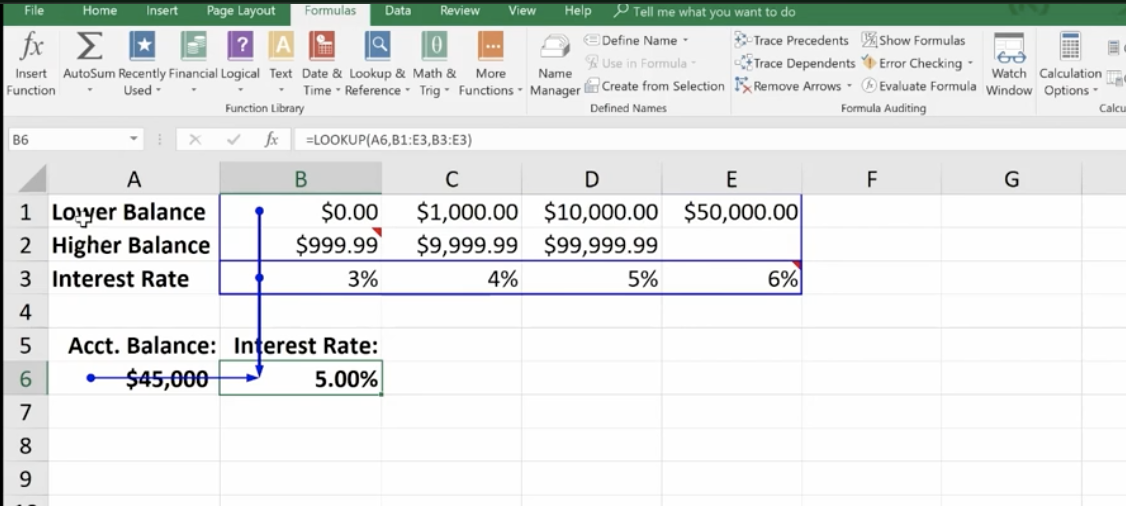
These are designed to ease the finding and referencing of data, especially in large tables. Here, cells A1 and E3 relate to a variable interest rate that is paid on a bank account. For balances under $1,000, the interest rate is 3% – between $1,000 and $10,000, the interest rate is 4%, etc.
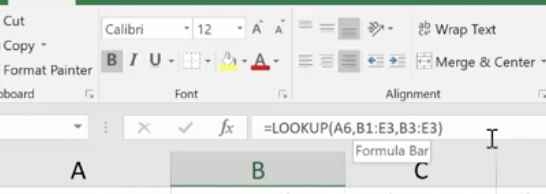
Cell A6 shows the balance of a specific account. The Lookup Function is used in B6. It looks up the interest rate and applies it to the account balance of $45,000. This is what the formula looks like in the bar at the top:
The vector form of the Excel Lookup Function can be used with any two arrays of data that have one-to-one matching values. For example, two columns of data, two rows of data, or even a column and a row would work, as long as the Lookup Vector is ordered (alphabetically or numerically), and the two data sets are the same length.
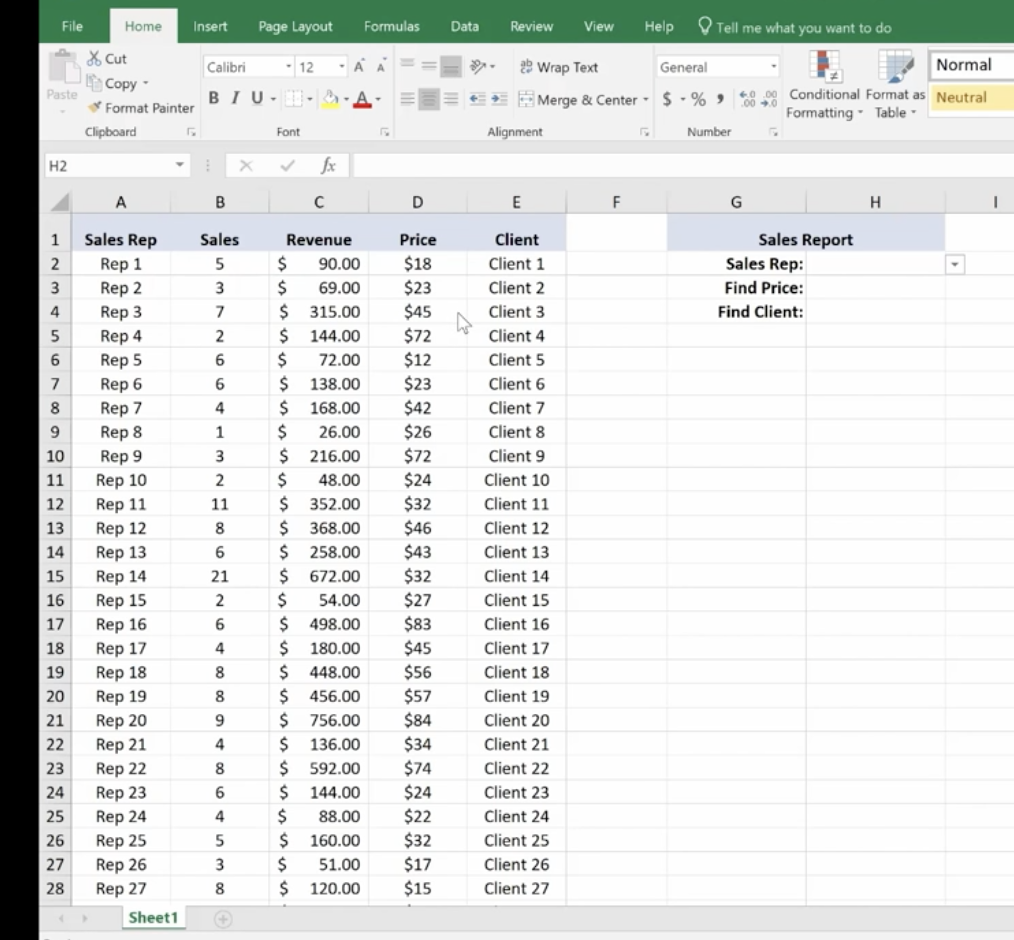
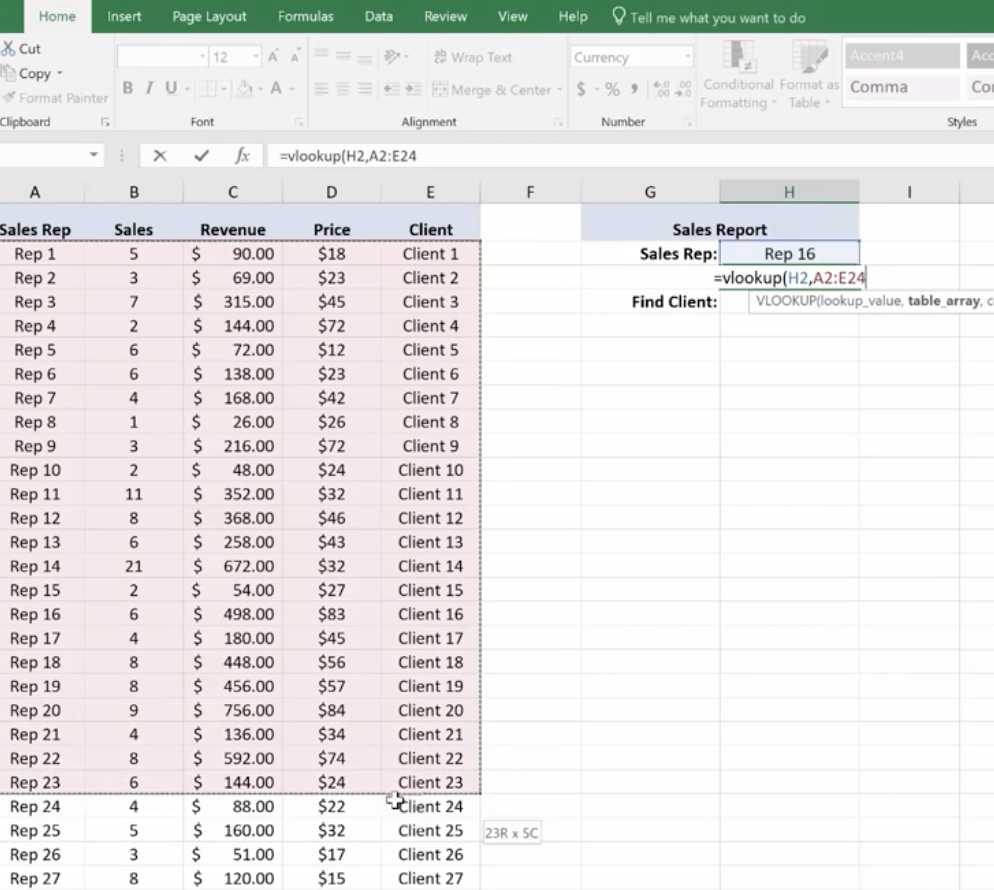
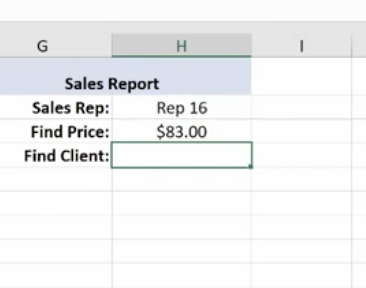
V Lookup and H Lookup are used to pull information into reports. We’re going to use Report Setup. Here, we have a worksheet that references salespeople, sales data, pricing, revenue, and the clients that they sold to. You’ll see on the top right where we set up a report with names referencing sales data.
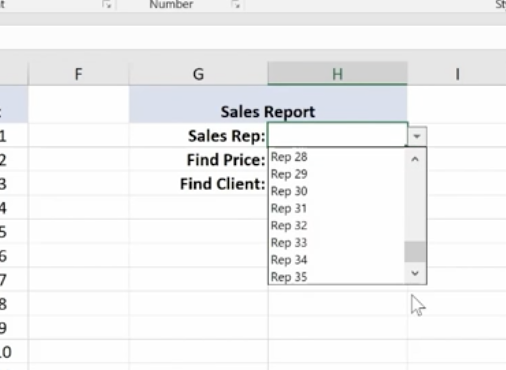
You can access the sales reps in the drop-down menu. Pick a rep and use the V Lookup Function to find the price.
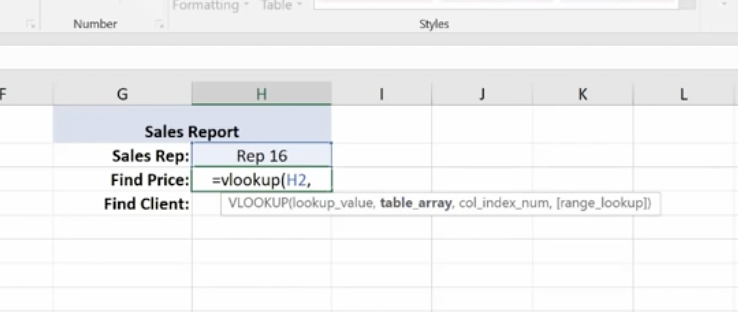
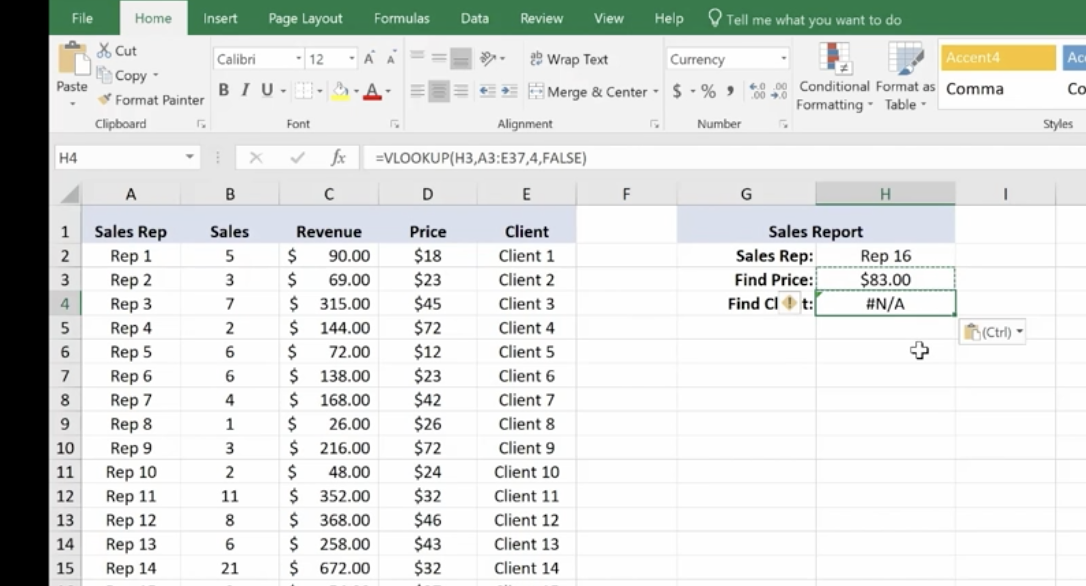
To Find Price, key in =vlookup and the corresponding cell number for Rep 16, plus the table array which is the entire table not including the header at the top.
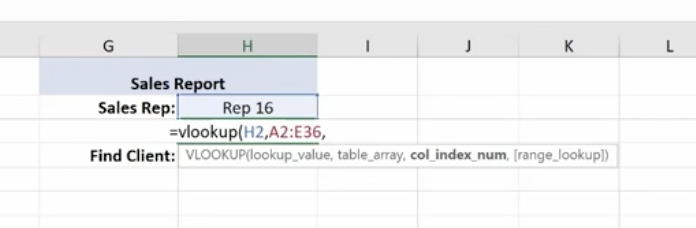
Then you need the column index number. This is the number of columns to the right of your lookup value column, which is column A. It’s the 4th column from column A (Price).
Enter 4,
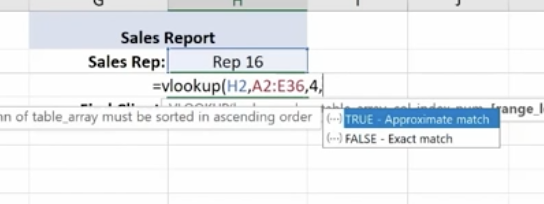
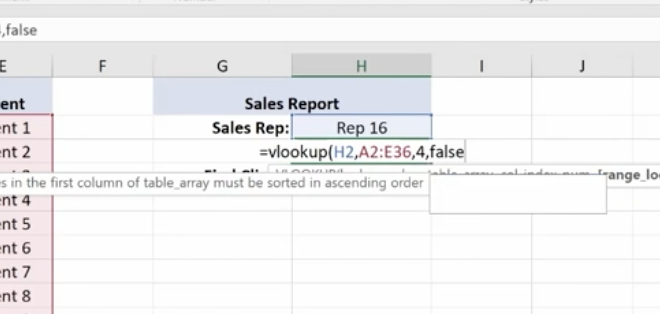
For range lookup we’re using true or false. We are entering false here.
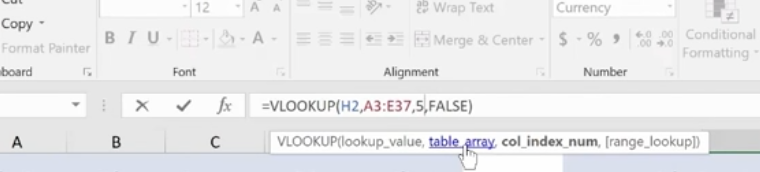
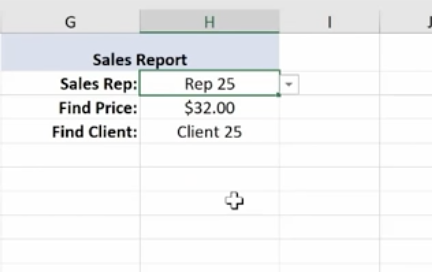
Hit Enter and this is what you have for your Find Price value.
Now we’ll do a similar V Lookup for the Client. Copy and Paste:
Make the necessary changes in your formula:
Client 16 goes with Rep 16.
Note: If you change the Sales Rep, all the corresponding values will change.
If you have a lot of data and long tables, V Lookup helps you find information easily. The V stands for Vertical (or by column), because columns are vertical. H Lookup is for Horizontal-like column headers.
Text Functions
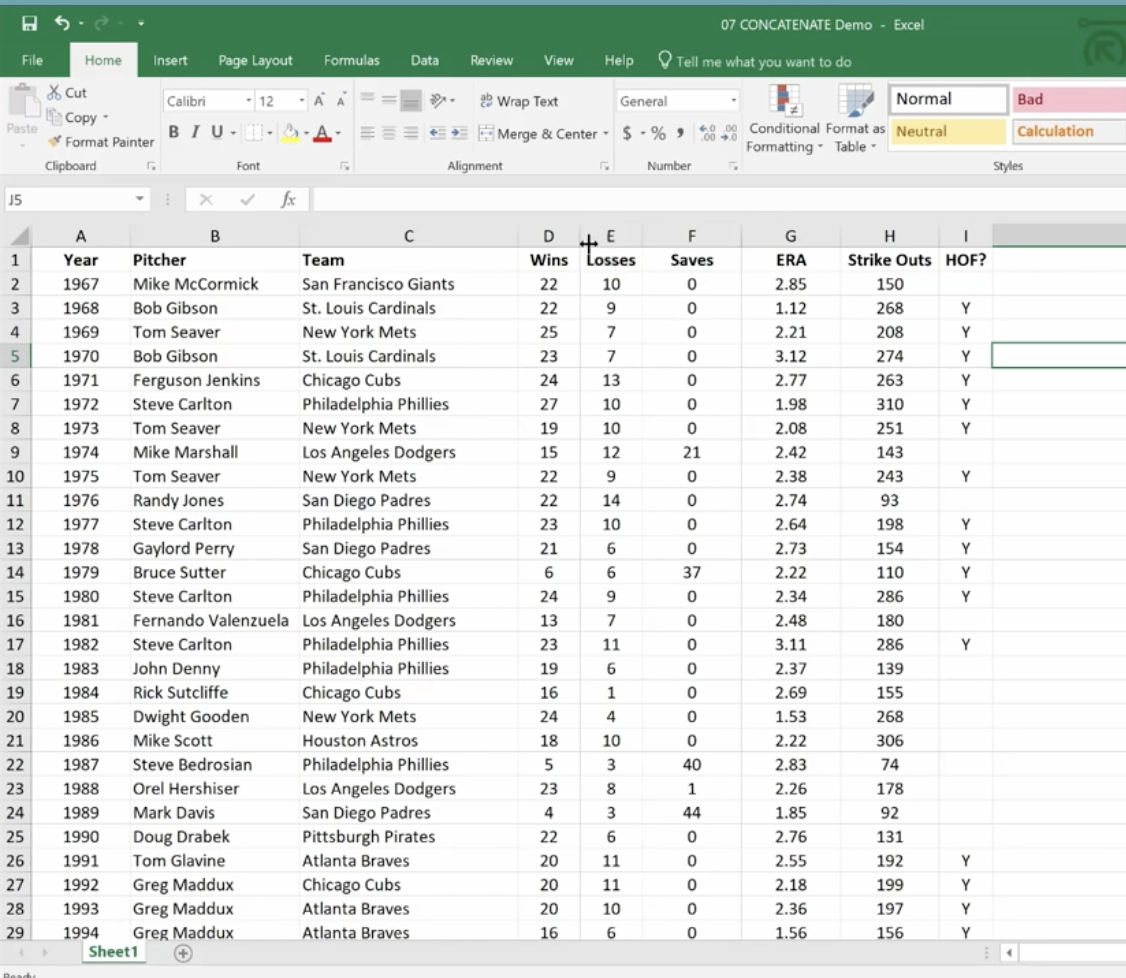
Text Functions contain some very powerful tools to adjust, rearrange and even combine data. These functions are used for worksheets that contain information and function as a database such as mailing lists, product catalogs, or even Cy Young Award Winners.
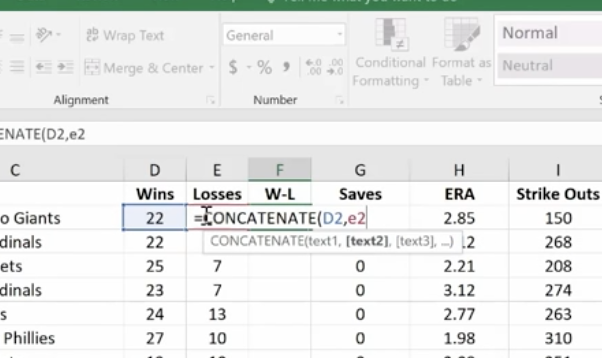
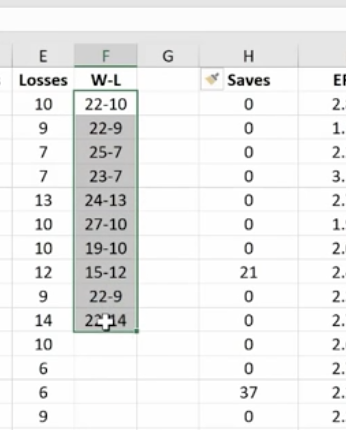
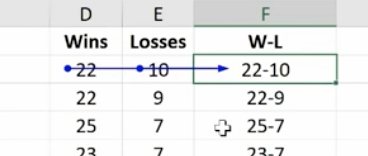
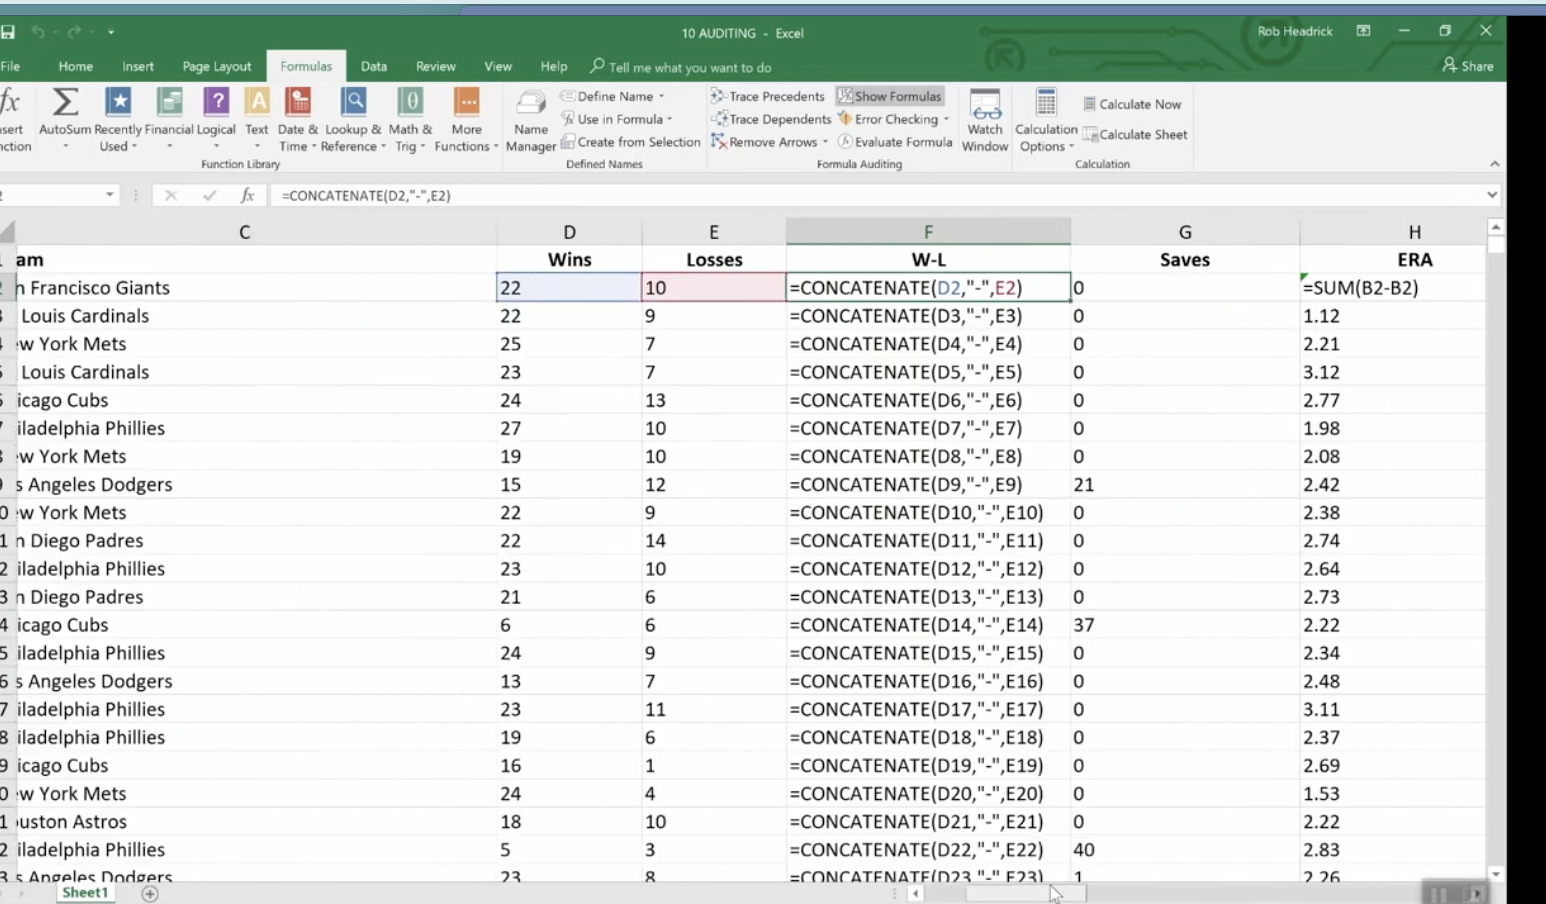
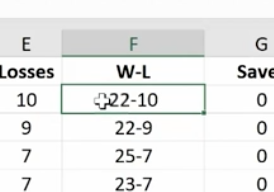
The first text function we’ll show you is concatenate. It links things together in a chain or series. Here, we have our Cy Young list. But we no longer need to see our Wins and Losses in a separate column.
To do this easily rather than manually, create a new column where your data will reside.
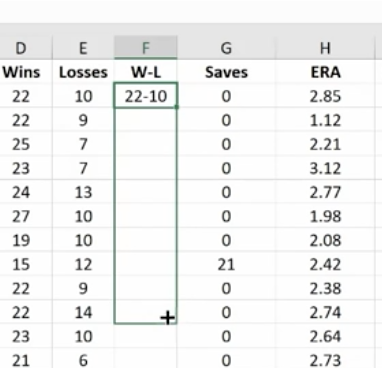
Hit Enter
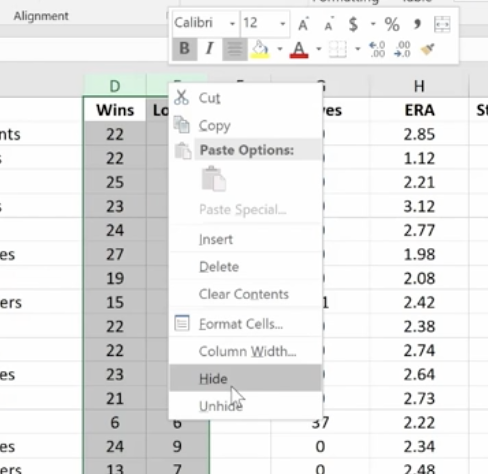
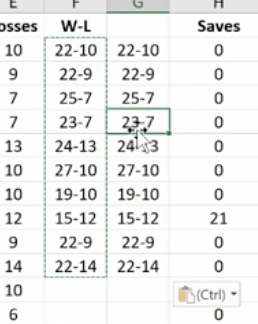
Now, just go in and hide the Wins and Losses columns. Don’t delete them or your new column will have a reference error.
If you do want to delete the Wins and Losses columns, you must first make a new column. Copy the W-L numbers and Paste Value in the new column. This way you’ve moved from a formula to the new information. If you delete your source information without taking this step you’ll be left with nothing.
Combine as many columns as you need with the concatenate function to make the data appear as you need it to.
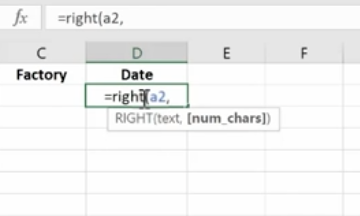
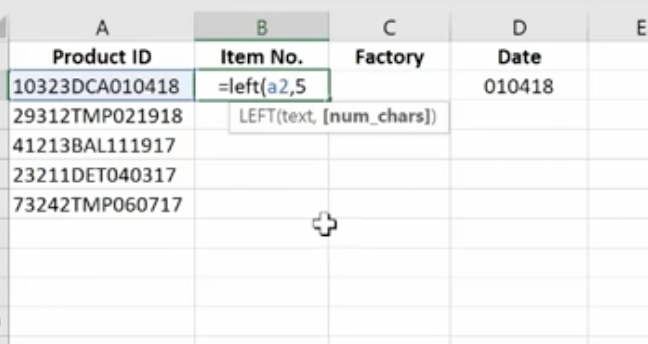
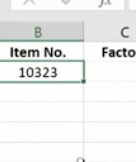
The Left Mid and Right Functions
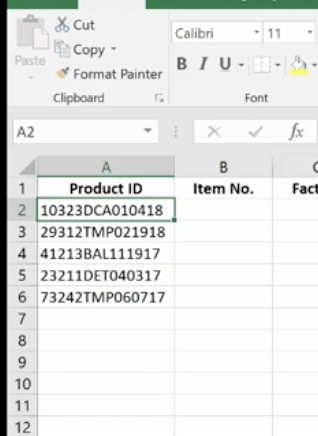
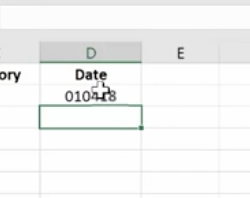
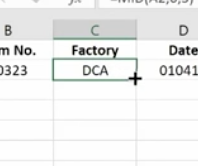
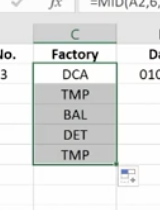
These are used to tell Excel that you only want part of a text string in a particular cell. Here, we have a product list and product IDs that tell us the date of manufacturer, the item number, and the factory where it was made. We’re going to pull the data out so we can put it in columns to use in different ways.
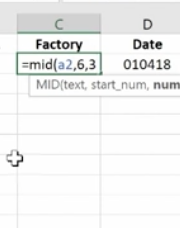
We use the Mid Function here.
This works because each of the product IDs are the same length. If they were different lengths you’d have to do something more creative.
Documenting and Auditing
You want to make your Excel files easy to understand for both yourself and others who need to use them – and this includes auditors. An organized worksheet results in clear error-free data and functions.
Commenting
The purpose of commenting is to provide notes to yourself or especially to others. Comments can include reminders, explanations or suggestions.
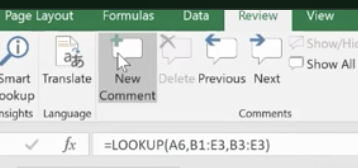
You’ll find the New Comment button at the top under the Review Menu. Simply click the cell where you want the comment to go and click New Comment. Then type your comment and click outside the box to close it. The comment will disappear but it’s still there. Anywhere you see a red flag, there’s a comment.
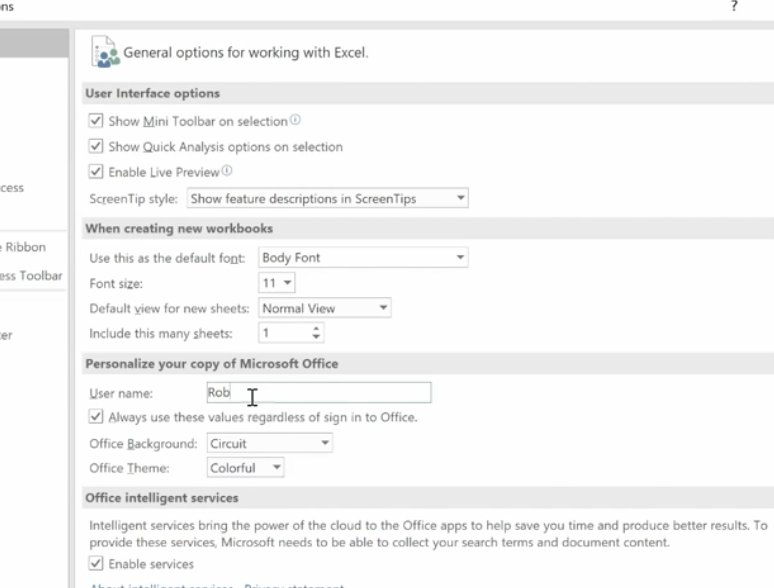
If your name doesn’t appear in the comment, go to File>Options>General and personalize your copy of Excel (in this case Microsoft Office) under the User Name. You won’t need to go back and change each comment; Excel will do this for you.
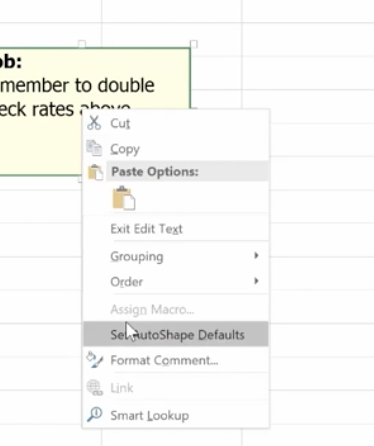
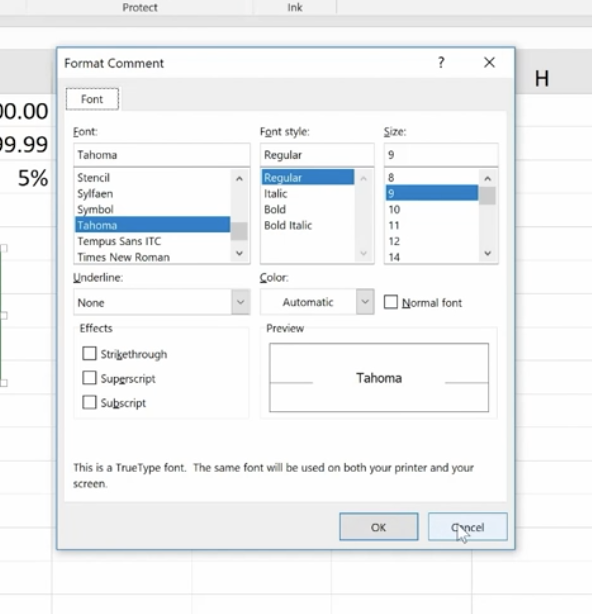
To format a comment, click inside the comment box and a drop down will come up where you can format the text.
You can change the color of the box and lines around the box. Some managers have different colors for members of their teams.
If you change the default color, it will change that for all your Microsoft products.
To delete a comment, go to the cell that hosts it, then go up and hit delete.
If you have a lot of comments, grab the handle on the box and resize it.
Auditing
What we really mean is formula auditing. This is an advanced way to check your work.
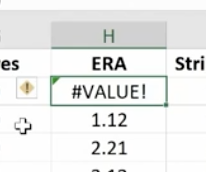
The yellow diamond on the left of this cell indicates that there’s an error.
Or to find any errors, go to Formula Auditing in the top menu.
You have a number of helpful tools here. Trace Precedents shows where the formula looks for information. Click the formula you want and click Trace Precedents. It will display where your data came from.
Here’s a more complex formula and trace auditing:
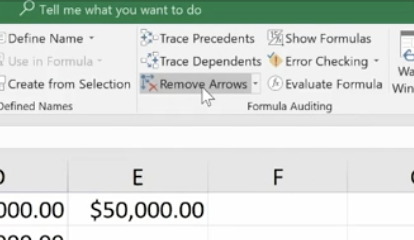
To hide the arrows, click “Remove Arrows.”
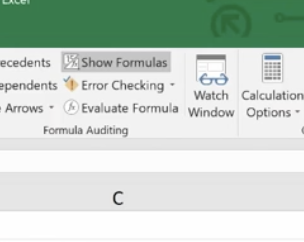
Show Formulas
This expands all of your columns and shows all of them in a bigger way. You can go in and check your formulas on the fly very easily. Click Show Formulas again and the worksheet goes back to the way it was before.
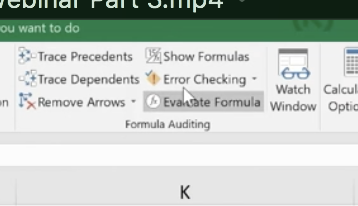
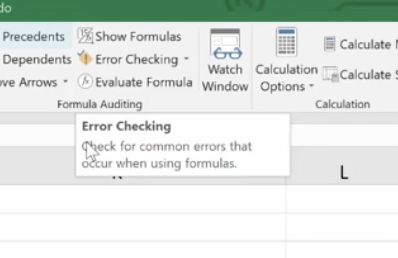
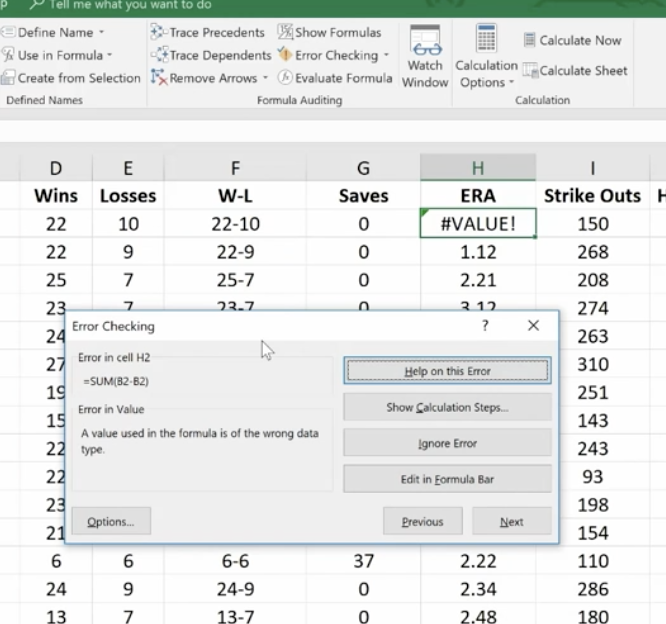
Error Checking
This feature lets you check all formulas at once.
This makes it easy to find errors and correct them.
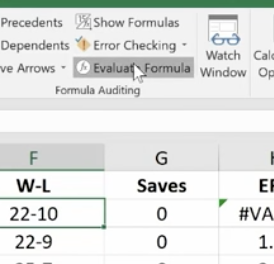
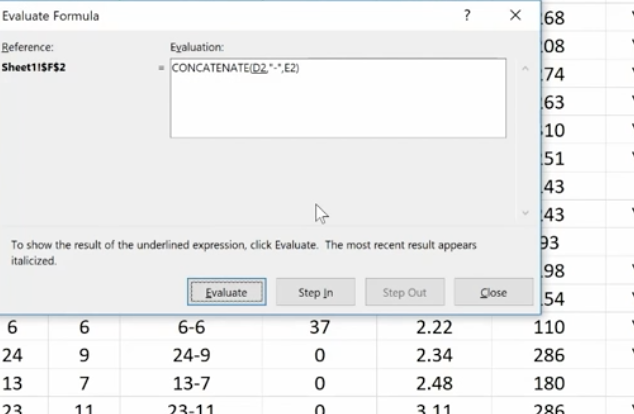
Evaluate Formula
This feature allows you to check a formula step-by-step. It shows the results of each individual part. It’s another great way to de-bug a formula that isn’t working for you. Click the formula you want to evaluate. Click Evaluate Formula and you’ll get a dialog box.
Click Evaluate and it will change the formula to the actual value that you can review. Each time you click Evaluate, it will take you through the steps of how you got to the final formula. You can trace your way through to see if you made any errors.
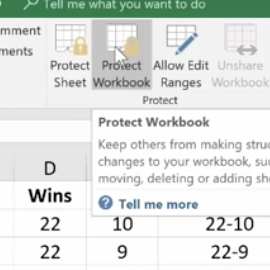
Protection
With protection you can lock in your changes in individual cells, spreadsheets, and entire workbooks. You can also protect comments from being moved or edited.
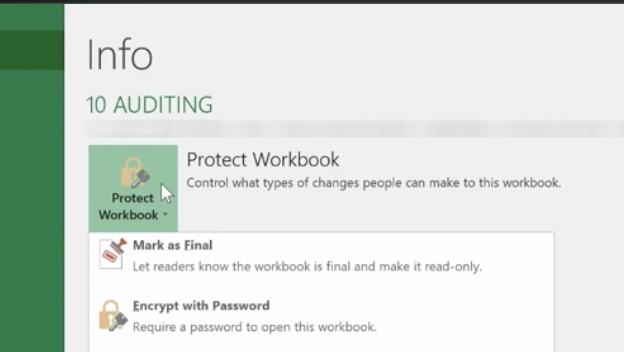
This is how to protect an entire workbook. It’s the highest level of protection.
You’ll want to do this if your workbook contains confidential information like:
Pre-released quarterly results
Employee salary tables
Staff member evaluations
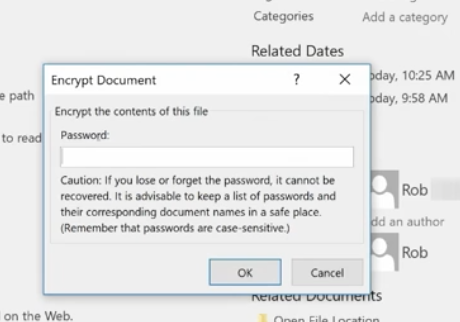
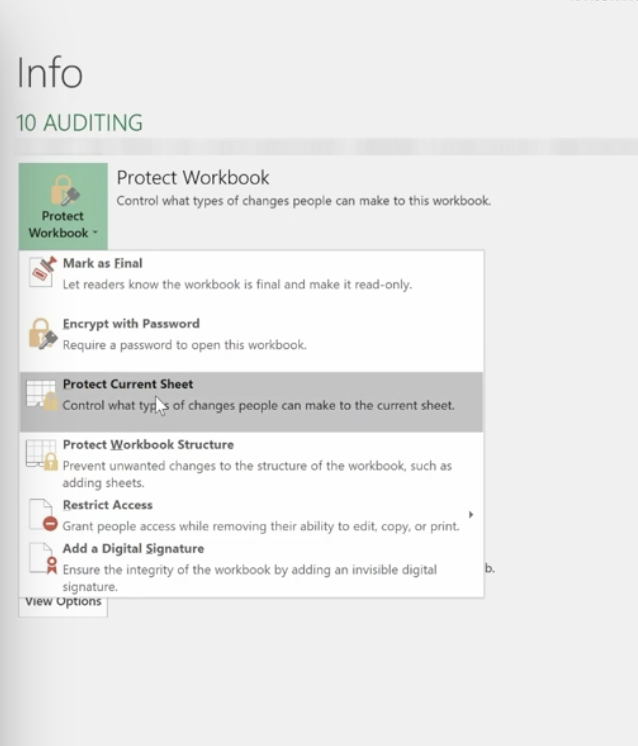
Click File>Info>Protect Workbook>Encrypt with Password.
Enter your password and be sure to make note of it because it can’t be recovered if you lose it. You can use password management software to keep track of your passwords.
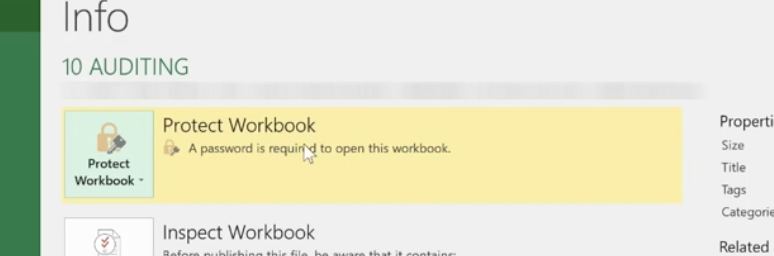
Once complete, click OK and your Protect Workbook function turns yellow indicating that you’ve protected your workbook.
To take off protection, retrace your steps.
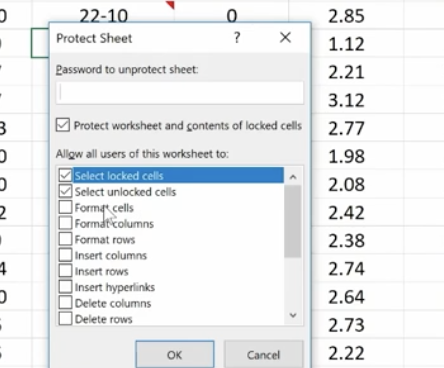
You can also protect a current sheet you’re working on. It will take you back to your worksheet where you’ll be presented with a variety of options.
You can also protect cells and comments from this option.
In the same way you protected the worksheet, you can protect your workbook.
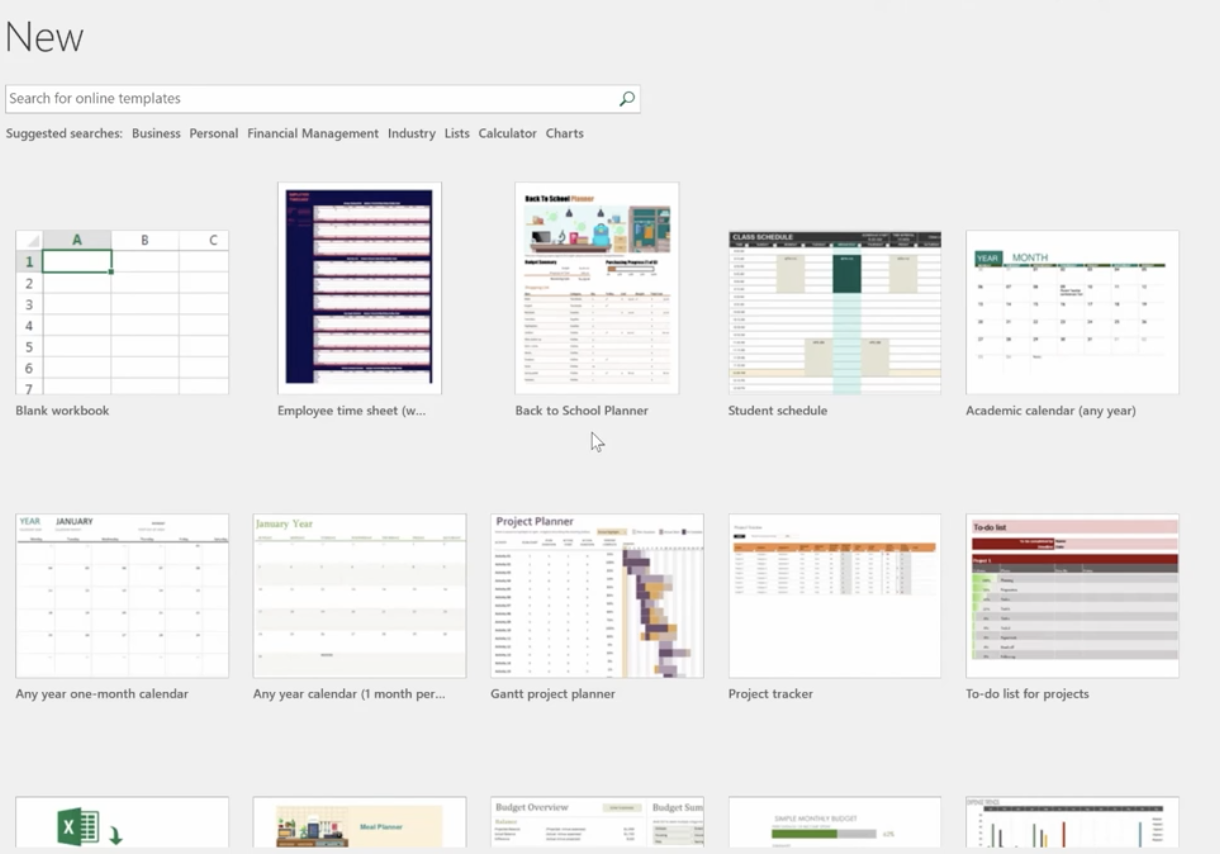
Using Templates
To see the variety of templates you can use in Excel, click File>New and you’ll be presented with a collection of 25 templates you can choose from.
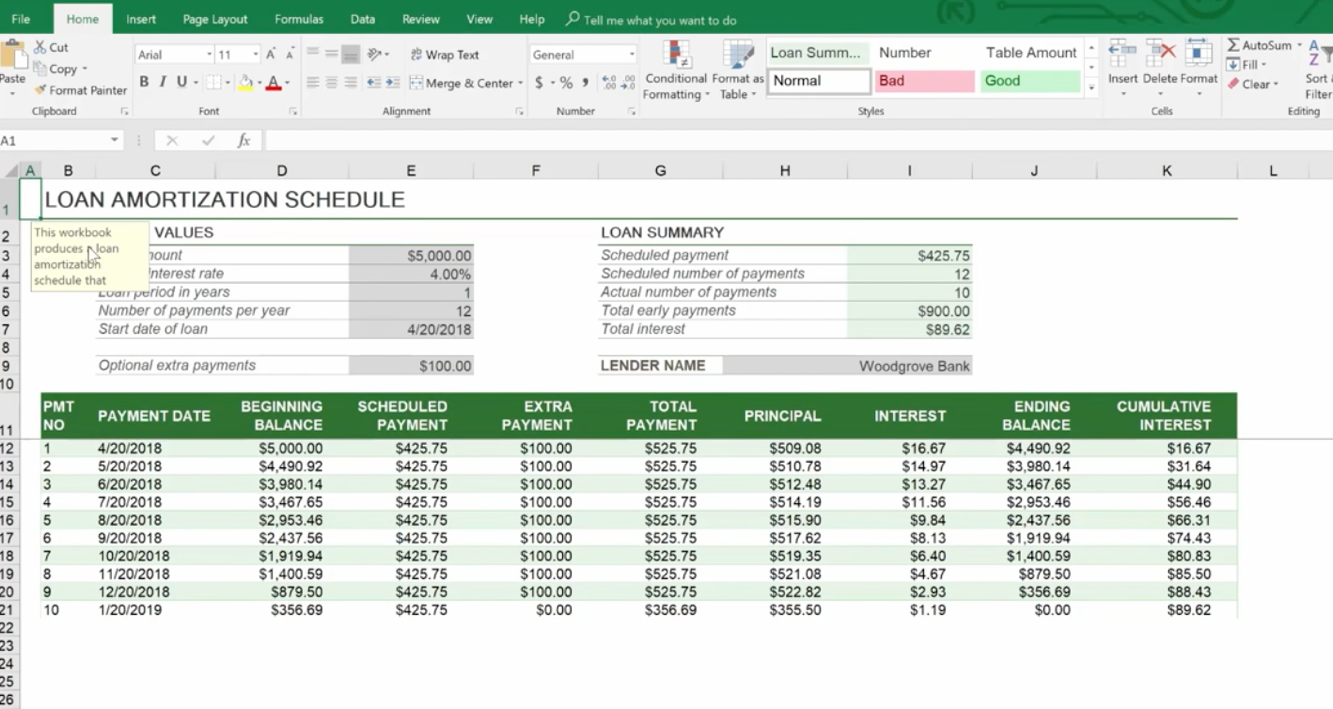
For example, there’s a great Loan Amortization Schedule you can use. Formulas are built in for you. All you need to do is change the numbers.
You can also go online while inside Excel to find more. You don’t want to download templates from outside Excel because they may contain macros that are contaminated with viruses.
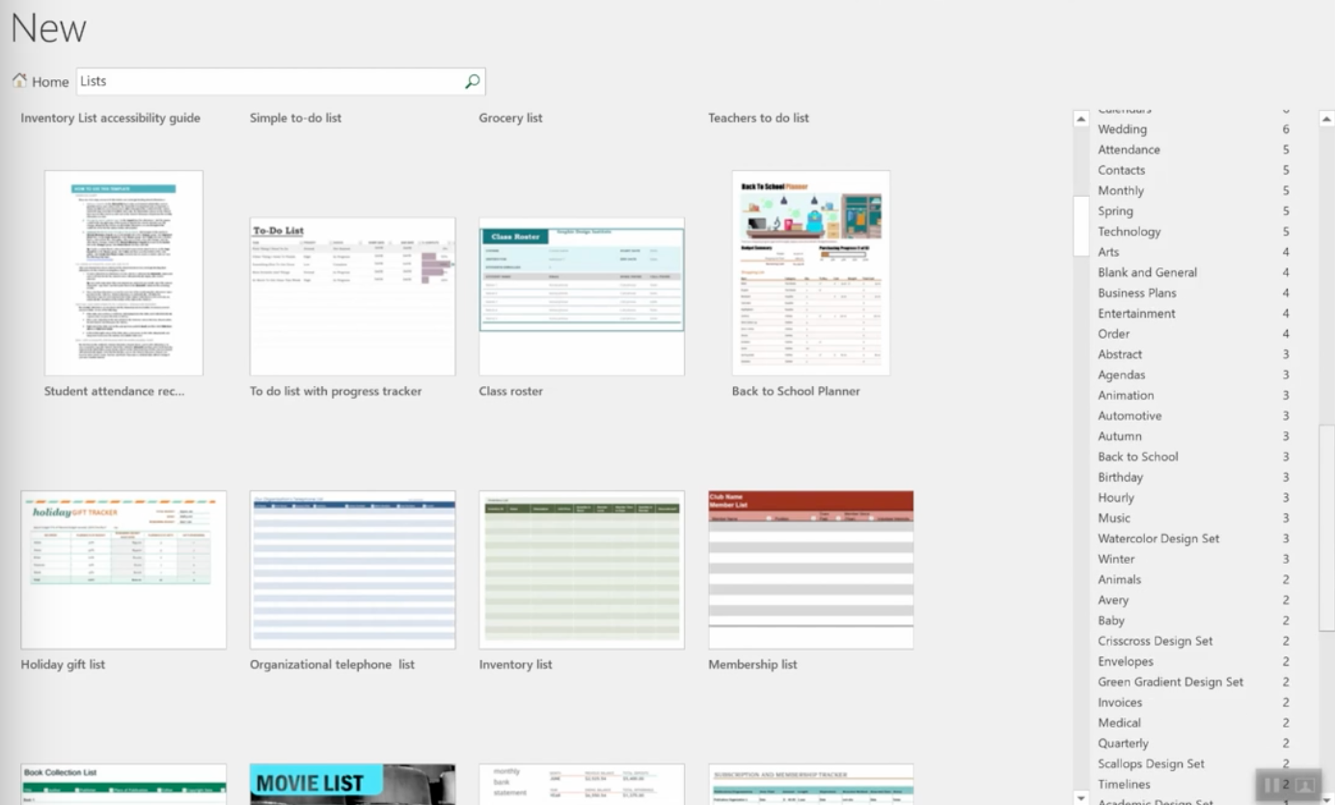
On the right side of the page, you have a huge selection to choose from.
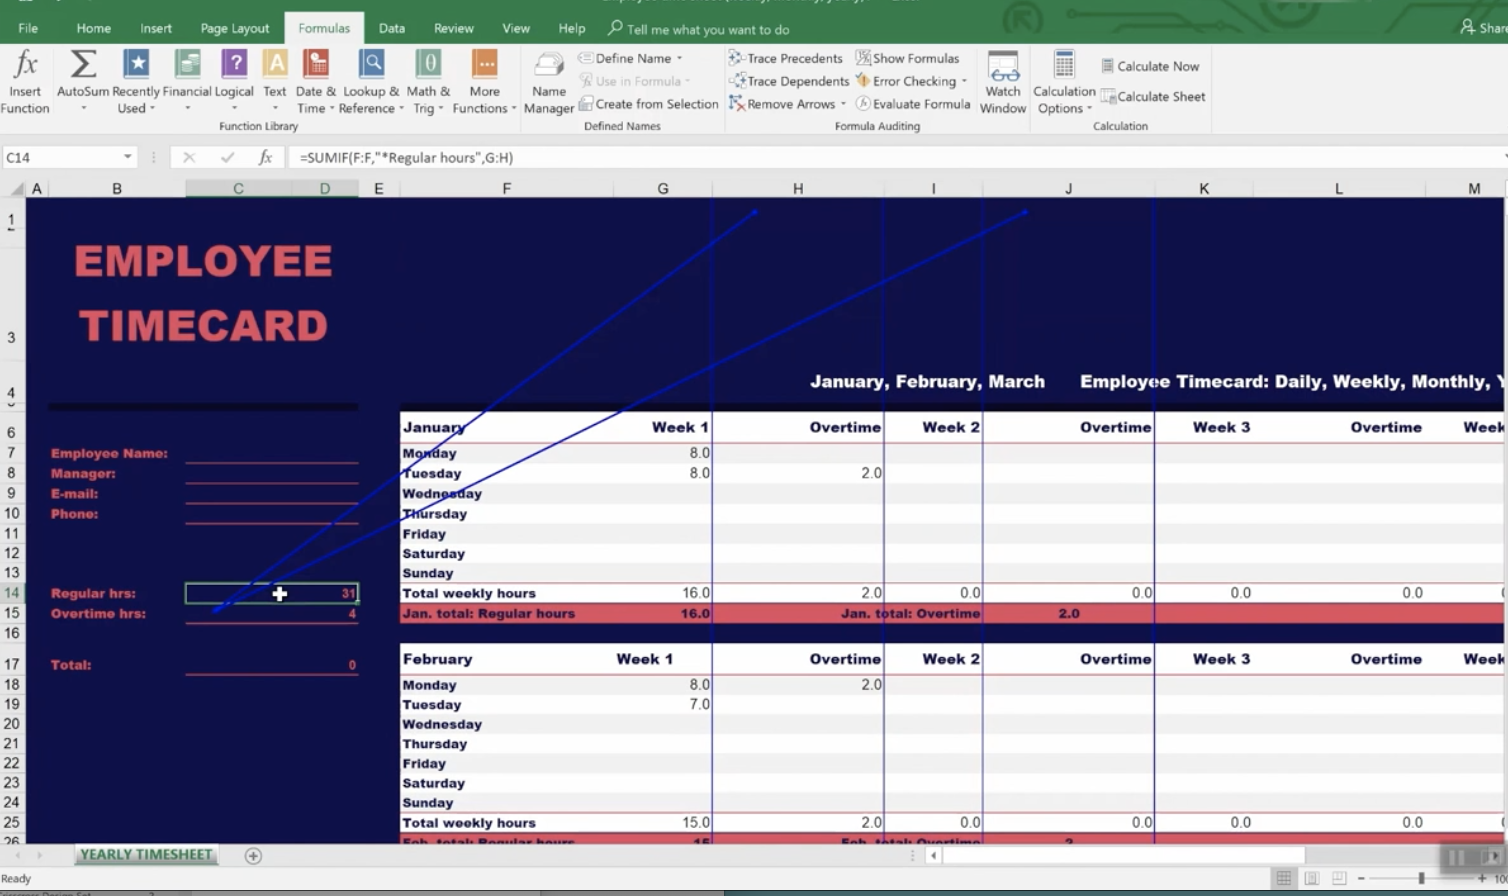
It even provides employee time sheets you can use that can save you so much time trying to figure out formulas.
Creating and Managing Templates
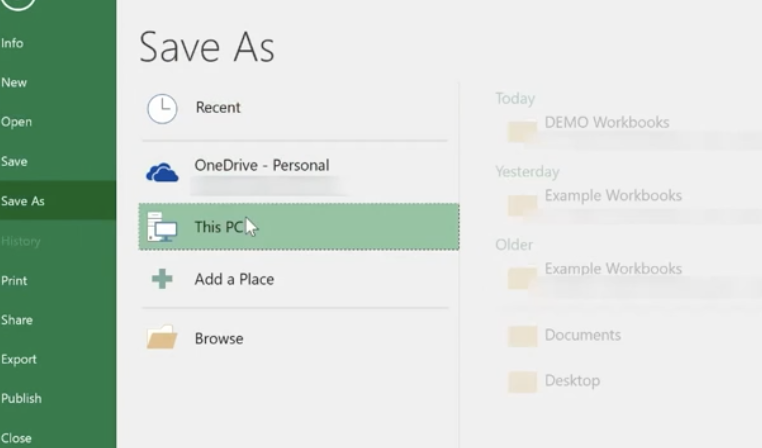
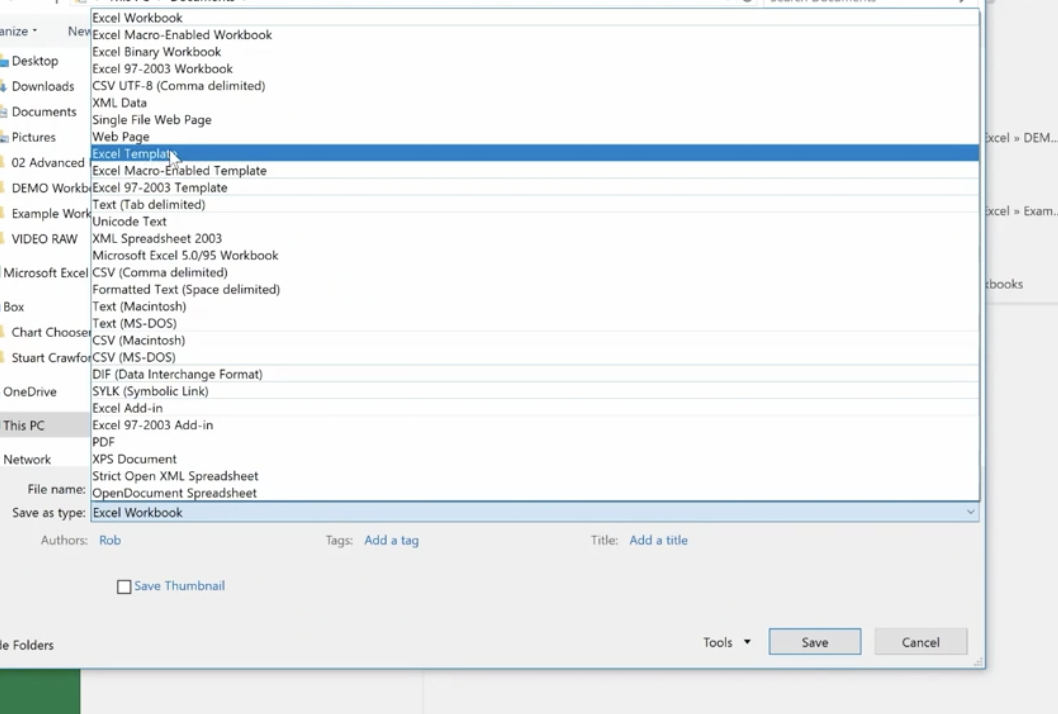
Go to File>Info>Save As and save the template to your location, then save as an Excel Template.
Before you save as a template you want to:
Finalize the look and feel of your template
Use review and auditing tools
Remove unnecessary data and information
Unprotect cells and sheets as appropriate
Create comments as guides
Congratulations! Now you’re an Excel Pro! This completes our Excel Like a Pro Series. If you have any questions or need assistance, feel free to contact our Excel 2016 experts.
Search Engine Optimization (SEO) is truly an important part of marketing for any business. Businesses that rely solely or largely on online marketing must understand the concepts of SEO marketing in order to be successful. If you’ve been doing this a while, then you probably know that it’s not as easy as it seems on the surface. Today, there are numerous specialists in this field with years of experience in Search Engine Optimization. They will testify that search engine optimization is a complex procedure that requires several layers of precision efforts in order to work.
Search Engine Optimization is an art that if well mastered, will ensure that your website is ranked higher than the competition. Of course, being on that first page of results is every business owners dream and if it were easy, everyone would be there at one time or another. As with all technology, people have found ways to master SEO and they’ve found ways to “beat the algorithm.” This process, though effective, can cause a website that really shouldn’t be there, to appear at the top of your search results for a specific word or phrase.
Beating the algorithm sometimes results in the website that should be right at the top, falling to the bottom of the page. Though Google and others do work hard to make sure things like this don’t happen, we all see it every day. Below, are our top 12 tips for getting your website to that first page of the listings.
Focus your content on fulfilling a need.
This is simple. All you need to do is find a need and fill it. If you do this well enough, consumers will come looking for you. Know your target consumer. Speak to them personally in your content. Make sure you’re addressing their pain points and hitting all their hot buttons. Be sure your content speaks to people in a personal way. Always remember that the customer is who you’re after; not the search engines. Write content that is useful to your customers.
Ensure your content is mobile friendly.
In this age, where people are somewhat addicted to their mobile phones, your web content must be mobile friendly. Make sure that everything is easily accessible from any device. People are using their smartphones more to shop and make purchases, so this process must be just as simple on a smartphone as online.
Do use keywords but ensure your web content makes sense
Knowing that keywords are the way to beat algorithms, some people load their web content with keywords. Check online to see what the current density rate for keywords is. At the moment, it’s around 2 percent. If you go over this, the search engines could classify your site as SPAM. This is the exact opposite of what you really want. In addition, loading your content with keywords makes it sound less authentic and even annoying. It diverts the attention of the readers from important information about your business.
Give your audience more than they expect
Your website should contain good information about your company and your products and services. You can also add interesting trivia, a surprising story about one of the company owners, or anything unique that might make visitors remember you. Some sites use humor. Above all, be truthful and sincere and this will create trust in your website visitors.
Ensure your work is amazing
Do not bore your audience with irrelevant information. While writing informative pieces, ensure they are entertaining. It’s often a good idea to work with a professional copywriter who can create incredible content that will WOW your audience.
Link, link, link
You don’t want your visitors searching elsewhere on the internet for information concerning things that you’ve discussed on your site. Instead, provide links that go out to these stories. People today appreciate the convenience. Inbound and outbound linking can be tricky so get help from a specialist if you feel you need it.
Keep creating content
Do not just create your website and then walk away. Instead, keep tweaking the content there. Keep adding fresh content each week. Make sure articles and blogs are relevant and valuable to your consumers.
Think like your consumer
Being an internet user yourself, you probably know a few things about how consumers think. But, it’s important to learn what motivates a person to make a purchase from your site. There’s a whole science behind these concepts. Once you understand the mindset of your target consumer, you can better address their needs and speak to their heart.
Ensure that content is evergreen
Before you post your content, ask yourself this question: “Three months from now, will this content still be relevant? What about in 6 months or two years?” Is the answer is yes, go ahead and publish it. If not, you may need to rewrite your content so that it’s just as relevant in two years as it is today.
Every piece of your content matters
Your writing should focus on the value of your products and services. You want an amazing website that stays at the top of search listings for years, not just a few days. If you focus on SEO tricks, you may be at the top for a while, but then shoppers may realize that in fact, there is not much on your site they need. Stay relevant. Give shoppers what they’re looking for. This is how you get return visitors.
Social media should be your best friend
Maintain all your social media sites placing fresh content there daily. Most business owners hire someone to do this for them and this can be a valuable investment that really pays off. Social media gives you the opportunity to interact on a personal level with customers and potential buyers. Don’t miss out on this opportunity.
Focus on retention
Work with someone who understands the analytics that you get from your site each week. You can use analytics to tell exactly when someone clicks away and moves on. Find out what they were doing when that happened. Maybe there’s a boring page on your website that could be updated with better content. Maybe there’s something offensive that you don’t see. Sometimes, it’s nothing more than colors, shapes, wording etc. Humans are visual beings. They make decisions based on their feelings.
Length matters a lot
Longer content ensures that you can insert more keyword variations. Today’s successful websites are posting longer blog articles. In fact, blogs that are at least 1000 words are ideal. Of course, longer pieces of content must be broken up with subtitles and images. This keeps readers interested.
Final thoughts
While search engine optimization may not be rocket science, it is still a science that many business owners don’t have the time or the expertise to master. Hire someone who is good at this and has a proven track record. Expect results and monitor their efforts to make sure this happens. It won’t happen overnight, of course, but within six months, you should begin to see some good changes in your search engine rankings.
“Hey Cortana, remind me to contact Bill at Acme to set up that sales meeting.”
More business people are relying on their voice assistants and AI chatbots to help them save time and effort, according to market research firm Spiceworks. After surveying more than 500 technology professionals throughout North America and Europe, they found that 40% of large businesses and 15% of smaller ones will now be using voice-assist technology to improve their business efficiencies.
Right now, Microsoft Cortana is the most commonly used AI assistant for businesses, at 49 percent – and 14% of businesses are using AI chatbots, with their Microsoft collaboration tools like Slack and Teams. This is probably because it’s so accessible and is integrated into Windows 10. Apple’s Siri isn’t far behind at 47 percent – it’s integrated into iOS and macOS.
Some of the tasks respondents use voice assist for include:
Voice-to-text dictation
Employee calendar management
Customer service purposes
Helpdesk management tasks
Sales and marketing
New Players in the Business Voice-Assist Marketplace.
Integrating voice assistants in the enterprise market is unleashing new use cases for the technology. In November 2017, Amazon launched their Alexa for Businessplatform, which lets businesses to create their own Alexa skills.
IBM recently launched their Watson Assistant for businesses. They plan to license it to enterprises so they can build customized, interactive tasks into their own products and services. The Watson Assistant is more focused on customization and privacy than are Google and Amazon. This might give IBM a competitive edge in the business marketplace.
Watson allows for better-tailored voice interactions and eliminates the need for a universal wake-up word like “Hey Siri” or “Alexa.” Plus, you can train the assistant using your own datasets. This makes it easier to set actions and commands.
The Watson Assistant also gives each user control over their personal data. It doesn’t pool users’ information and allows each person to control which Watson-powered devices and applications can access their data via the IBM cloud. The technology then learns and remembers each user’s preferences.
IBM is introducing their Watson Assistant to hotels, hospitals, banks, offices, restaurants, connected cars, and more. They’ve partnered Harmon where they’re using the Watson Assistant in a Maserati concept car. The Munich airport is also using IBM’s Watson Assistant to power a robot that provides directions to travelers. And Chameleon Technologies is using it to control temperatures in homes based on residents’ daily schedules.
What Voice Assist Will Demand from Your IT Professionals.
As voice assist becomes increasingly mainstream in the workplace, IT departments will face many challenges. As it stands now, the various forms of voice assist, machine learning and artificial intelligence operate on multiple platforms, operating systems, apps, and hardware. This will make it difficult to harness their potential without considerable investment in resources and expertise.
Not only will IT professionals need to have a complete grasp of its functionality and how to integrate it with networks and legacy systems, but they must also define and implement strategies for using it, and provide training and education for an entire pool of users in the enterprise.
As voice assist becomes more interactive and “personal,” IT professionals will need to combine their technical skills along with strategic and interpersonal capabilities to achieve greater success.
Adoption of the technology is moving slowly but is predicted to pick up as the power of voice achieves a new level yet to be discovered. Those businesses that stay informed and ready for and prepared for change will be better positioned to take advantage of its benefits. Some of these benefits include increased productivity and sales, more and better innovations, improved collaboration, and the ability to increase global market share.
Deep Learning
Voice assistant providers are improving recognition capabilities through the power of deep learning, a form of artificial intelligence (similar to facial-recognition technology). Deep learning goes a step farther than machine learning that is based on algorithms and historical data.
It will be able to predict a pattern of speech based on previous content without training by compiling vast amounts of data from the Internet. Voice assistants will be capable of taking meeting notes with much more accuracy. And, they’ll be able to identify different voices in a room to transcribe who said what.
Deep learning will be better at translating foreign languages. Imagine how this could fuel the growth of a global business, and the ability for more seamless collaboration. Right now, voice assist is a bit “robotic,” but eventually it will be more conversational in tone and respond more accurately due to deep learning.
But, Don’t Fire Your Administrative Assistant Just Yet.
Those who aren’t using them say it’s because they don’t see a use for them, that the cost is holding them back, and they worry about security issues. They also worry about technology distracting their employees and that it could negatively affect productivity.
Although voice assistants and chatbots are helpful in the workplace, the technology still needs improvement. 59% said that it can misunderstand requests and 30% said that it is inaccurate when executing commands. And, 29% said that it can’t distinguish their voice from others.
Other than using them for simple tasks, voice assist has yet to become widely used in the workplace. If you have a lot of employees in one area, the technology won’t work for you. It has difficulty deciphering commands with there are simultaneous conversations taking place. But, as the technology improves, more will be willing to use it.
Is your business ready to meet the demands that voice assistants and future technology advancements will surely bring? If your small or mid-sized business is struggling to manage your existing IT systems, or you can’t keep up with IT security concerns, it’s time to consider partnering with a Technology Solutions Provider. In this way, you’ll be prepared for what’s coming next in the world of voice-assist, and other technologies that can help you better compete in your marketplace, improve productivity and ultimately your profitability.
Are you using Outlook to its fullest potential? If not, you’re missing out on a valuable tool that will make your work so much easier. Not only will it incorporate everything you need to do with emails, like make appointments and set “Quick Steps,” it can save you a lot of time. We have 9 great timesavers we want to share with you here.
1. Turn Off Notifications
You know those little pop-ups that appear when you’re trying to concentrate on a project? They are there to let you know that you have new mail. This is great if you’re waiting for an important email. Otherwise, they can be very distracting.
Here’s how to turn these off:
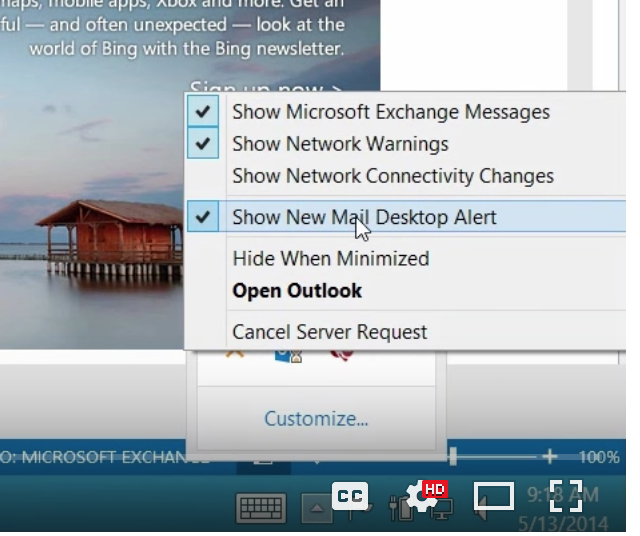
Just go to the bottom right-hand side of your screen (in Windows) and click on the little triangle. A check box will come up.
You can see here where it says, “Show New Mail Desktop Alert”.
Uncheck this and no more annoying pop ups!
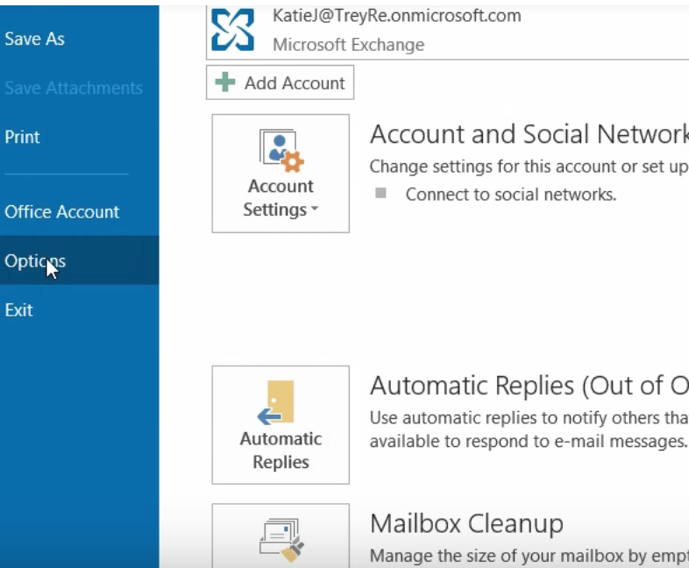
You can also do this right from Outlook:
Go to the left-hand side of your screen with Outlook open.
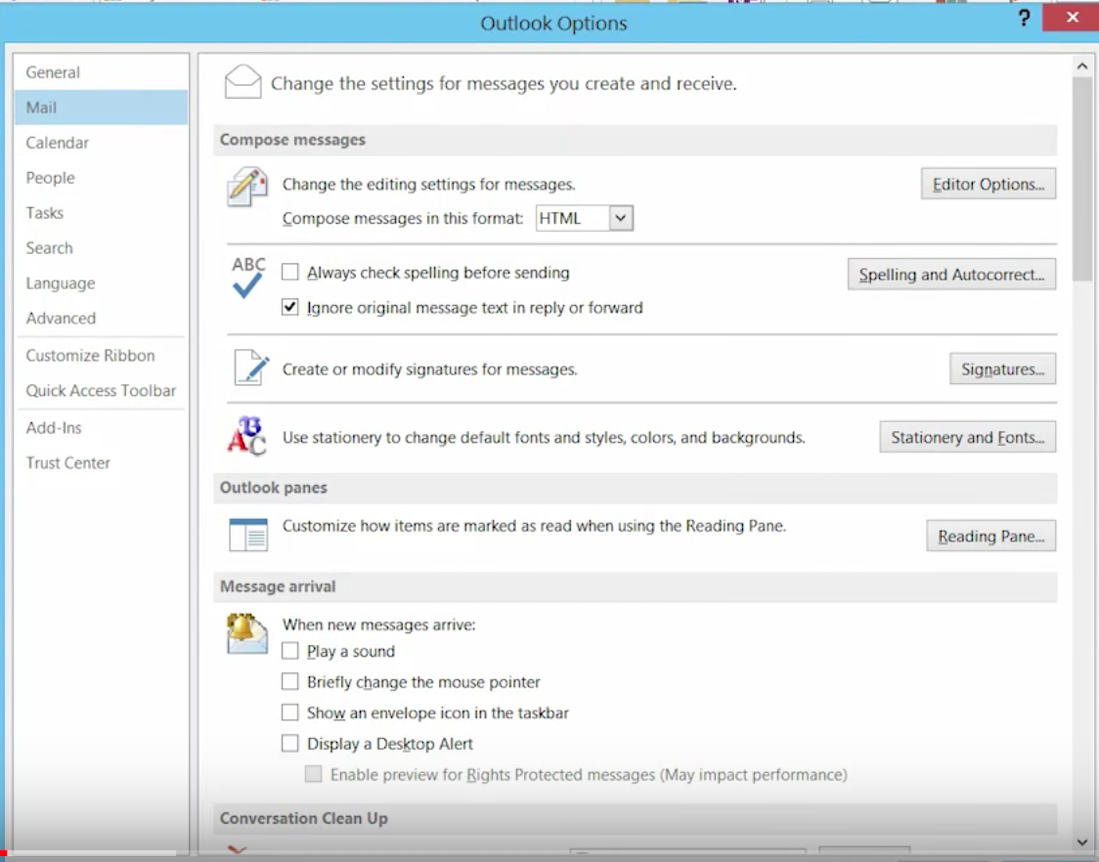
Select “File” and “Options.”
Under “Mail” you’ll see a bunch of options. Here’s where you can select all the notifications and sounds that simply distract you, and that you don’t need. Ah, peace and quiet for a change!
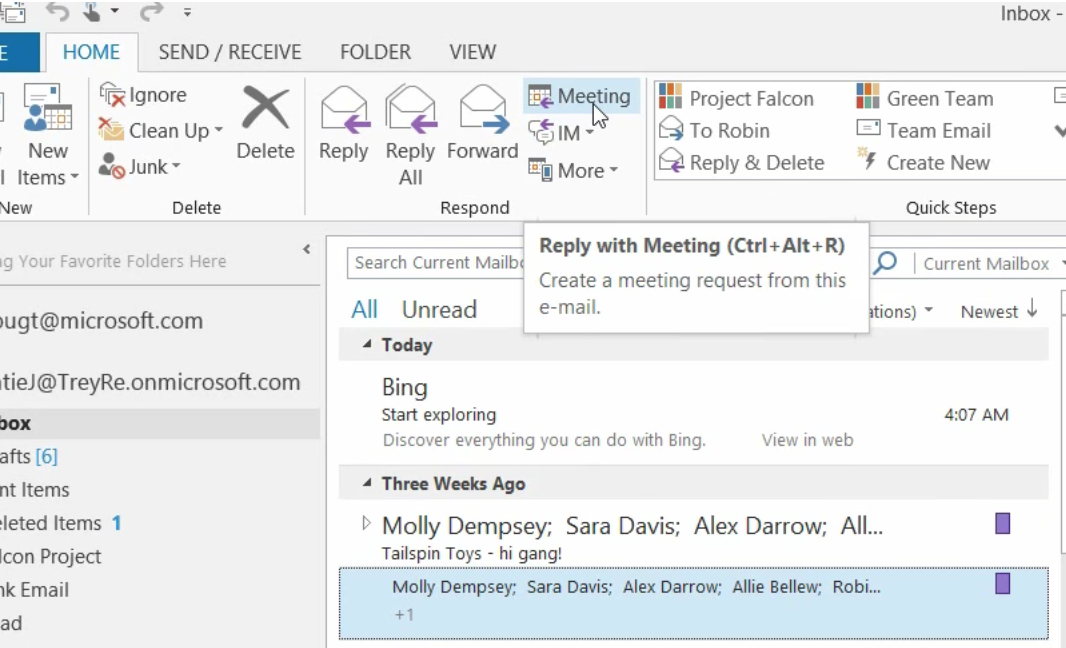
2. Drag Mail to the Calendar
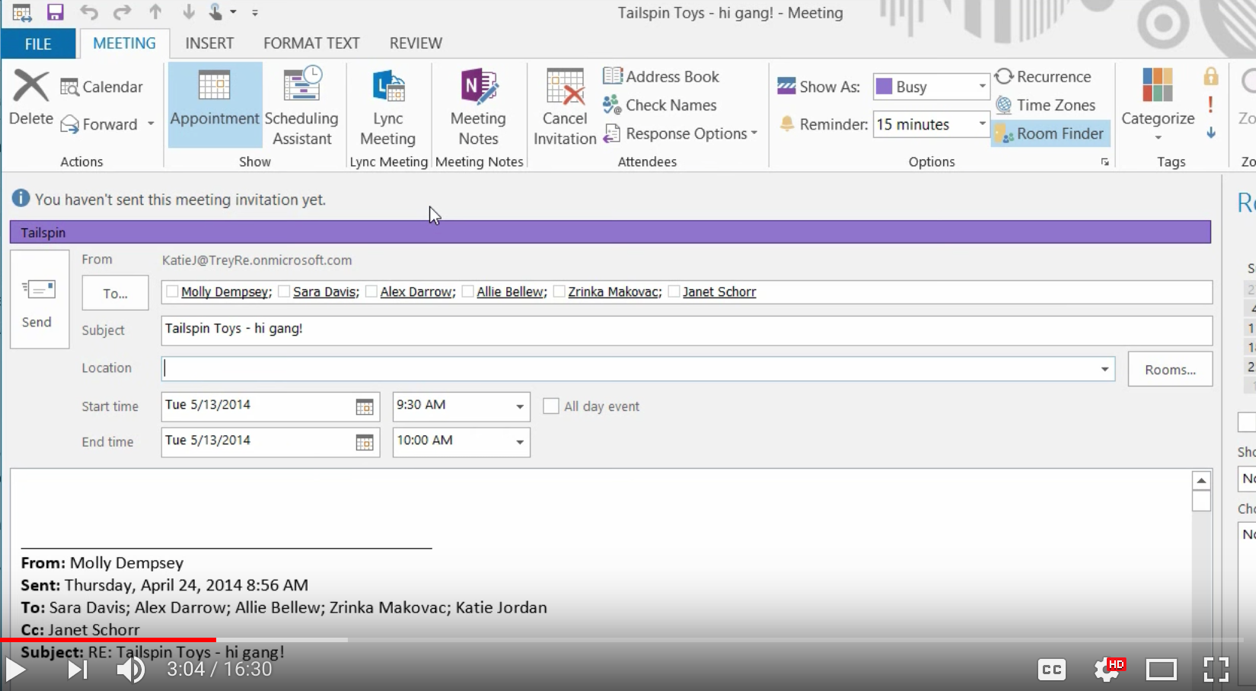
When you’re in an email, and you want to add a meeting to your calendar, simply go up to the top Ribbon where it says “Meeting” and you can “Reply with Meeting” to all the people on the email stream.
Set up the time and place, and then invite everyone.
3. Block Off Time Slots
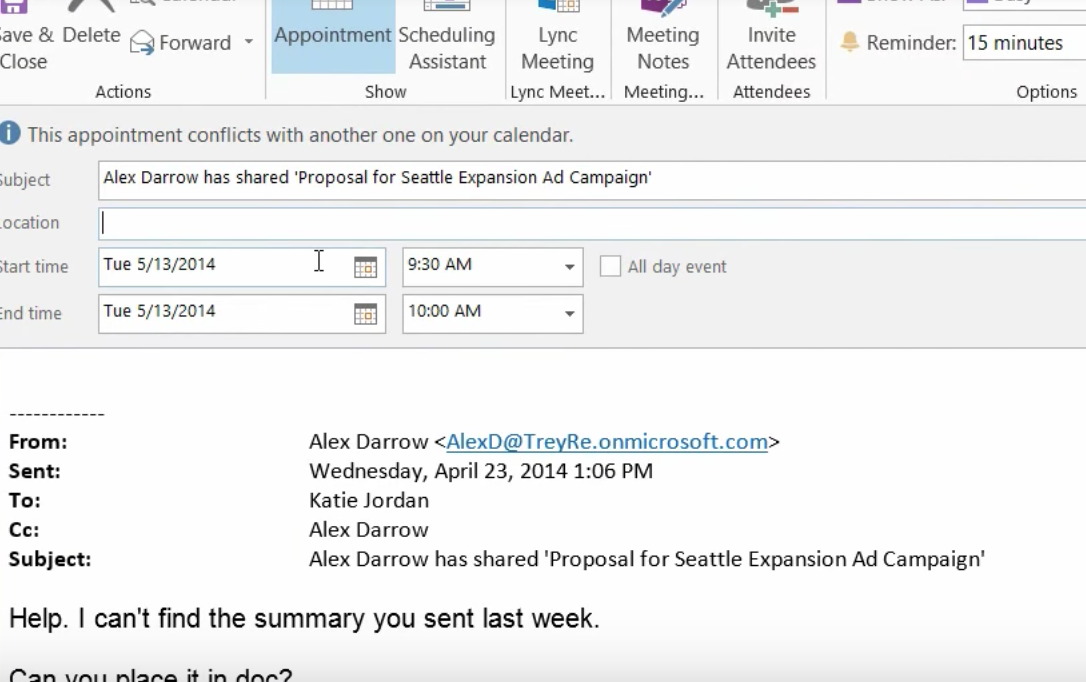
Let’s say someone emailed you a proposal and you need to block off some time to read it. Here’s how to do this right from the email and attachment:
Here’s the email with the proposal marked in blue.
Drag the box down to the left where it says “CALENDAR” and it will create a prompt where you can enter the block of time in your calendar, on the day and time that works for you. It will appear as an appointment in your calendar.
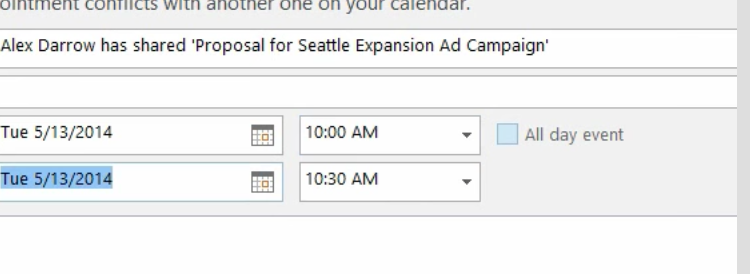
When you’re entering time in your meeting time slot, Outlook does some of the work for you.
Say you want to start at 10:00 am. Simply key in 10 and hit TAB, and Outlook will enter the rest (10:00 AM). You can even enter military time. 15:15 TAB and Outlook will convert it to 3:15PM.
You can do the same with the end time as well.
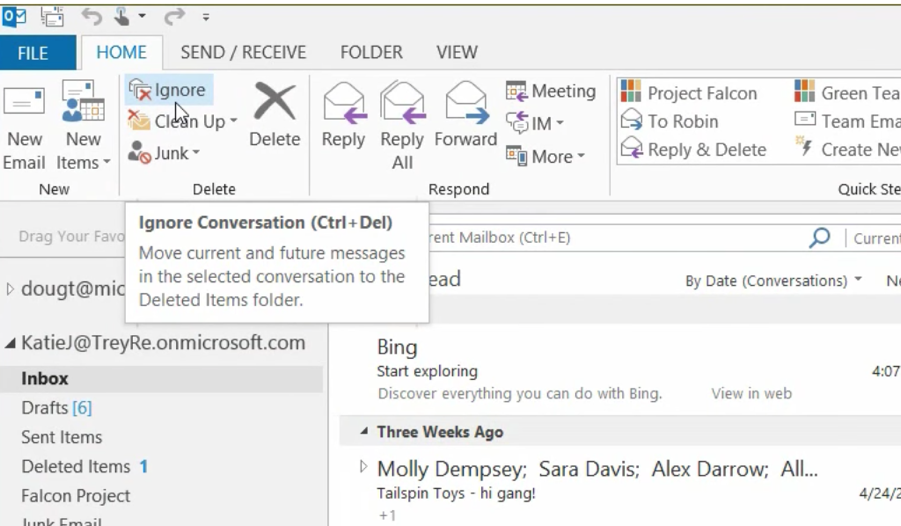
4. The Ignore Button
If there’s an email that keeps appearing in your inbox, but you don’t want to see it anymore, rather than deleting it you can simply go to the Ignore button on the top left, (or Control >Delete) and emails about this subject will automatically go into your Deleted Items.
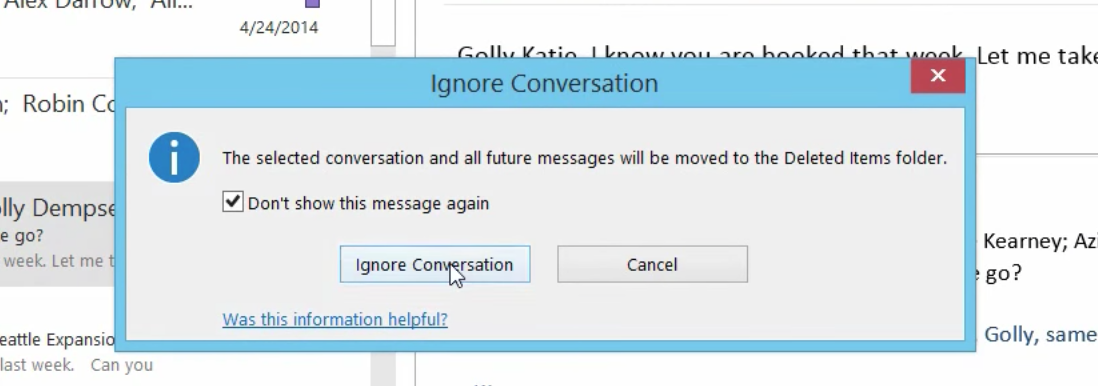
You’ll get this prompt to ensure that you want to delete the message every time. Check “Don’t show this message again” and click “Ignore Conversation.” You won’t be bothered by the message anymore.
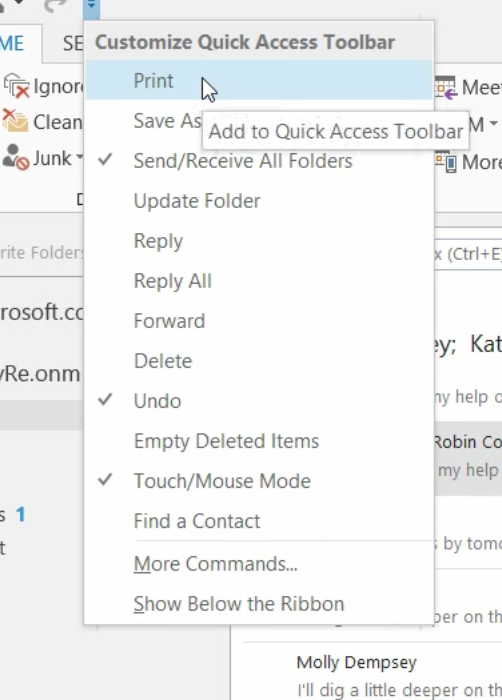
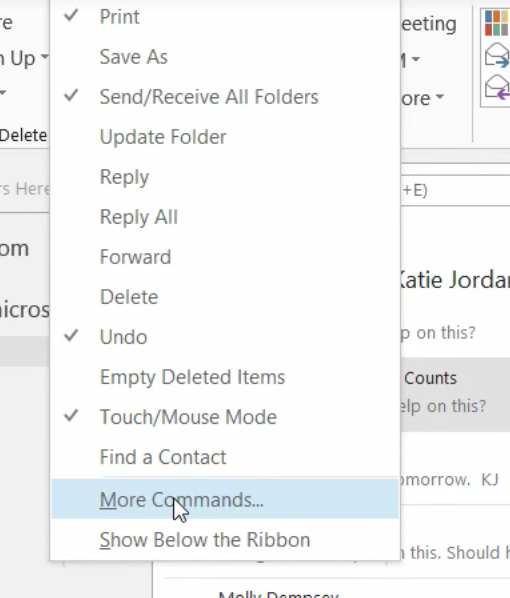
5. The Quick Access Toolbar
Microsoft provides this toolbar in all of their software solutions. You can put some of your most used commands in this toolbar. Simply check the ones that you want to appear. They will always appear at the top of your screen until you remove them.
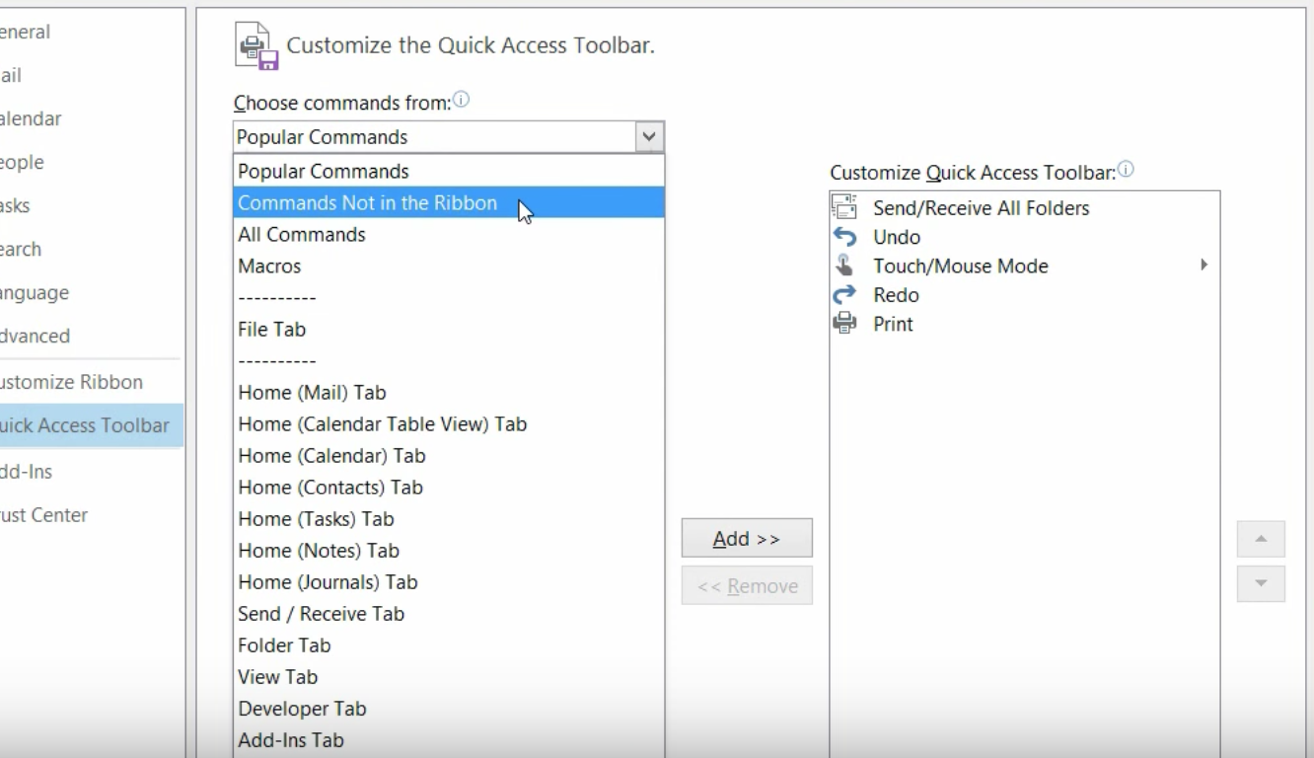
And you can easily add more commands, as you see below.
Simply highlight the commands to the left and click “Add” and they will appear in your ribbon. To remove, do the opposite. Highlight the commands to the right and click “Remove.”
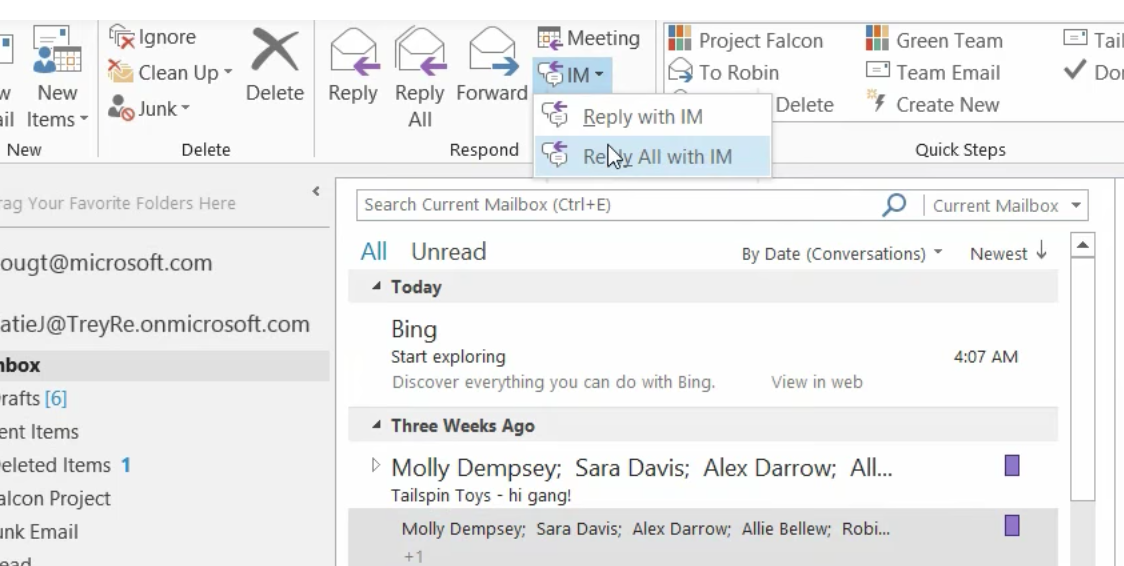
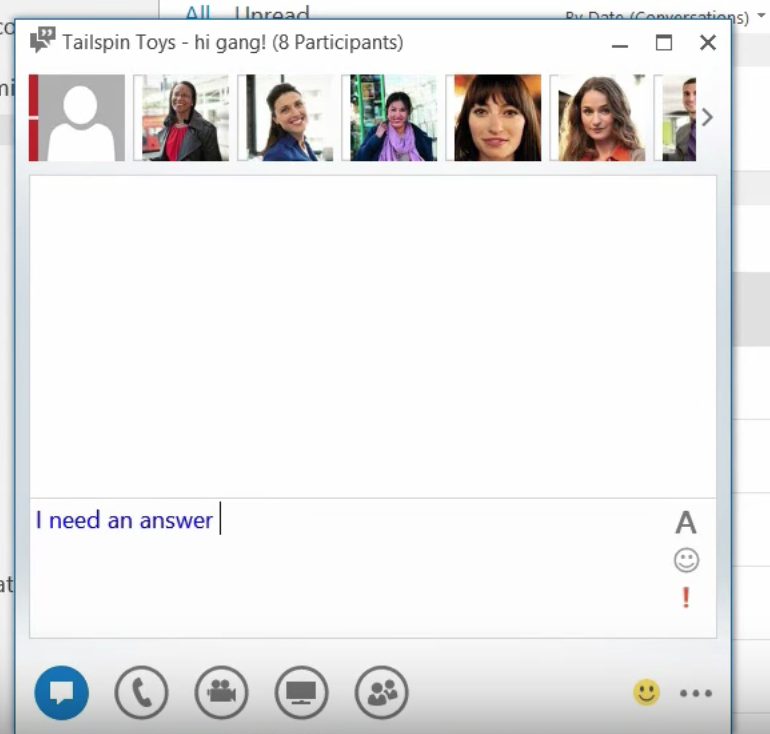
5. Respond Fast with Instant Messaging
Sometimes you need a fast way to get a message to someone, and email isn’t doing this for you. Right from Outlook, go to the top ribbon to: “Reply All with IM”
Now, you can send everyone on your email stream an Instant Message instead of an email. This comes in handy if you need to get a quick message to your team. However, it only works if your team is connected to you with Microsoft Link. If not, you can do this with Skype as well.
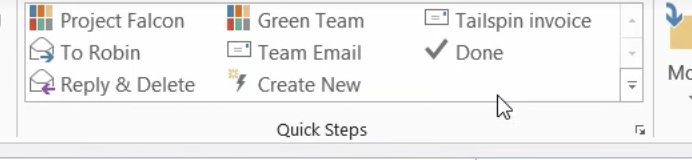
6. Quick Steps
You may recognize this in the top Ribbon. It’s been in Microsoft products since 2010.
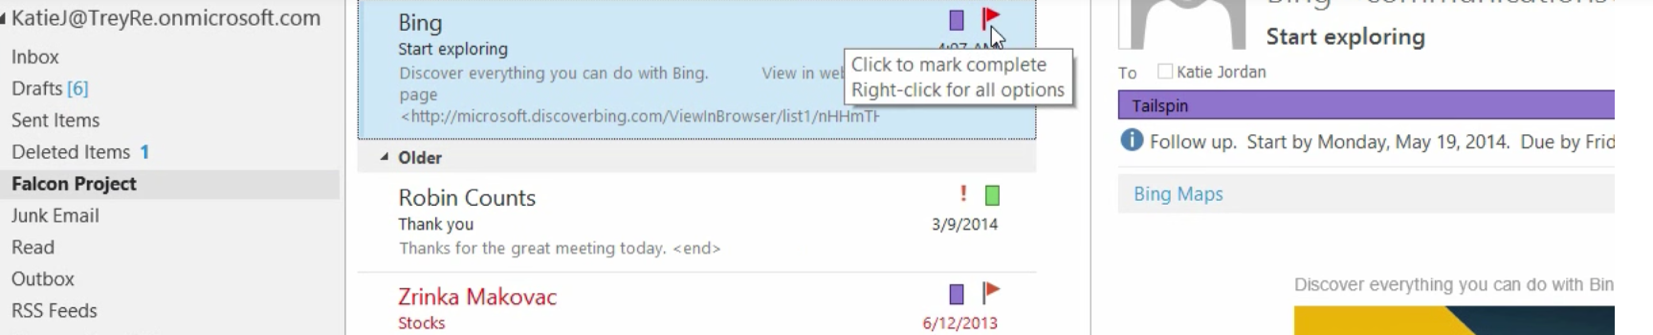
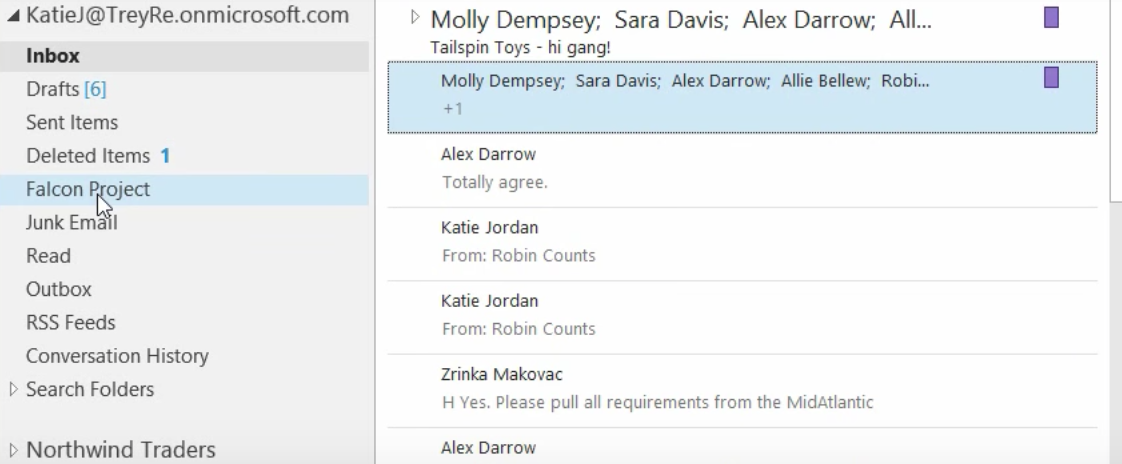
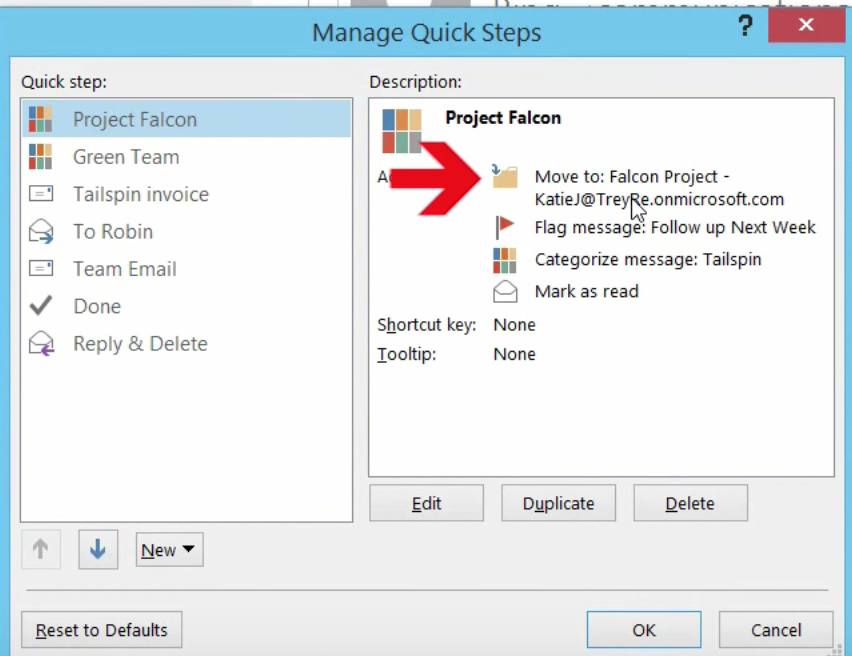
Sometimes you do things manually. Or you may set up Rules. For example, “If the email is from Molly Dempsey save it to Project Falcon.” Or something like this. You can also save commands like this in Quick Steps. Here’s one we set to move the message, mark it as read, tag it, and put a follow-up flag on it.
Quick Steps moved the email, categorized it and marked it as read, just as we specified.
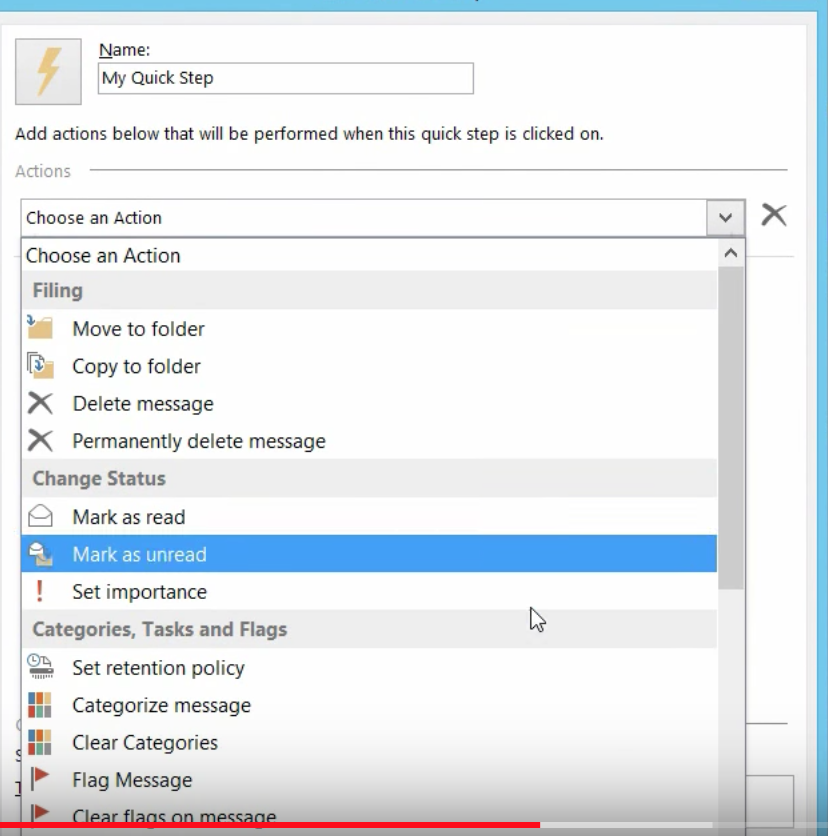
There are multiple actions you can choose from in Quick Steps. Start with “Create New” and your selections will pop up. Click “New Message.” Then preset the email that you think you’ll use over and over.
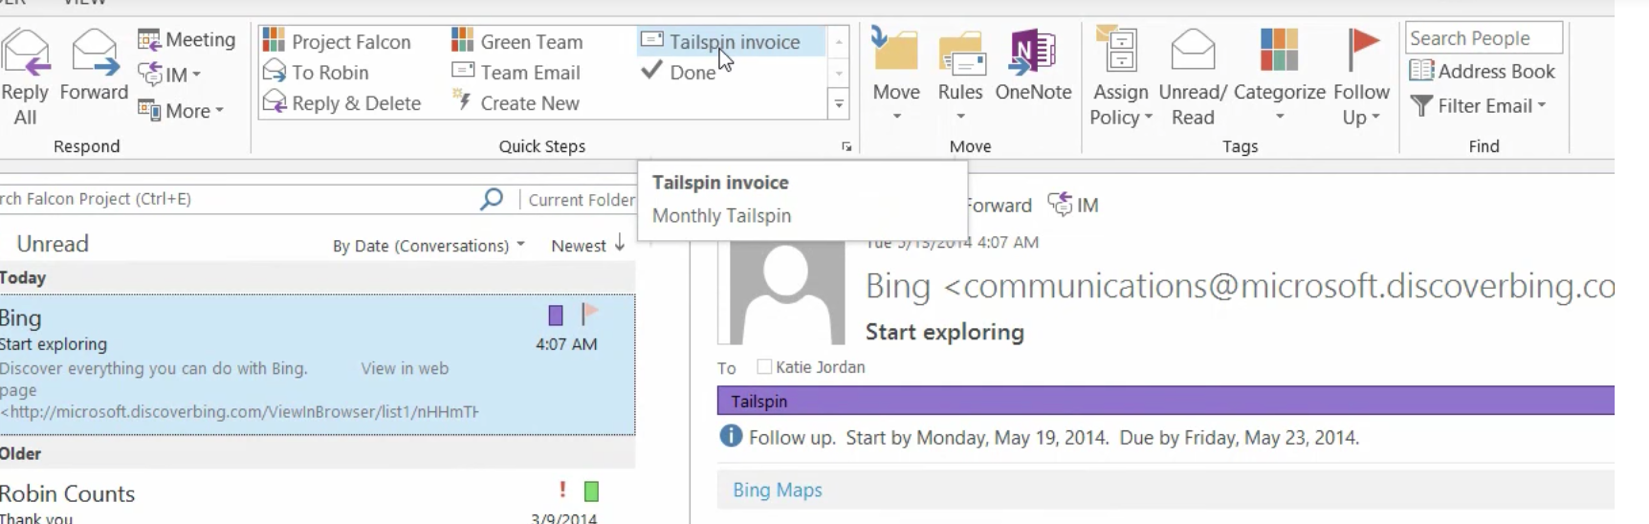
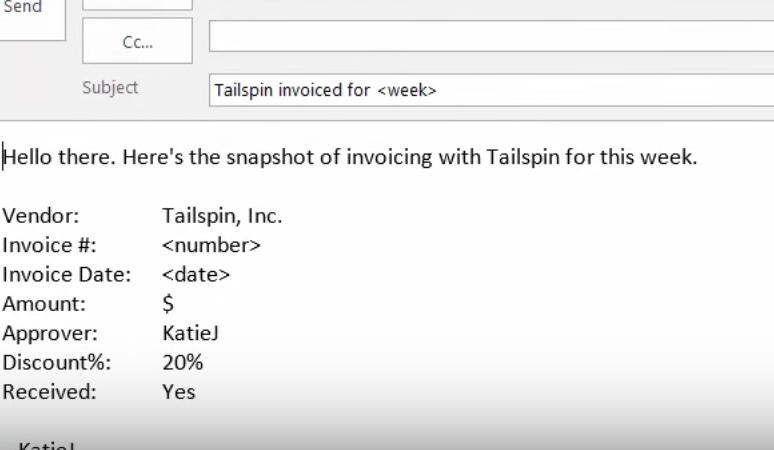
Here’s a Quick Step to create an invoice right from Outlook.
Click the invoice you want (we have one called Tailspin already set up). Outlook will take you to your contact list where you can choose who to send it to.
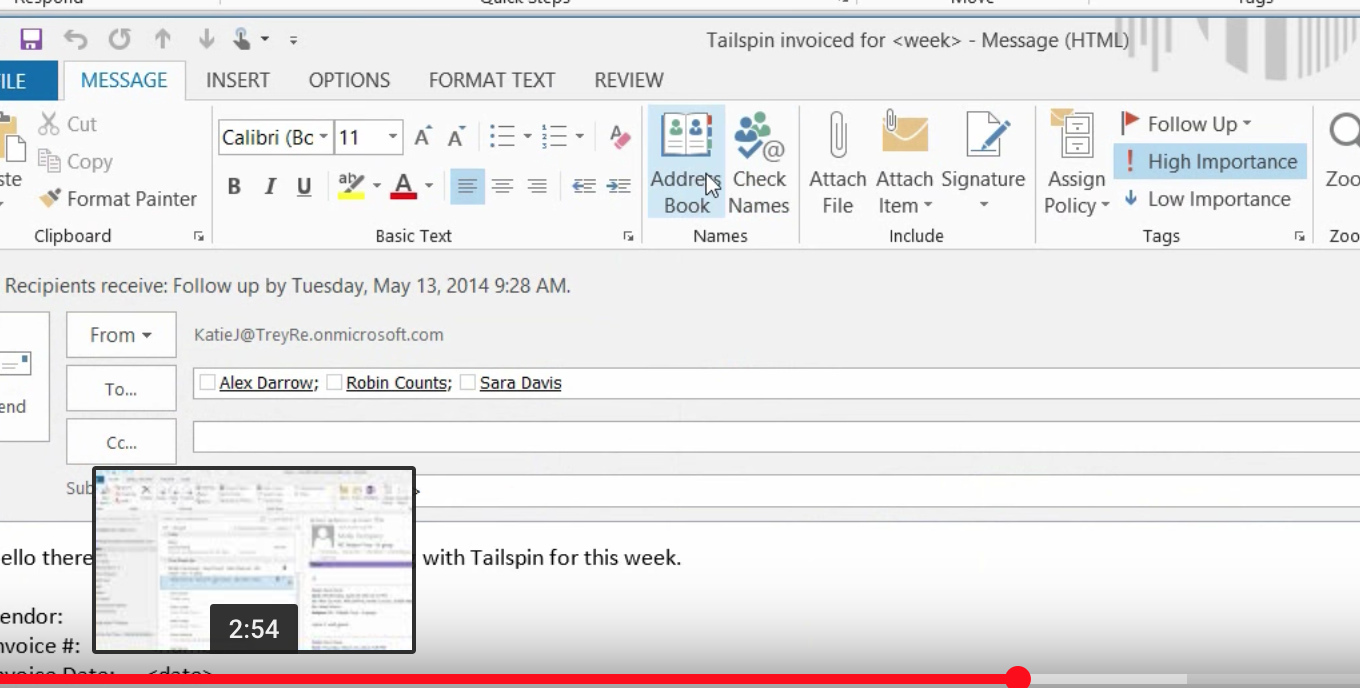
Then we set the importance level as “High.”
And we simply fill in the information in the preset template, send it and it’s done!
7. Out of Office in Advance
Now you can set your “Out of Office” messages in advance. Remember when you had to do this right before you left town? No more.
Here’s how to set it up:
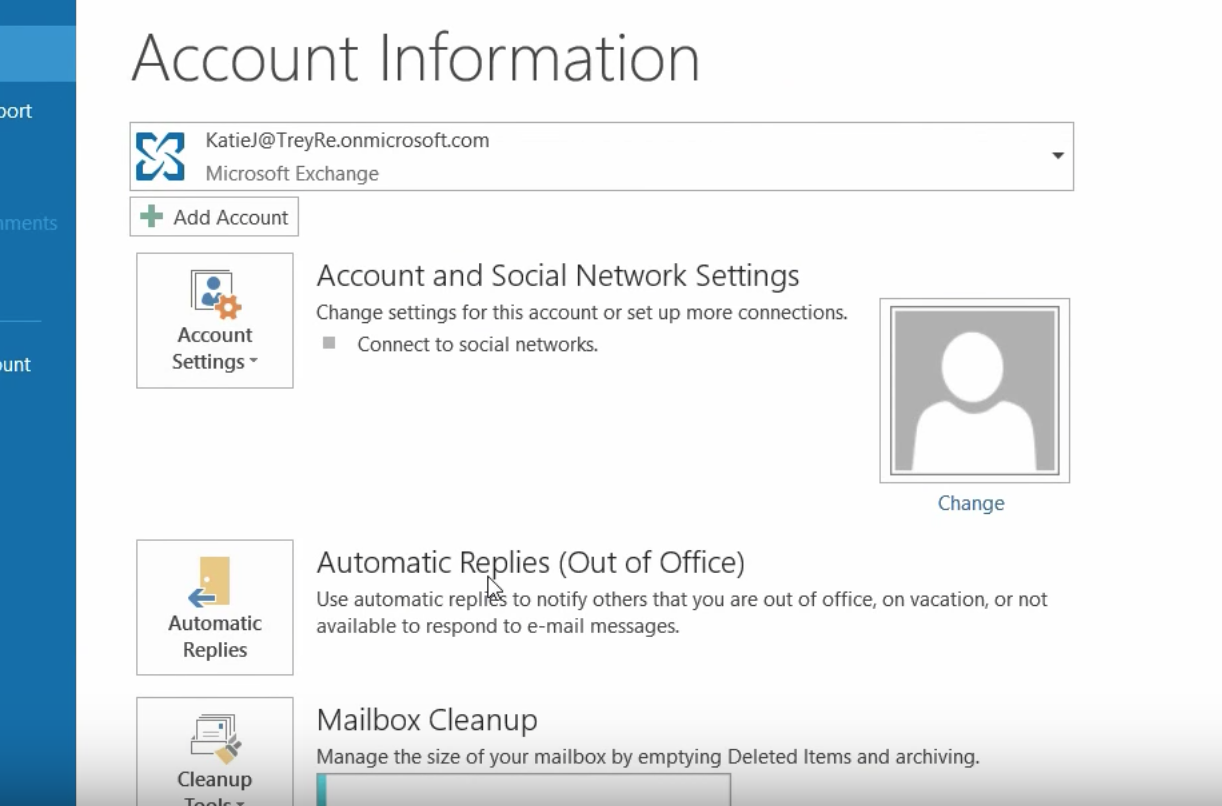
Go to the “File” menu.
Click ” Automatic Replies (Out of Office)
Then set up your parameters.
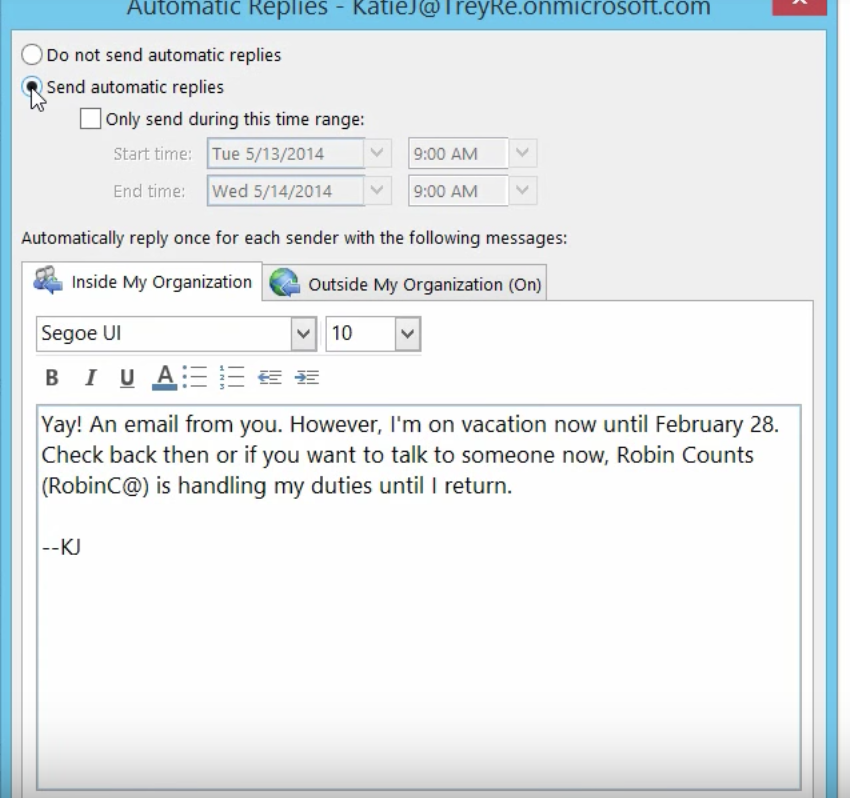
Click “Send Automatic Replies” and type in the start and end date, along with the message you want to send when you’re away.
Check the box that says, “Only send during this time range”. Outlook will remember to send the Out of Office message beginning on the date and time you set and stop on the end date and time.
You can also set Out of Office emails for those emailing you from inside or outside your organization. How easy is that?
8. Search Your Email
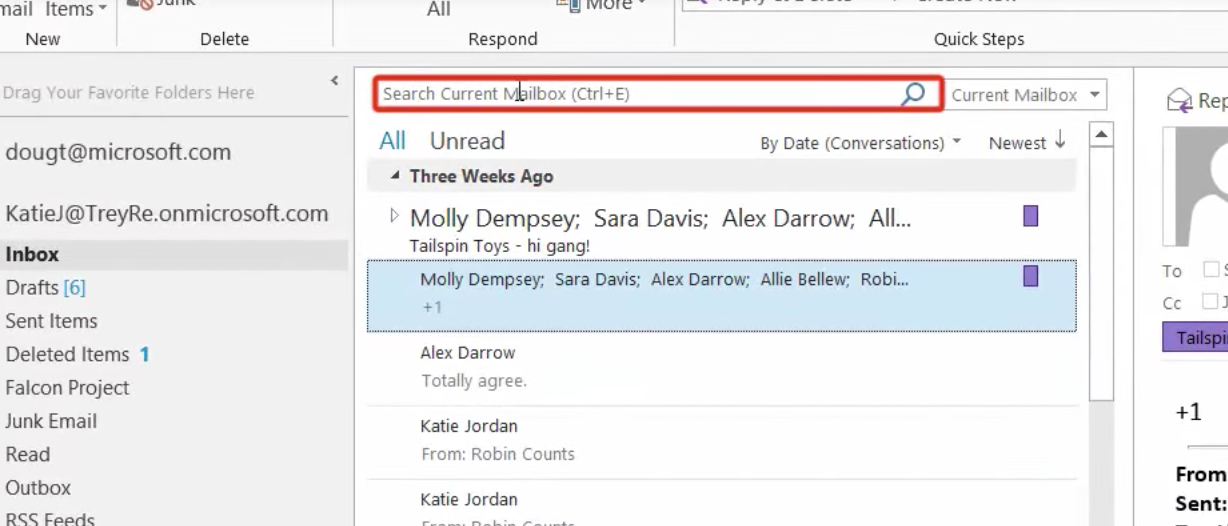
The search box is right above your emails.
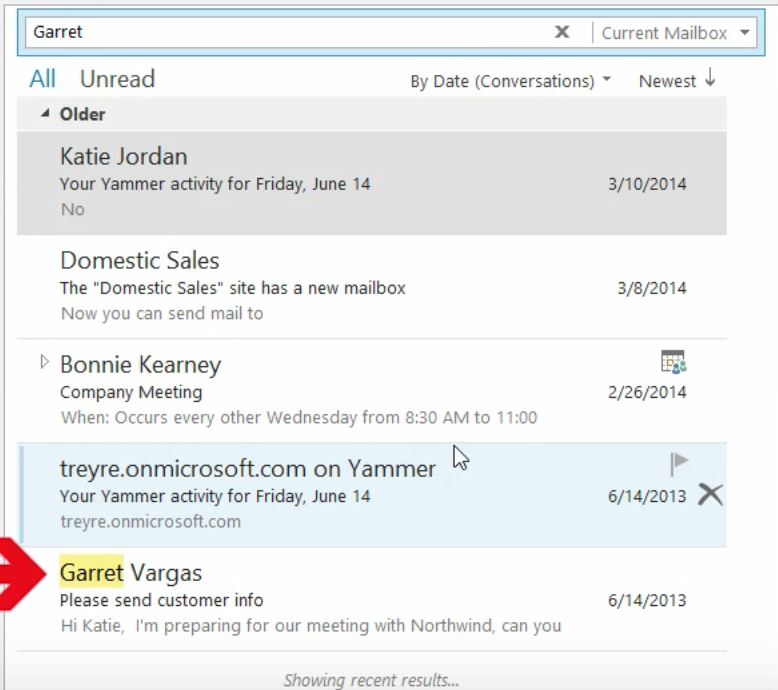
Say we want to find messages from Garret Vargas. All I have to do is type “Garret” and his messages came up.
But as you can see, some other messages popped up here. They probably contain Garret’s name.
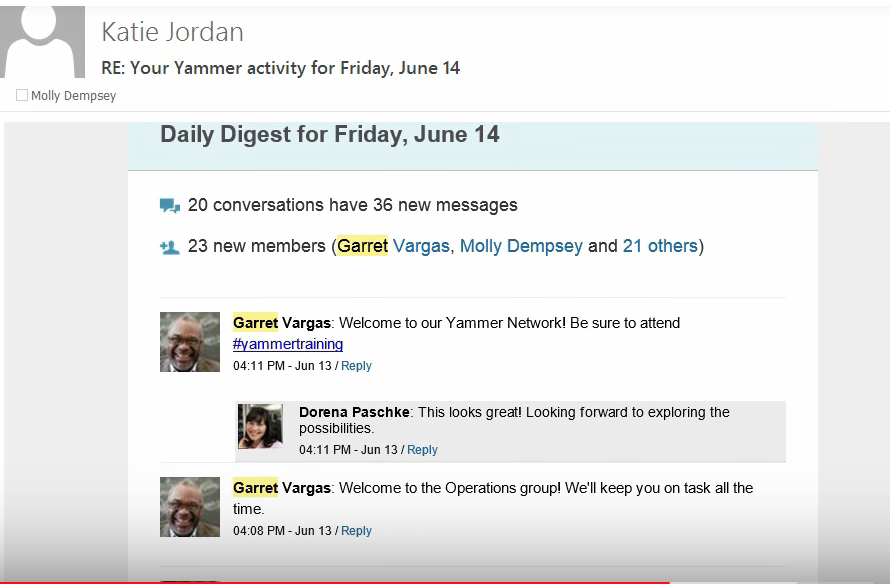
Yes, you can see below that Garret’s name was in Katie Jordan’s message. Outlook search capabilities go that deep into your emails. Outlook will even look in attachments in your emails for what you’re searching for.
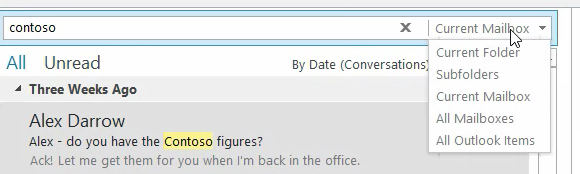
You can also search the Current Mailbox or All Mailboxes.
And, notice that when you’re in Search you have all kinds of options in the top Ribbon.
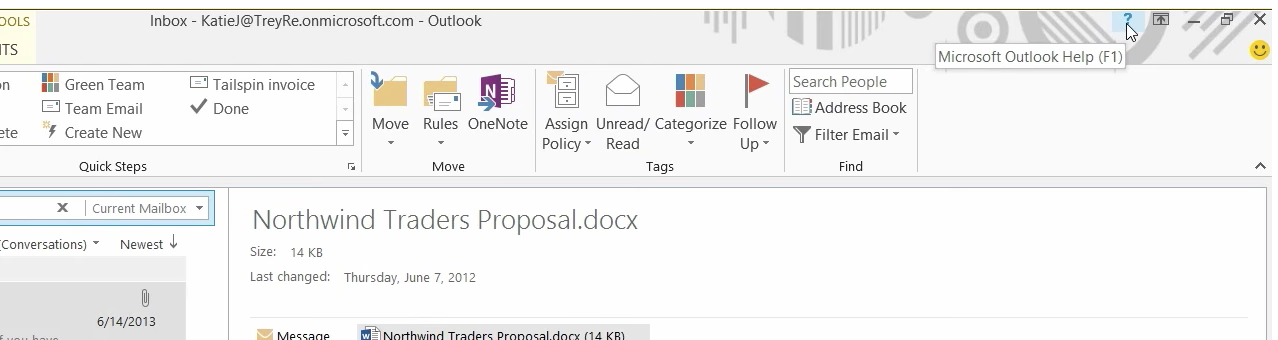
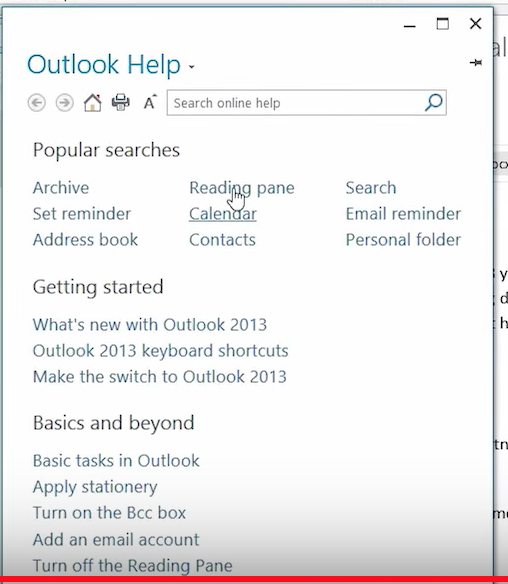
9. Look for ? or press F1 for Help
The ? is on the top right of your screen if you ever need help in Outlook or any Microsoft program.
Or, simply click F1 and the Help prompt will appear.
Microsoft Outlook has many other great features. Keep watching this space for more ways to get the most from Outlook and other Microsoft products.
The new Outlook 2016 has incorporated some cool features, designed to be helpful and make your work day a little smoother. It can look a bit different depending on what version of Outlook you’re using and how your admin sets it up.
What’s New in Outlook 2016?
When you open Outlook, you’ll see six areas. Across the top is that familiar ribbon we’ve all become used to seeing. Above the ribbon, you’ll find the Title Bar which has the File tab, Home tab, Send/Receive, Folder, and View. Across the main section, you’ll find four wide panes of varying widths. Across the bottom is the newest addition to Outlook, the navigation bar.
While on the home tab, you can take a closer look at the four panes or main sections. The narrowest one located on the left contains your inbox, sent, deleted and other items pertaining to your mail folders. The second column contains your messages. Here, you can get a closer look at the items in your inbox. It shows the names and dates of each email. The widest pane shows the contents of the actual email. This section is called the reading pane. If you click on a specific email, you can read it and reply or forward it. The fourth smaller pane to the right contains your calendar and do-to list.
At the bottom, you’ll see the newly added navigation bar. Hover over each item there for a closer look. This is handy because you can access frequently used features or people very quickly here. The dots, which represent “more”, open up a “navigation options” dialog box. There you can change a number of things pertaining to the way your email client is laid out. You can also choose navigation options > compact navigation. This will make the navigation bar smaller. Little icons replace the larger words that were used. The icons can run horizontally across the bottom or vertically along the side.
Reading Pane Too Small?
You may not always need your calendar to stay open. It’s easy to close. Simply click on the arrow at the top to close it. You can also close the folders section located on the far left the same way. By closing these two sections, you’ll now have a much wider email viewing pane. This can be helpful if you have a long or important email to read. If you need to take a quick look at the folders, simply click on the words “All Folders” (far left side, vertically written) and a handy pop-out appears. This pop-out will stay there until you click on “All Folders” again. The navigation pane appears vertically written as well and this configuration can give you the greatest amount of space to work on emails.
In addition, you have the option of manually dragging the borders for each section. This is a quick and easy way to increase or decrease the width of a pane so that your Outlook email works best for your situation.
The New Navigation Pane
In the 2016 version, a navigation pane was added to the bottom. It has links that go out to:
Mail
Calendar
People
Tasks
More – More is represented by small dots in most programs now.
You can hover over each one to learn more about it or access that particular feature. For instance, hover over “People” to see all those listed in your contact list. You can also hover over a specific person to get more information about this person. For each of your contacts, you’ll see small icons along the bottom so you can email, call or video chat with that person. The same is true for each item in the Navigation Pane. Simply hover over your calendar for a quick look at your day, week or month. The calendar in your Navigation Bar performs the same tasks as the actual calendar portion of your Home Page. For that reason, you may find it handy to just leave that Calendar closed and use the one in the Navigation Bar. This will give you more room for emails and other tasks you do on the Home Page.
Taking a Deeper Look at The Ribbon
The Ribbon has been around since Word 2007 and most users are fairly knowledgeable about how to use it. If it’s in the way and you’d like to temporarily remove it, click on the small triangle on the far right side of the page. This collapses the Ribbon. When you want it back, click on the same triangle and it reappears. This works for all Microsoft Office programs, including Word, Excel, and Access.
Of course, there are shortcuts for just about all the actions found on the Ribbon. Many users find it helpful to learn those shortcut keys and use them instead of navigating through the tabs/items on the Ribbon. You can also hide or view the Ribbon by clicking on the View tab. Outlook 2016 is all about making your email tasks much simpler.
Dealing with Emails
Once you get your work area set up so that it’s most efficient for you, it’s time to read and answer a few emails. At the top of each one, you have inline options to reply, reply all, forward or IM. Click on reply and you can just start typing your message. You can also right-click in this area for a list of other options like changing the font and color of your typing. Right-clicking in various areas of the page will always call up a list of other helpful options and this can often prevent you having to reopen the Ribbon to accomplish a task.
When an email has attachments, you can click on the attachment to view it there in the Outlook program. This is true for PDF docs, Word docs, and Excel. This saves you the trouble of having to open Word, Excel or Adobe and this can be a real time-saver. If you do want to open up the specific program and view the document there, simply double click on the attachment.
Show As Conversation
Another helpful feature when dealing with lots of emails from different people on the same topic is the “Show as Conversation” feature found on the View tab. By clicking on “Show as Conversation” you can group all the emails about a specific topic so that they make sense. This prevents you from having to sort through dozens of emails to find all those related to a topic. Once these emails are grouped together, it’s easy to click on one to read or respond to it.
The Clean Up Tool
Like many users, you may have a dozen emails on one specific topic and yet only five of them are actually important and contain good information. The Cleanup Tool can be used to remove those emails that only say something inconsequential like, “I agree” or “Thanks” or contain redundant information. The Cleanup Tool is found on the home page and hovering over it will show three options:
Clean up conversation
Clean up folder
Clean up folders and subfolders
Before the messages are cleaned up, you will get a warning box that asks if you’re sure. Many users find it helpful to clean up messages and folders on a regular weekly basis. This can prevent you from maxing out your Outlook storage limit. Simply run the Clean Up tool each week on folders and emails to keep redundant items from clogging up the works.
These are just a few of the many ways to make Outlook 2016 work more efficiently. By learning these tips and tricks you can save valuable time throughout your day and reduce stress.