Undoubtedly, Office 365 has taken the business world as we know it by storm. With each update that Microsoft makes to Office 365, more and more companies are jumping on the Office 365 bandwagon, and for good reason. This enterprise software has something to offer for just about every business. Some business owners have even identified Office 365 as a major factor behind the success they’ve experienced.
If you’re thinking about making the switch to Office 365, here is some information about the features of this enterprise software that should help you make a concrete decision.
Available on the Cloud
As a business owner, your primary concern should be perfecting your products and services. Unless your business operates within the IT industry, you and your employees shouldn’t have to worry about servers and maintenance. Fortunately, if you decide to switch to Office 365, you and your employees won’t have to.
Office 365 is a cloud-based software. Therefore, you and your employees can use this software primarily on the cloud. However, if needed, you also have the option of integrating Office 365 with the on-premises solutions of your company. Not only will you save money on maintenance costs by using Office 365 on the cloud, but you will also enjoy peace of mind knowing that your data is safe and secure.
Scalability
If you foresee your business growing significantly in the near future, it is in your best interest to consider switching to Office 365. Scalability is one of the most lauded features of Office 365. With Office 365, you only need to pay for the features that you get.
Therefore, in the early stages of your business, you don’t need to worry about wasting money on features that you won’t use. As your business grows, you won’t be forced to switch to another enterprise software to ensure your growing needs are met. Instead, all you will need to do is pay for more services and data storage. By choosing Office 365 from the beginning, you will save yourself a lot of time and trouble.
Access Anywhere and Anytime
In many organizations, the productivity of employees is limited significantly by the lack of access to documents and data anytime and anywhere. If you want your employees to be able to access anything required for work from home, coffee shops, and elsewhere, you should consider getting Office 365. Since Office 365 is available on the cloud, this software will make it possible for your employees to be productive hundreds of miles away from their desk in the workplace. Also, your employees won’t be forced to work from a laptop or desktop computer. Office 365 makes it possible to be productive working from a tablet or even an iPhone.
Simplified Migration
One concern that many business owners have when it comes to switching to Office 365 is the migration process. If you also have this concern, you will be happy to know that Microsoft has made migrating to Office 365 incredibly easy. This is true no matter what storage tools your business is using currently. Also, once you make the switch to Office 365, you will never need to worry about migrating your data once more in the future because Microsoft is constantly making updates to Office 365. Microsoft strives to make timely updates to Office 365 to ensure this enterprise software continues to meet the needs of businesses across the world.
Unification of Your UI
Another issue that many businesses have is needing to use a plethora of software and apps to accomplish various tasks. If you want your employees to be able to enjoy a more unified UI, you should consider switching to Office 365. Office 365 has a business app for just about everything your employees need to do. Microsoft regularly releases new business apps on the Windows Store and quite a few of these apps are free. If you don’t want your employees to have to deal with a crowded home screen, you can pick and choose the apps you know your employees will need to use and add them to the Office 365 home screen. That way, your employees will be able to access these apps easily.
Another advantage of having your employees use Office 365 for all their needs is that they don’t need to worry about compatibility between apps. Since all of these apps are developed and/or managed by Microsoft, these apps will be compatible with each other. Not having to deal with compatibility issues on a regular basis will boost the productivity of your employees.
New Bug Updates and Features
If you’ve used other enterprise software in the past, chances are you’ve been frustrated with the lack of bug updates or new features. In some cases, you may have had to wait a few years for the release of a new product or update. Fortunately, if you switch to Office 365, you won’t have to deal with this frustrations anymore. As stated above, Microsoft releases updates and bug fixes regularly and you will have access to these updates as soon as they’re released.
Data Loss Prevention
As you probably know, data is the lifeline of most businesses. Accordingly, most businesses do everything in their power to secure their data and prevent data loss. One reason many businesses are switching to Office 365 is that this enterprise software makes data loss prevention so easy. Office 365 comes with a multitude of backup and data protection features that will allow you to enjoy peace of mind.
With each passing day, more and more companies make the switch to Office 365, an enterprise software that is frequently lauded as an all-in-one package. Switching to Microsoft’s Office 365 can put your business on the path to success and prosperity in the near future. For more information about why your company should switch to Office 365, don’t hesitate to contact us.
Phishing is one of the most dangerous forms of identity theft. It’s usually presented in the form of pop-ups or spam emails. The majority of account takeovers come from simple phishing attacks where someone in an organization gets tricked into releasing private credentials and information.
Never give your contact details over the phone. This includes user IDs, passwords, Social Security numbers or other personal information. The IRS, a bank, Microsoft or other legitimate organizations will never call and ask you for this information.
Be suspicious of every email. Never click on a link or open an attachment in an email without verifying the sender’s identity and intent. Always be suspicious of any email asking you to verify information, send money or pay an overdue invoice.
Don’t respond to a CEO request for urgent payments. There have been numerous cases where a CEO’s contact information was spoofed and used to convince employees to send money to scammers. Contact the CEO directly to determine if this is a fraudulent request.
It doesn’t take long for a hacker to steal your company secrets.
More Tips To Share With Your Staff
Be cautious about opening attachments. They may contain malware that can infect your computer.
Type in URLs and email addresses, don’t click the link email.
Use Two-Factor Authentication. It requires both your password and an additional piece of information to log in to your account.
Always update your applications and operating system. Don’t delay, as they will protect your computer and network from the latest threats.
Back up your files to an external hard drive or cloud storage to ensure you have a duplicate of all your files and applications if your network is compromised.
What Else You Can Do
Ask our IT Security Experts to provide a layered and managed security protection for your technology. A layered security approach combines best-in-class firewalls, web-filtering, and software-update services to protect your network from viruses, malware, and hackers.
Tell your employees to let you know if they experience the following:
They can’t open their files, or they get error messages saying a file is corrupted or contains the wrong extension.
A window pops up with a ransomware program they can’t close. This window may contain a message about paying a ransom to unlock files.
A message says that a countdown has started for a ransom to decrypt files and that it will increase over time.
They see files in their directories with names like “How to decrypt files.txt or decrypt_instructions.html.”
Have questions?
Our team can conduct Security Awareness Training for your employees. This way they’ll know what to do if they get a phishing email.
This great tip comes from Karen Turner of Turner Efficiency in Calgary, Alberta, Canada.
Draw a line down your page so you can immediately distinguish notes from tasks/to-do’s/follow-up actions.
When has a meeting or a class ended without you having to do some follow-up? Not often, I bet. That’s why a line is so effective.
Use the outside 1/3 of the page for all the “after” actions so they’re easy to see, especially when you fan your notebook’s edge.
Use the inside 2/3 of the page for notes.
Finally, for fast filing, rip out the page and put the 2/3 notes part in the file and the 1/3 actions part on your desk for follow-up.
Granted, this won’t win you any tidiness awards, but it will ensure that your files are compliant and, at the very least, save you from searching through notebooks.
With everyone so busy these days, people are searching for new ways to get more done and Microsoft Planner is an excellent tool for that. It allows teams and individuals to collaborate on any project in real time. It has so many great features that can streamline projects, helping you to achieve deadlines while producing better work.
Each year, Microsoft works diligently to update its product line with helpful features for all products including its Planner. These features are designed to give users greater insight into project schedules, receive notifications of upcoming deadlines, and filter tasks accordingly.
The latest and one of the most useful features for the Microsoft Planner enables users to publish tasks to their Outlook calendar. This handy feature allows users to view their Outlook calendar alongside their personal calendar. This can give you a much better idea of what’s coming up and what projects you need to work on first.
There are numerous other features like this that can cut time and stress out of your day. Since many are not familiar with these new functions, we’re going over them to give users a bird’s eye view of some of the most important new updates in MS Planner.
First things first: what to know about Microsoft Planner
MS Planner is a sophisticated work management app that comes as part of Office 365. Today, millions of businesses and offices worldwide are using Office 365. This product is part of Microsoft’s cloud-based environment that includes well-known programs such as Word, PowerPoint, Excel and OneNote.
MS Planner offers its users the ability to organize any project, share files with others or even collaborate on a project. It features a very handy chat environment where employees can get together and discuss a project while jointly viewing files.
The Outlook Calendar
As a busy individual, you are probably looking for anything that can make your life simpler. Having a work calendar that integrates with your personal calendar is a big time-saver. You can now view or import Planner tasks into your Outlook calendar. Adding the task to your Outlook calendar can be accomplished using the iCalendar feed. This creates a link that members can share with others.
Publishing an iCalendar feed is simple as well. Start by tapping the ellipsis at the top of your page, then select the Add plan to Outlook calendar from the drop-down menu. A dialog box appears giving you the option to Publish or Unpublish your plan’s schedule and other information. By selecting Publish, you can automatically send scheduling information to anyone with the iCalendar link. Now that person can open the plan in their own personal Outlook program.
Please note that you must be the plan owner in order to view and work with this feature. In addition, your admin has the ability to turn this feature off when setting up MS Planner.
Visually organizing your work
MS Planner allows users to organize their tasks into buckets. This feature makes it easy to categorize each task based on several factors. A task can be organized by the task owner, the status, the due date and other dynamics. You can designate a task as a Favorite or check to see which tasks are due first. Updating the status of any assignment or handing it off to another staff member is easy to do because tasks in Planner can be dragged and dropped between columns.
You might want to check and see who’s working on a specific task or whether a task is overdue. Each plan has its own Board with Charts view. By checking the Charts view, users can see the overall progress of the task. Who’s been working on it? What still needs to be done? The Charts view gives you lots of important information about any task.
Adding iCalendar link to Outlook
Click on the option called Add to Outlook to add the plan to your own Outlook calendar. This prompt opens up your personal Outlook calendar in Outlook on the web. The dialog box contains the same iCalendar link and the calendar name (which you can change if you’d like to rename the plan.) Once you’ve created an iCalendar link, you can then paste it into any iCalendar app. Users who have the link can easily view your plan’s task information.
Adding a plan to your Outlook calendar if not the plan owner
Sometimes the plan owner will want to share their iCalendar link with you so that you can add it to your personal Outlook calendar. To accomplish this, click on the ellipsis at the top of the plan and select Add plan to Outlook calendar in the drop-down menu that appears. Now you’ll have the option to review everything before saving it. Once the plan is saved, all info is imported to Outlook. You can view the details using Outlook. The plan now appears under People’s calendars. Select the plan to view all the details.
This is the final of a three-part series about using Microsoft Excel 2016. It will cover some of the more advanced topics. If you aren’t great with numbers, don’t worry. Excel does the work for you. With the 2016 version of Excel, Microsoft really upped its game. Excel’s easy one-click access can be customized to provide the functionality you need.
If you haven’t read Part I and Part II of this series, it’s suggested that you do so. The webinar versions can also be found on our site or on YouTube.
This session will discuss the following:
More with Functions and Formulas
Naming Cells and Cell Ranges
Statistical Functions
Lookup and Reference Functions
Text Functions
Documenting and Auditing
Commenting
Auditing Features
Protection
Using Templates
Built-In Templates
Creating and Managing Templates
More With Functions And Formulas
Naming Cells And Cell Ranges
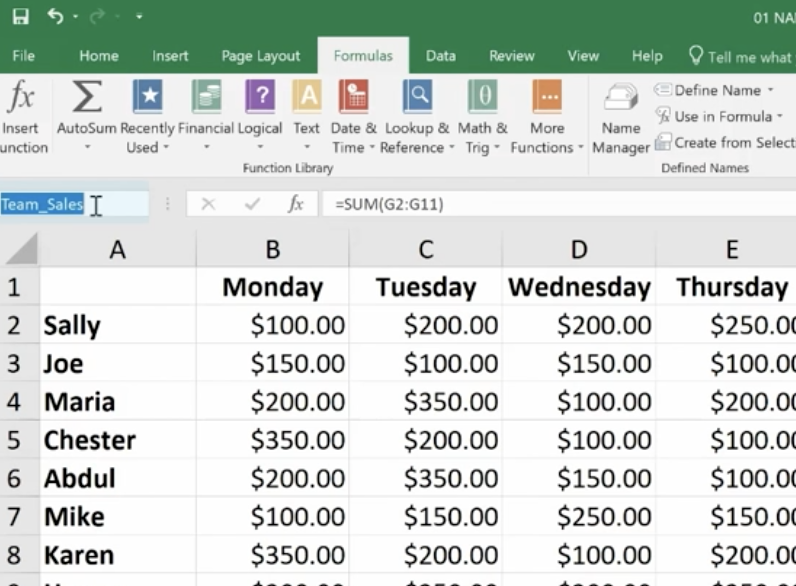
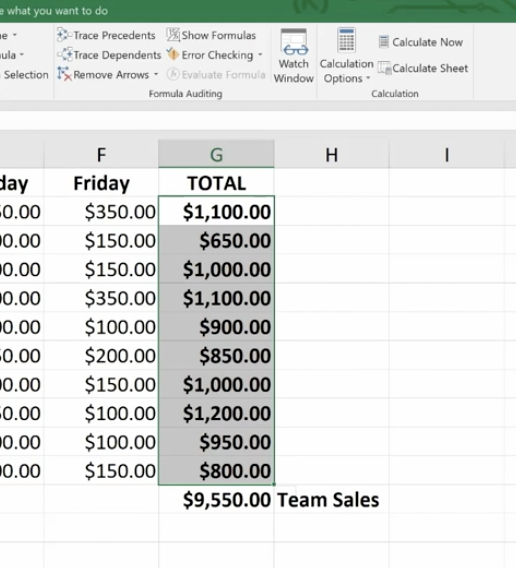
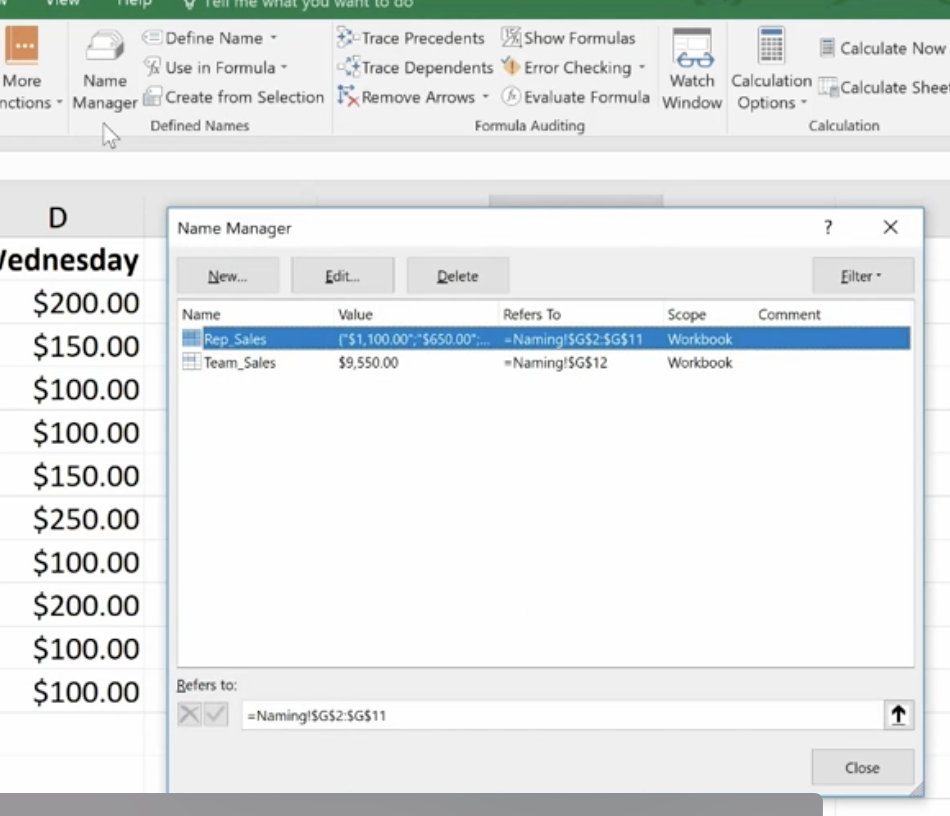
How do you name a cell? You do so by the cell’s coordinates, such as A2 or B3, etc. When you write formulas using Excel’s coordinates and ranges you are “speaking” Excel’s language. However, this can be cumbersome. For example, here G12 is significant because it refers to our Team Sales.
You can teach Excel to speak your language by naming the G12 cell Team Sales. This will have more meaning to you and your teammates. The benefits of naming cells in this fashion are that they are easier to remember, reduce the likelihood of errors, and use absolute references (by default).
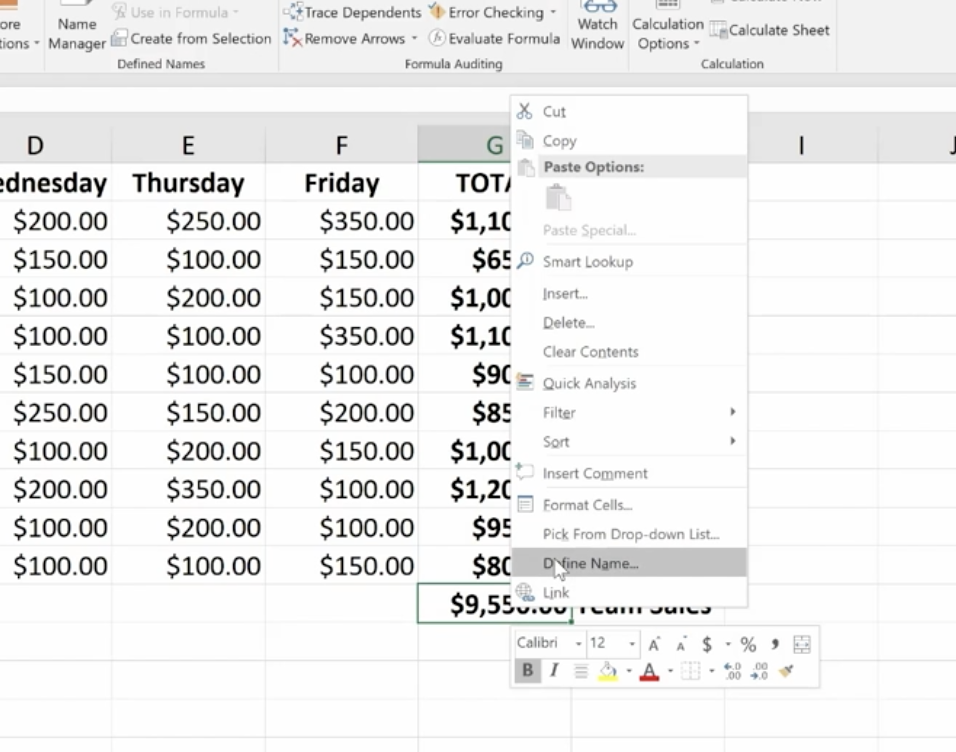
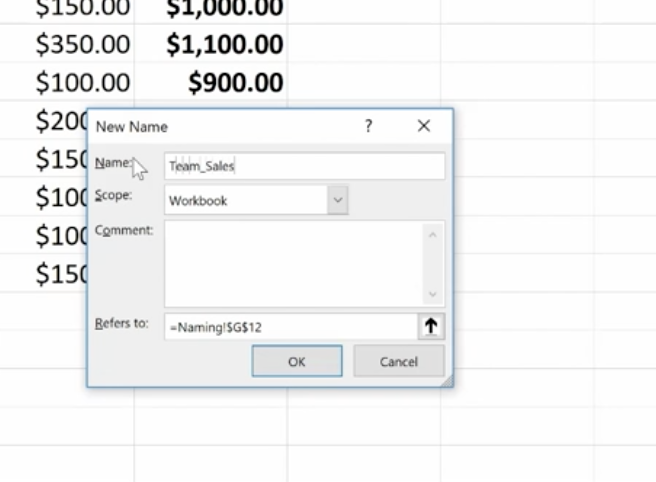
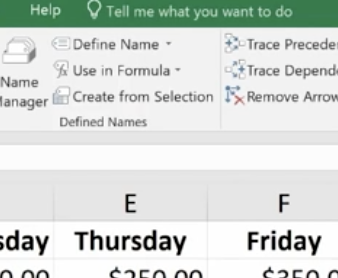
To name our G12 cell Team Sales, right-click on the cell, choose Define Name, and type “Team Sales” into the dialog box. You can also add any comments you want here. Then click Ok.
Another way to do this is to click on the G12 cell and go up to the Name Box next to the Formula Bar, then type your name there.
And, there’s a third option at the top of the page called “Define Cells” that you can use.
Notice that there’s an underscore between Team and Sales (Team_Sales). There are some rules around naming cells:
You’re capped at 255 characters.
The names must start with a letter, underscore or a backslash (\).
You can only use letters, numbers, underscores or periods.
Strings that are the same as a cell reference, for example B1, or have any of the following single letters (C,c,R,r) cannot be used as names.
How To Name A Range
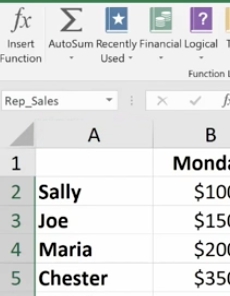
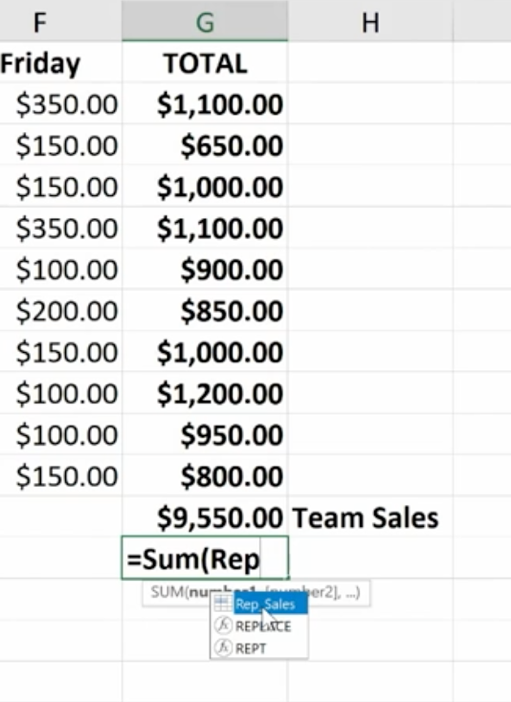
Highlight an entire range of cells and name your range (we’re doing this in the upper left-hand corner).
Then you can easily use the name to produce the sum you need:
You won’t have to go back and forth from spreadsheet to spreadsheet clicking on specific cells to calculate your formula. You simply key in the name of the cell range you want to add. Just be sure to remember the names as you build your spreadsheets over time.
If you ever make a mistake or want to change names, you can go to Name Manager to do this.
Remember that if you move the cells, the name goes with it.
Statistical Functions
The three statistical functions are:
Average If
Count If
Sum If
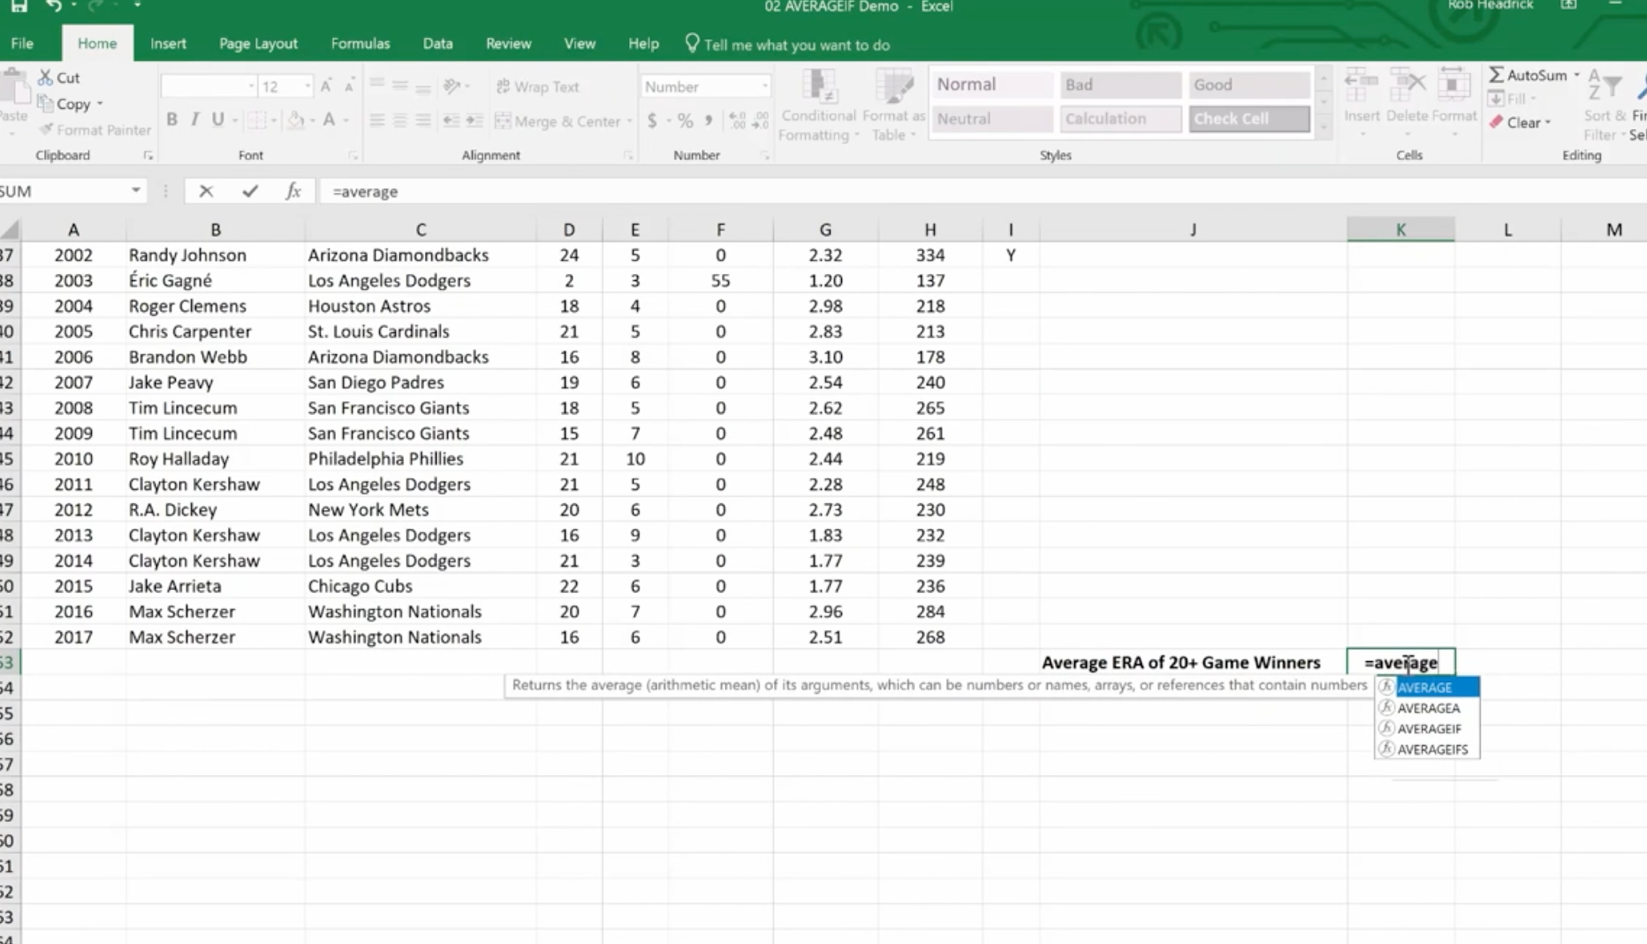
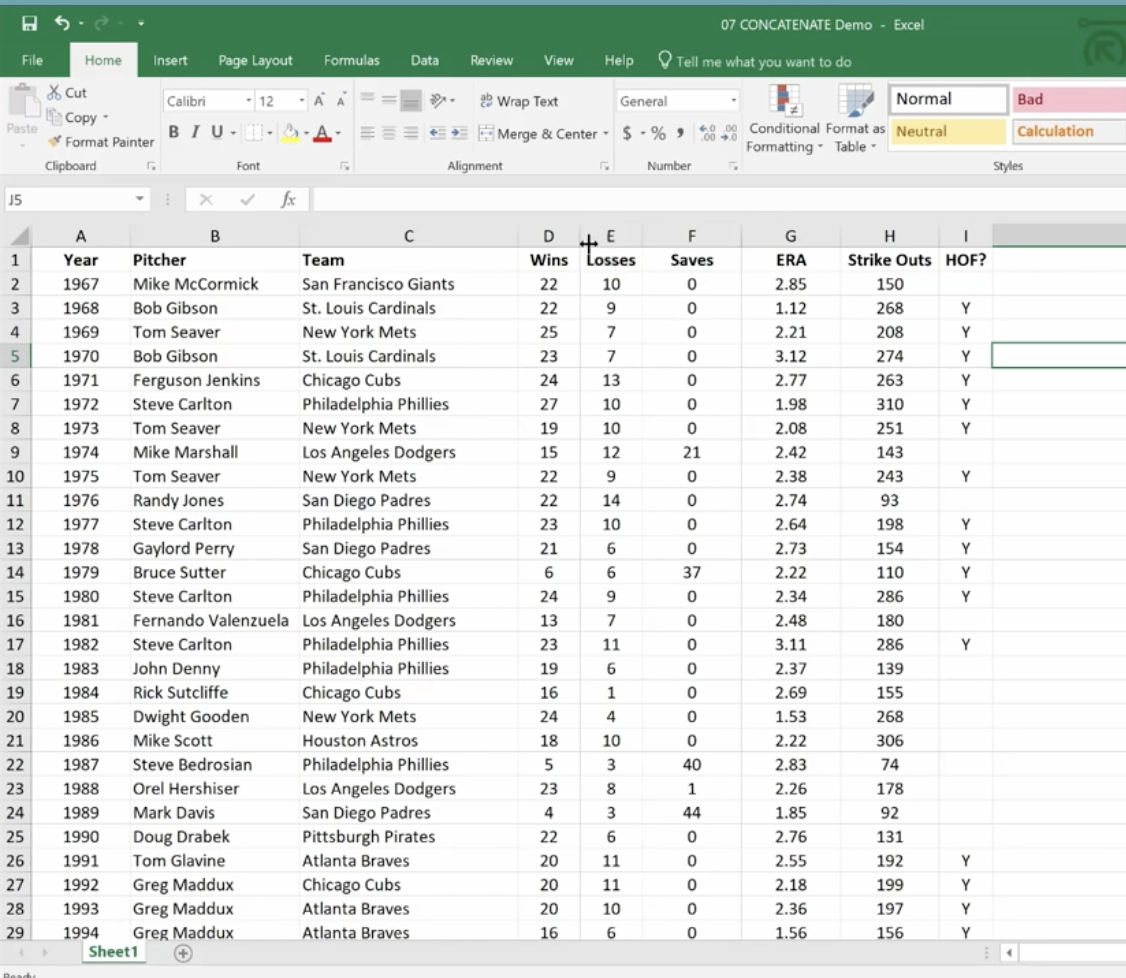
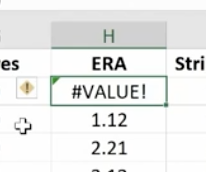
The Average If can be used to figure out the average of a range based on certain criteria. Here we’re going calculate the Average If of the ERA of 20+ Game Winners from the spreadsheet we developed in our last session.
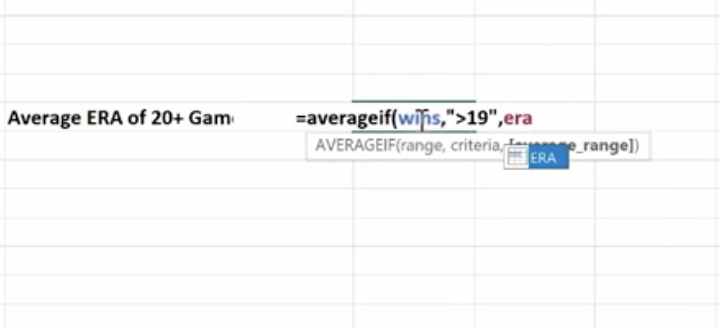
We’ve already named some of our cell ranges (wins, era). And we want to know the average greater than 19.
Hit Enter and you have the average.
You can use this feature across a wide variety of scenarios. For example, if you wanted to know the average sales of orders above a certain quantity – or units sold by a particular region, or the average profit by a distinct quarter.
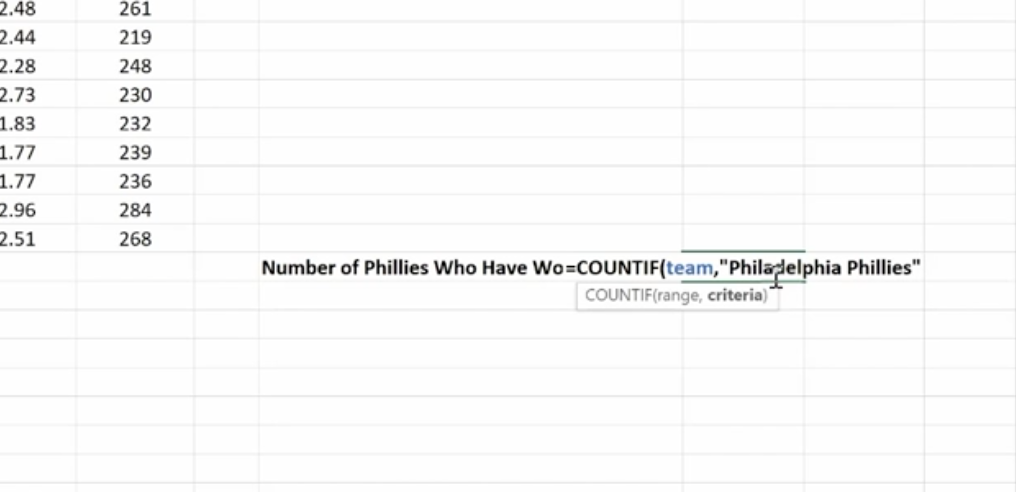
Count If is used for finding answers to questions like, “How many orders did client x place?” “How many sales reps had sales of $1,000 or more this week?” or “How many times have the pitchers of the Philadelphia Phillies won the Cy Young Award?”
As you can imagine, it’s essential that you type in the text exactly the way you named that particular cell.
Hit Enter and you get your answer
Now we’re going to use the Sum If function to calculate the number of strikeouts by the pitchers on this list who are in the Baseball Hall of Fame.
Sum If is a good way to perform a number of real-world statistical analyses. For example, total commissions on sales above a certain price, or total bonuses due to reps who met a target goal, or total earnings in a particular quarter year-over-year.
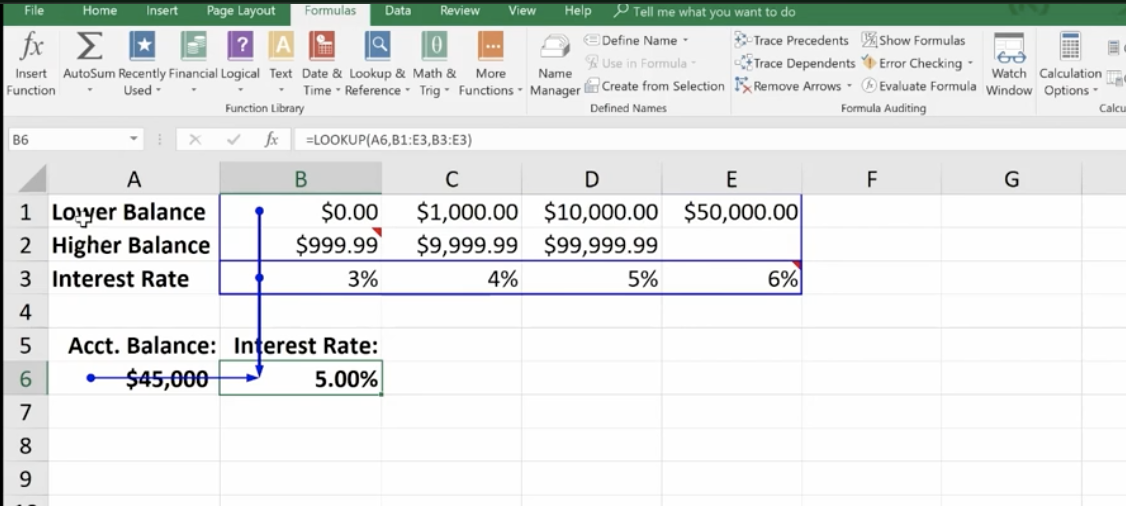
Lookup and Reference Functions
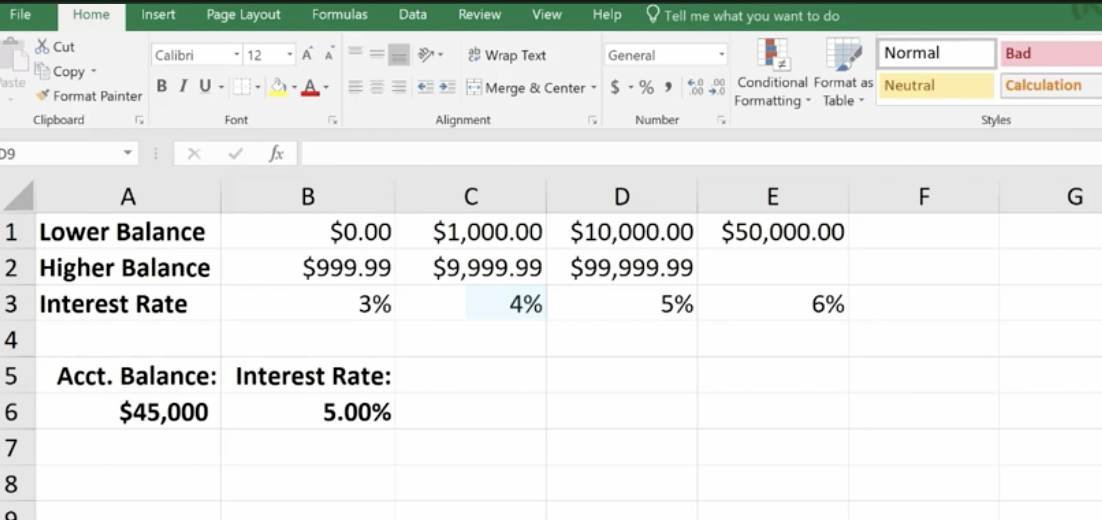
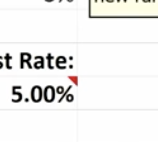
These are designed to ease the finding and referencing of data, especially in large tables. Here, cells A1 and E3 relate to a variable interest rate that is paid on a bank account. For balances under $1,000, the interest rate is 3% – between $1,000 and $10,000, the interest rate is 4%, etc.
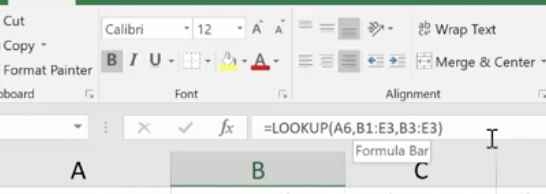
Cell A6 shows the balance of a specific account. The Lookup Function is used in B6. It looks up the interest rate and applies it to the account balance of $45,000. This is what the formula looks like in the bar at the top:
The vector form of the Excel Lookup Function can be used with any two arrays of data that have one-to-one matching values. For example, two columns of data, two rows of data, or even a column and a row would work, as long as the Lookup Vector is ordered (alphabetically or numerically), and the two data sets are the same length.
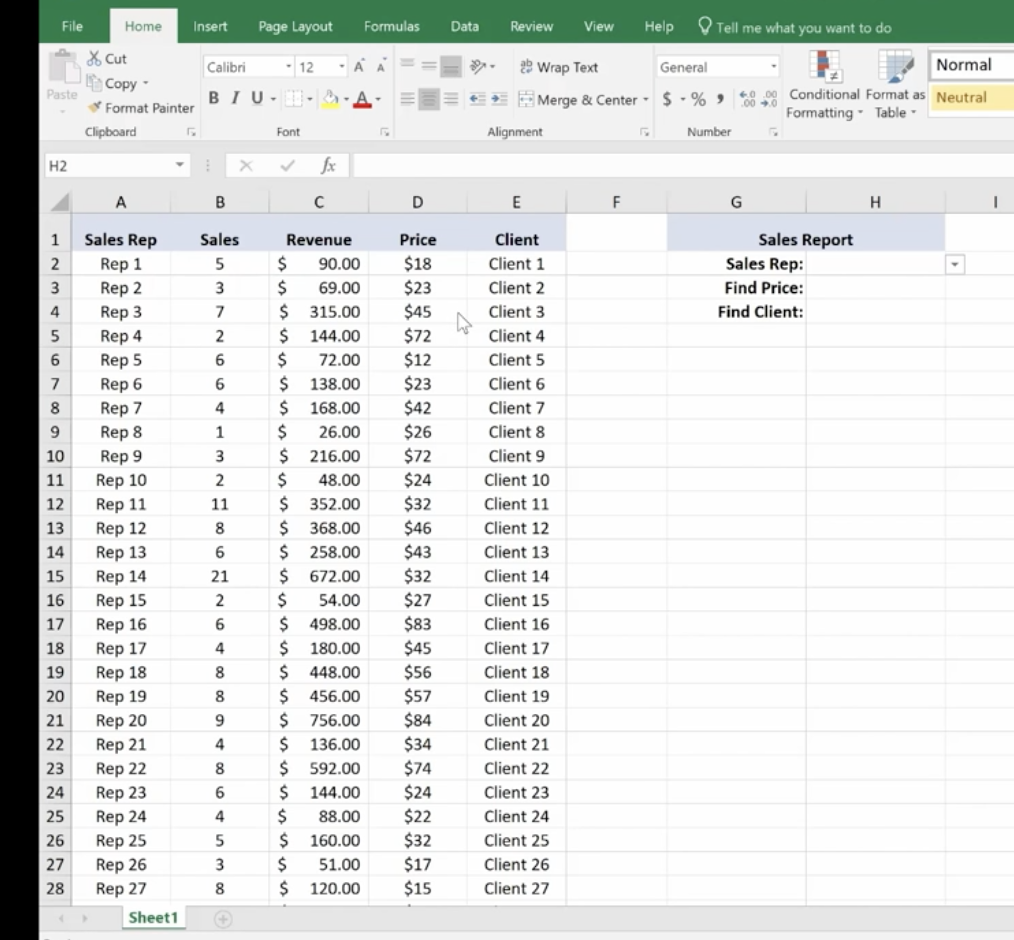
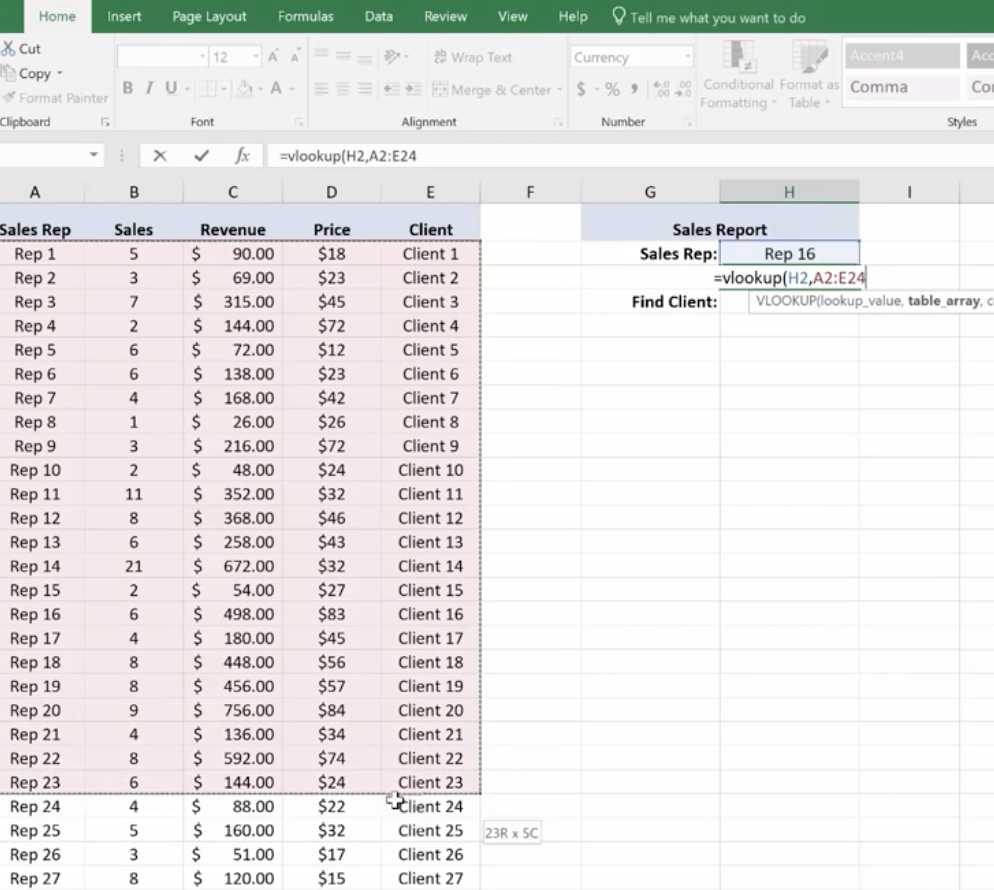
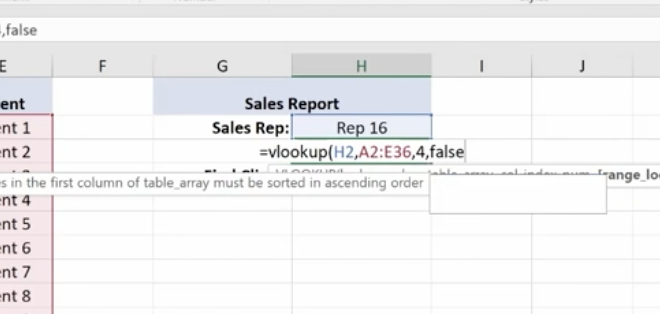
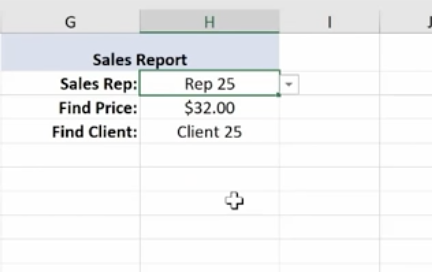
V Lookup and H Lookup are used to pull information into reports. We’re going to use Report Setup. Here, we have a worksheet that references salespeople, sales data, pricing, revenue, and the clients that they sold to. You’ll see on the top right where we set up a report with names referencing sales data.
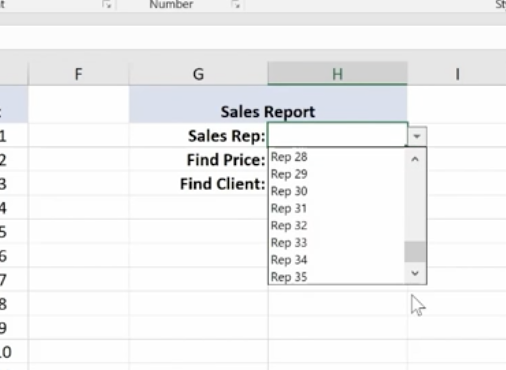
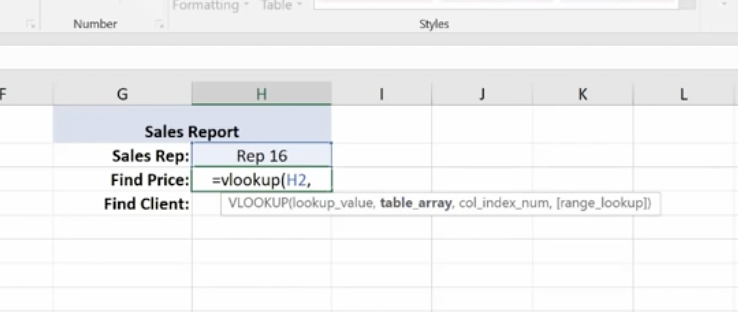
You can access the sales reps in the drop-down menu. Pick a rep and use the V Lookup Function to find the price.
To Find Price, key in =vlookup and the corresponding cell number for Rep 16, plus the table array which is the entire table not including the header at the top.
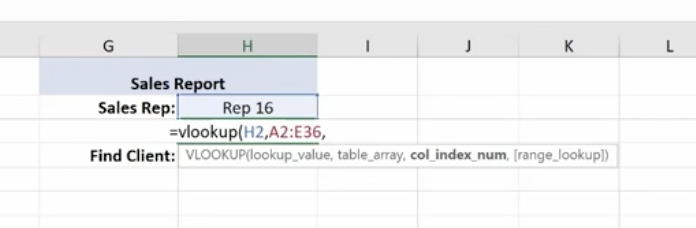
Then you need the column index number. This is the number of columns to the right of your lookup value column, which is column A. It’s the 4th column from column A (Price).
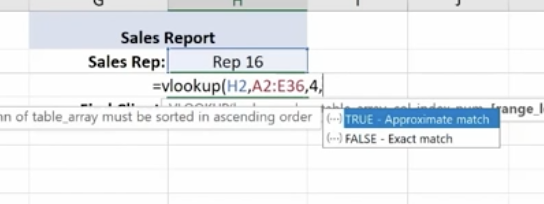
Enter 4,
For range lookup we’re using true or false. We are entering false here.
Hit Enter and this is what you have for your Find Price value.
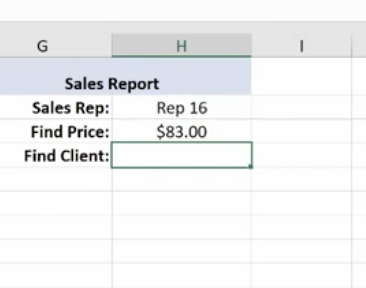
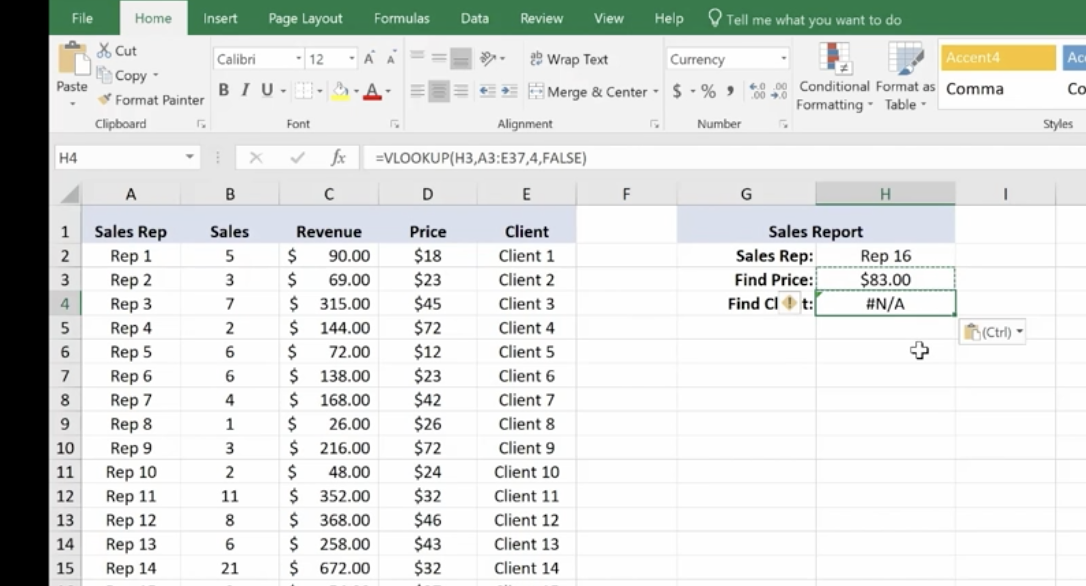
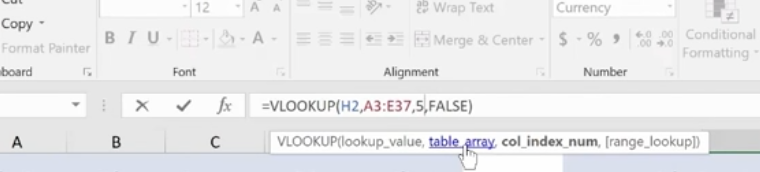
Now we’ll do a similar V Lookup for the Client. Copy and Paste:
Make the necessary changes in your formula:
Client 16 goes with Rep 16.
Note: If you change the Sales Rep, all the corresponding values will change.
If you have a lot of data and long tables, V Lookup helps you find information easily. The V stands for Vertical (or by column), because columns are vertical. H Lookup is for Horizontal-like column headers.
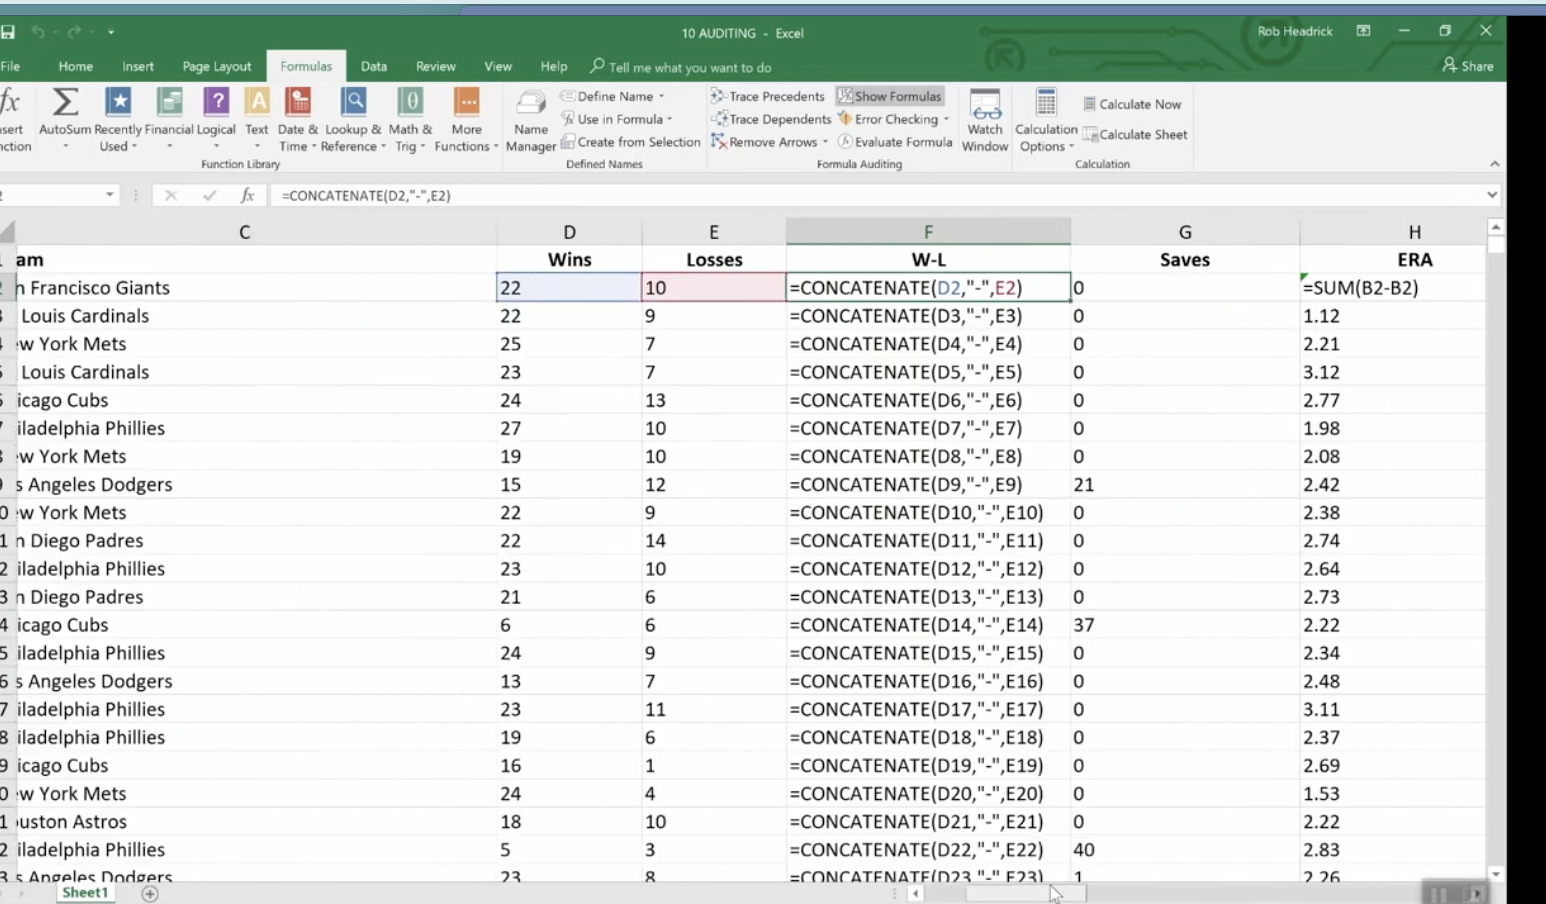
Text Functions
Text Functions contain some very powerful tools to adjust, rearrange and even combine data. These functions are used for worksheets that contain information and function as a database such as mailing lists, product catalogs, or even Cy Young Award Winners.
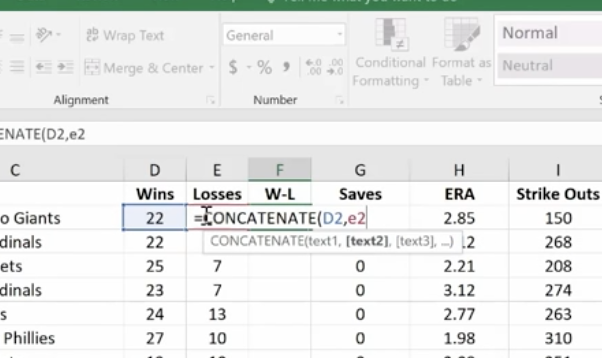
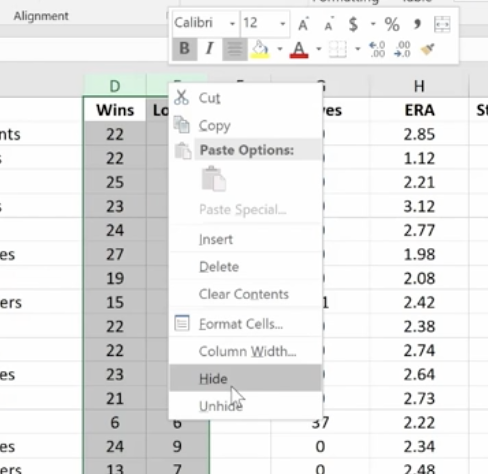
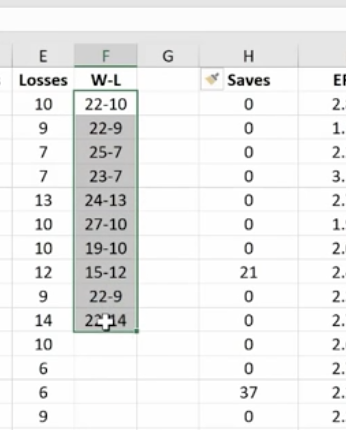
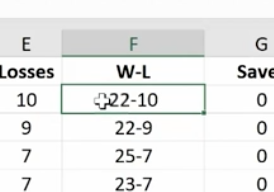
The first text function we’ll show you is concatenate. It links things together in a chain or series. Here, we have our Cy Young list. But we no longer need to see our Wins and Losses in a separate column.
To do this easily rather than manually, create a new column where your data will reside.
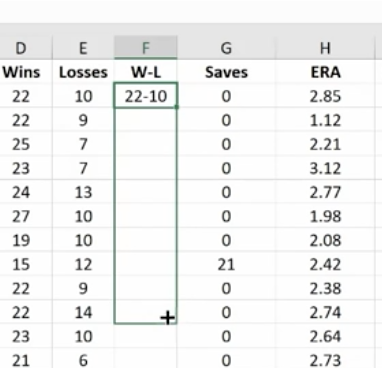
Hit Enter
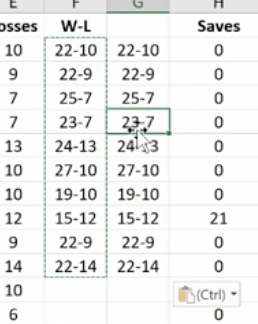
Now, just go in and hide the Wins and Losses columns. Don’t delete them or your new column will have a reference error.
If you do want to delete the Wins and Losses columns, you must first make a new column. Copy the W-L numbers and Paste Value in the new column. This way you’ve moved from a formula to the new information. If you delete your source information without taking this step you’ll be left with nothing.
Combine as many columns as you need with the concatenate function to make the data appear as you need it to.
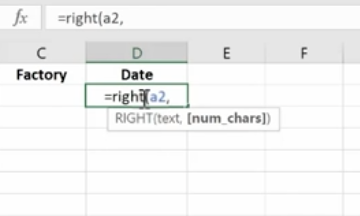
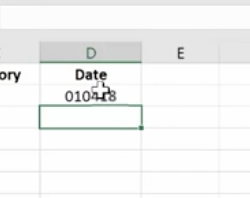
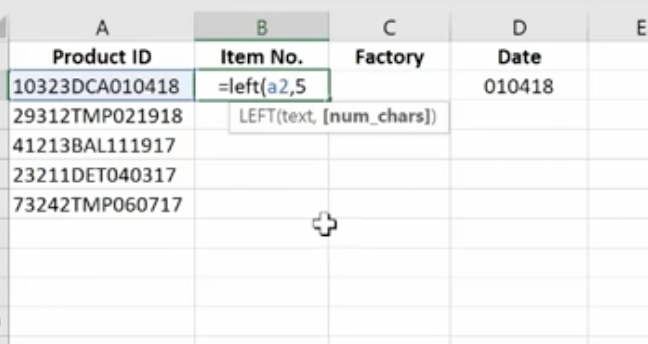
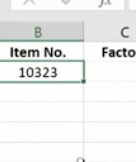
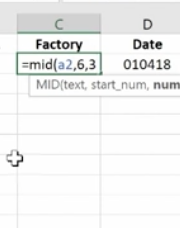
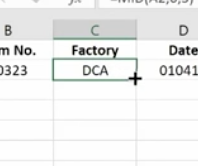
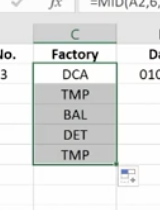
The Left Mid and Right Functions
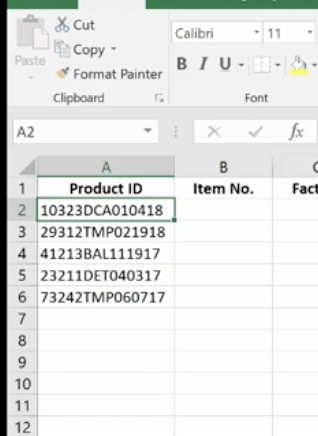
These are used to tell Excel that you only want part of a text string in a particular cell. Here, we have a product list and product IDs that tell us the date of manufacturer, the item number, and the factory where it was made. We’re going to pull the data out so we can put it in columns to use in different ways.
We use the Mid Function here.
This works because each of the product IDs are the same length. If they were different lengths you’d have to do something more creative.
Documenting and Auditing
You want to make your Excel files easy to understand for both yourself and others who need to use them – and this includes auditors. An organized worksheet results in clear error-free data and functions.
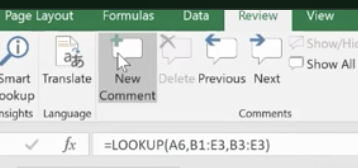
Commenting
The purpose of commenting is to provide notes to yourself or especially to others. Comments can include reminders, explanations or suggestions.
You’ll find the New Comment button at the top under the Review Menu. Simply click the cell where you want the comment to go and click New Comment. Then type your comment and click outside the box to close it. The comment will disappear but it’s still there. Anywhere you see a red flag, there’s a comment.
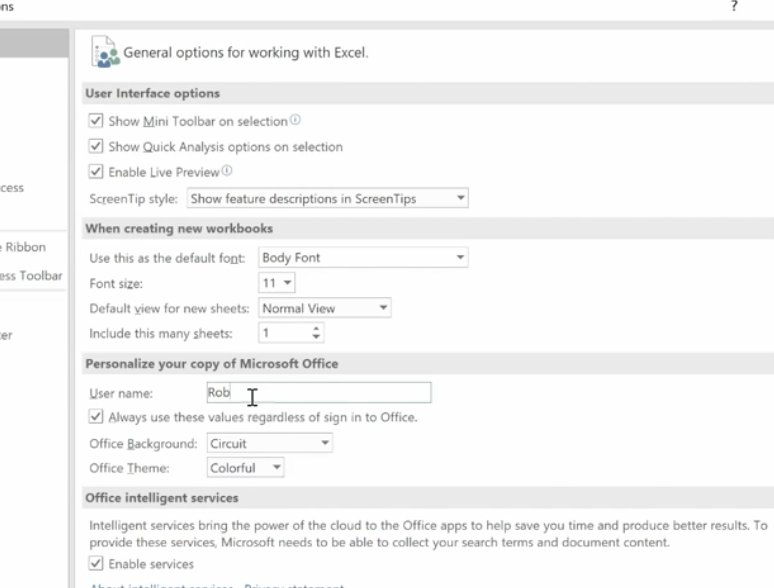
If your name doesn’t appear in the comment, go to File>Options>General and personalize your copy of Excel (in this case Microsoft Office) under the User Name. You won’t need to go back and change each comment; Excel will do this for you.
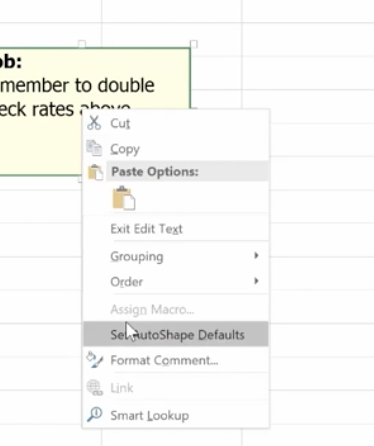
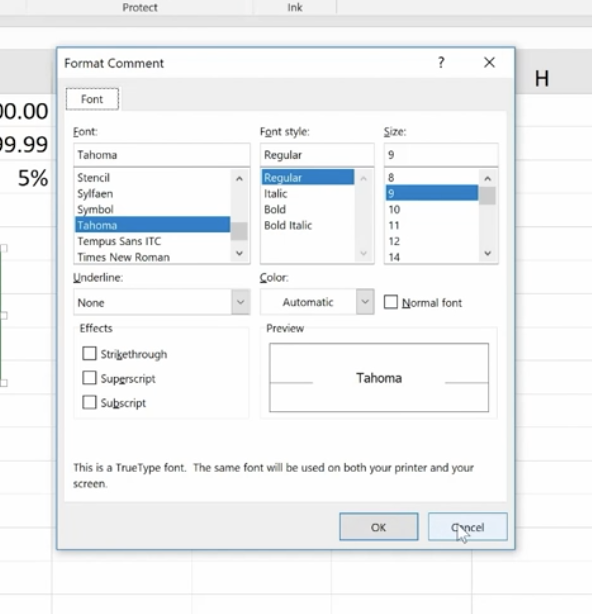
To format a comment, click inside the comment box and a drop down will come up where you can format the text.
You can change the color of the box and lines around the box. Some managers have different colors for members of their teams.
If you change the default color, it will change that for all your Microsoft products.
To delete a comment, go to the cell that hosts it, then go up and hit delete.
If you have a lot of comments, grab the handle on the box and resize it.
Auditing
What we really mean is formula auditing. This is an advanced way to check your work.
The yellow diamond on the left of this cell indicates that there’s an error.
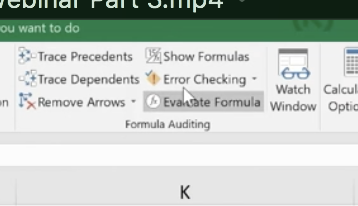
Or to find any errors, go to Formula Auditing in the top menu.
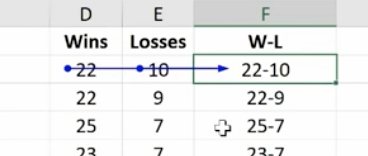
You have a number of helpful tools here. Trace Precedents shows where the formula looks for information. Click the formula you want and click Trace Precedents. It will display where your data came from.
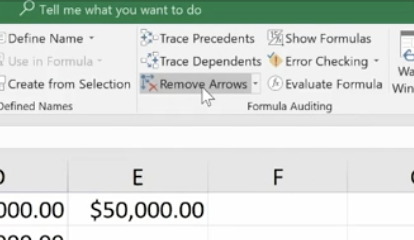
Here’s a more complex formula and trace auditing:
To hide the arrows, click “Remove Arrows.”
Show Formulas
This expands all of your columns and shows all of them in a bigger way. You can go in and check your formulas on the fly very easily. Click Show Formulas again and the worksheet goes back to the way it was before.
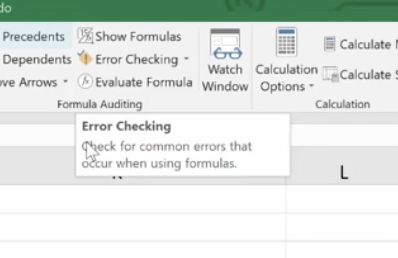
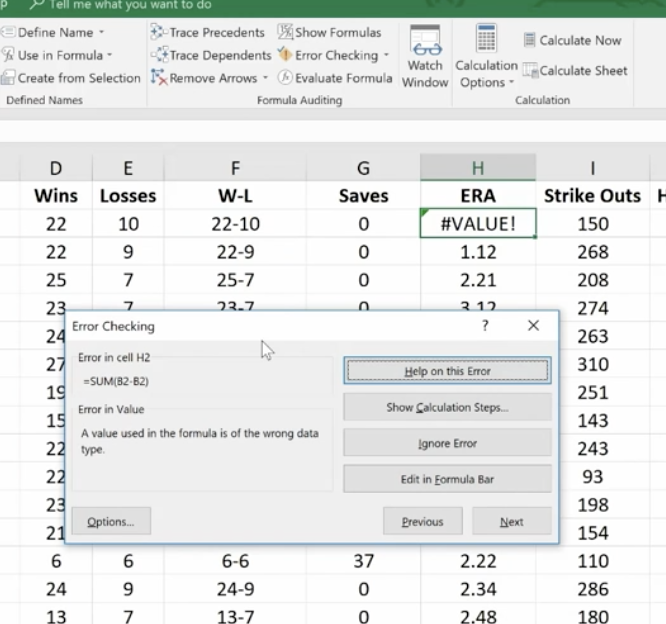
Error Checking
This feature lets you check all formulas at once.
This makes it easy to find errors and correct them.
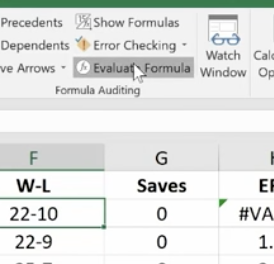
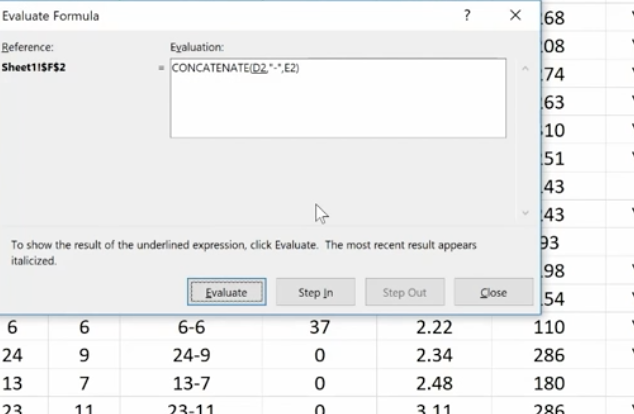
Evaluate Formula
This feature allows you to check a formula step-by-step. It shows the results of each individual part. It’s another great way to de-bug a formula that isn’t working for you. Click the formula you want to evaluate. Click Evaluate Formula and you’ll get a dialog box.
Click Evaluate and it will change the formula to the actual value that you can review. Each time you click Evaluate, it will take you through the steps of how you got to the final formula. You can trace your way through to see if you made any errors.
Protection
With protection you can lock in your changes in individual cells, spreadsheets, and entire workbooks. You can also protect comments from being moved or edited.
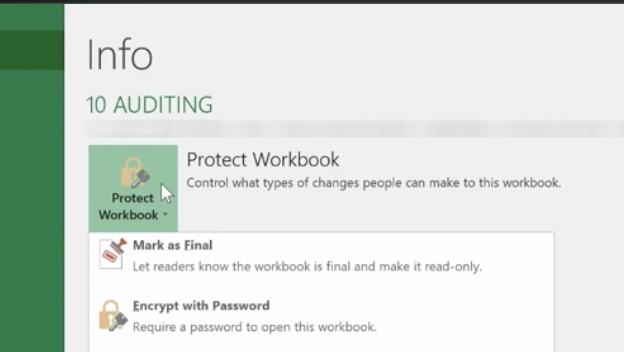
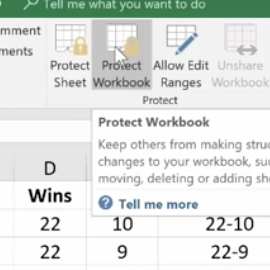
This is how to protect an entire workbook. It’s the highest level of protection.
You’ll want to do this if your workbook contains confidential information like:
Pre-released quarterly results
Employee salary tables
Staff member evaluations
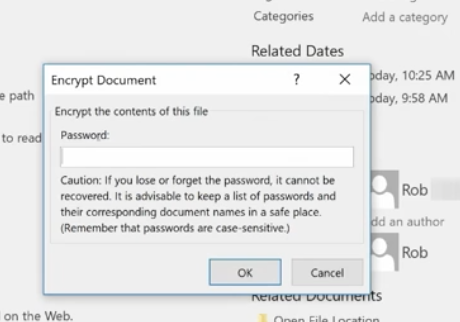
Click File>Info>Protect Workbook>Encrypt with Password.
Enter your password and be sure to make note of it because it can’t be recovered if you lose it. You can use password management software to keep track of your passwords.
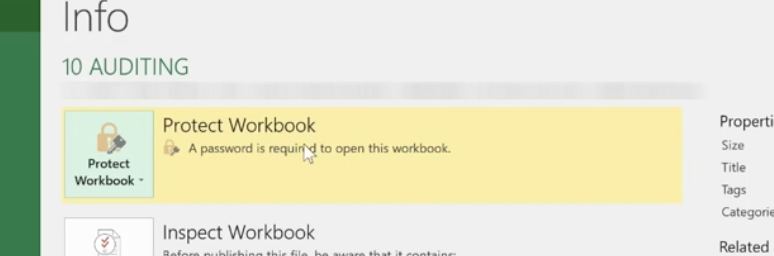
Once complete, click OK and your Protect Workbook function turns yellow indicating that you’ve protected your workbook.
To take off protection, retrace your steps.
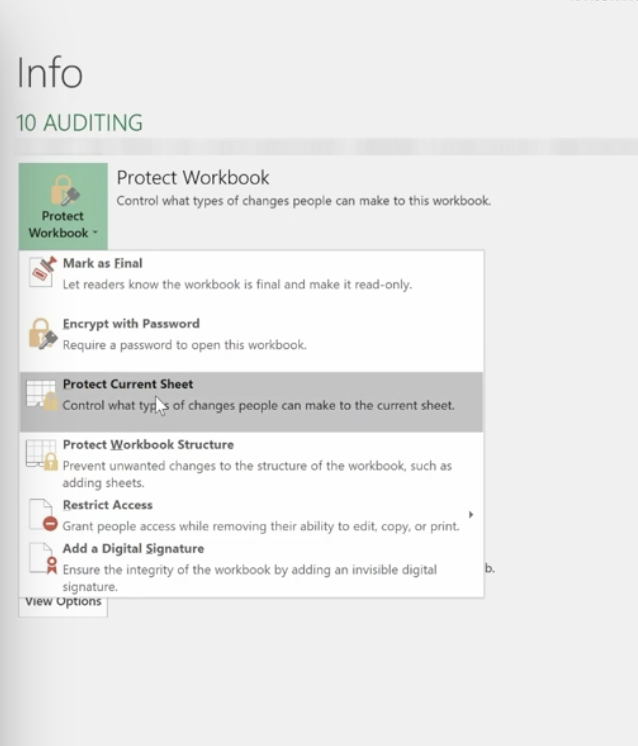
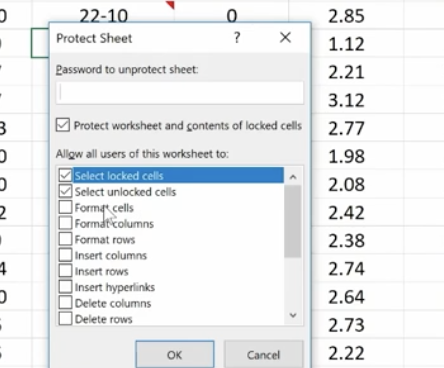
You can also protect a current sheet you’re working on. It will take you back to your worksheet where you’ll be presented with a variety of options.
You can also protect cells and comments from this option.
In the same way you protected the worksheet, you can protect your workbook.
Using Templates
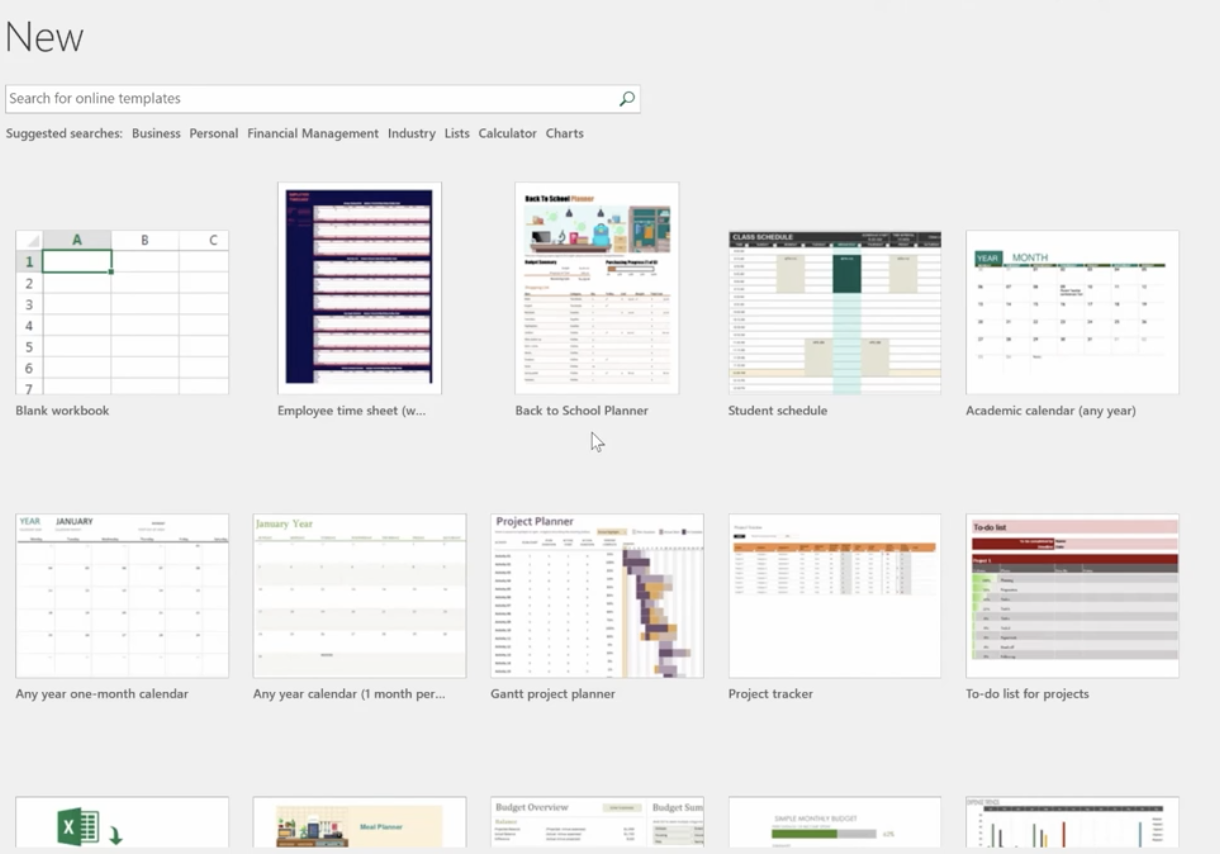
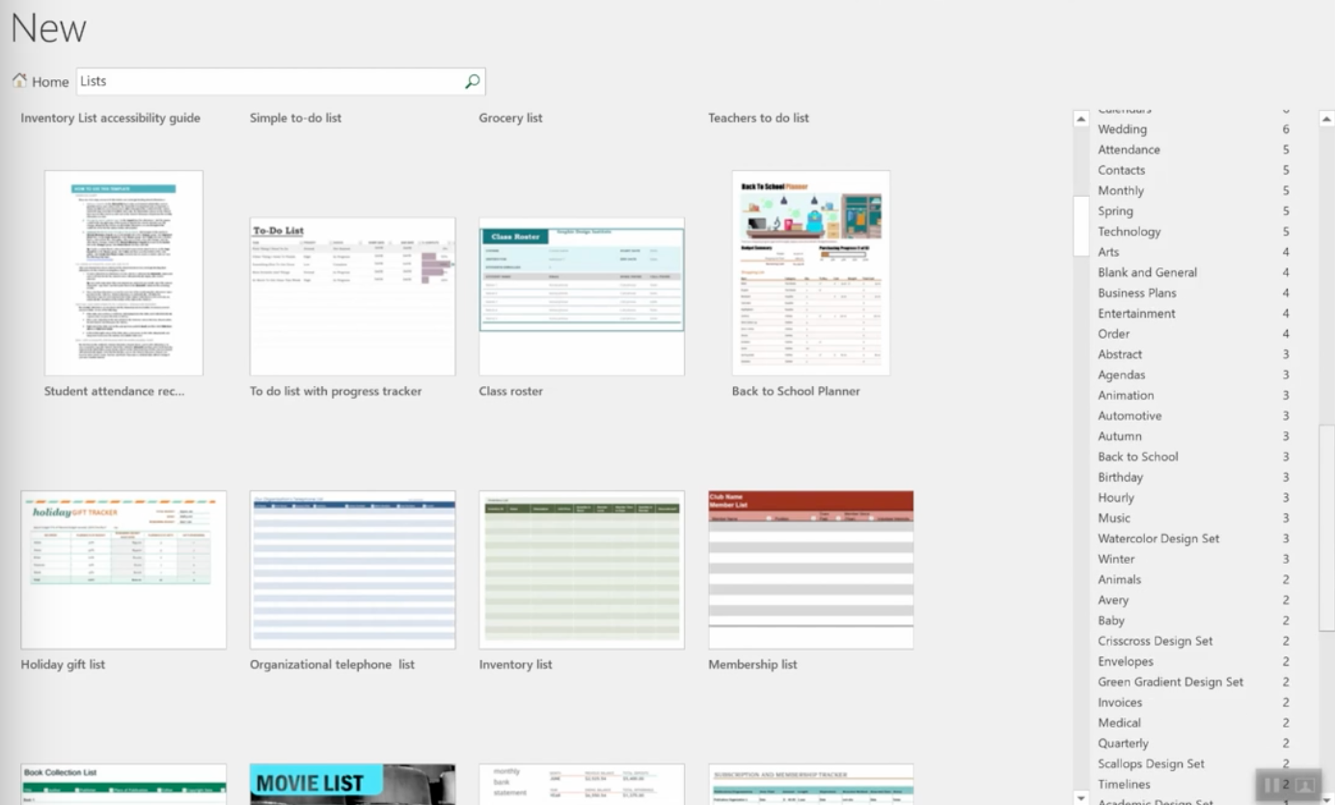
To see the variety of templates you can use in Excel, click File>New and you’ll be presented with a collection of 25 templates you can choose from.
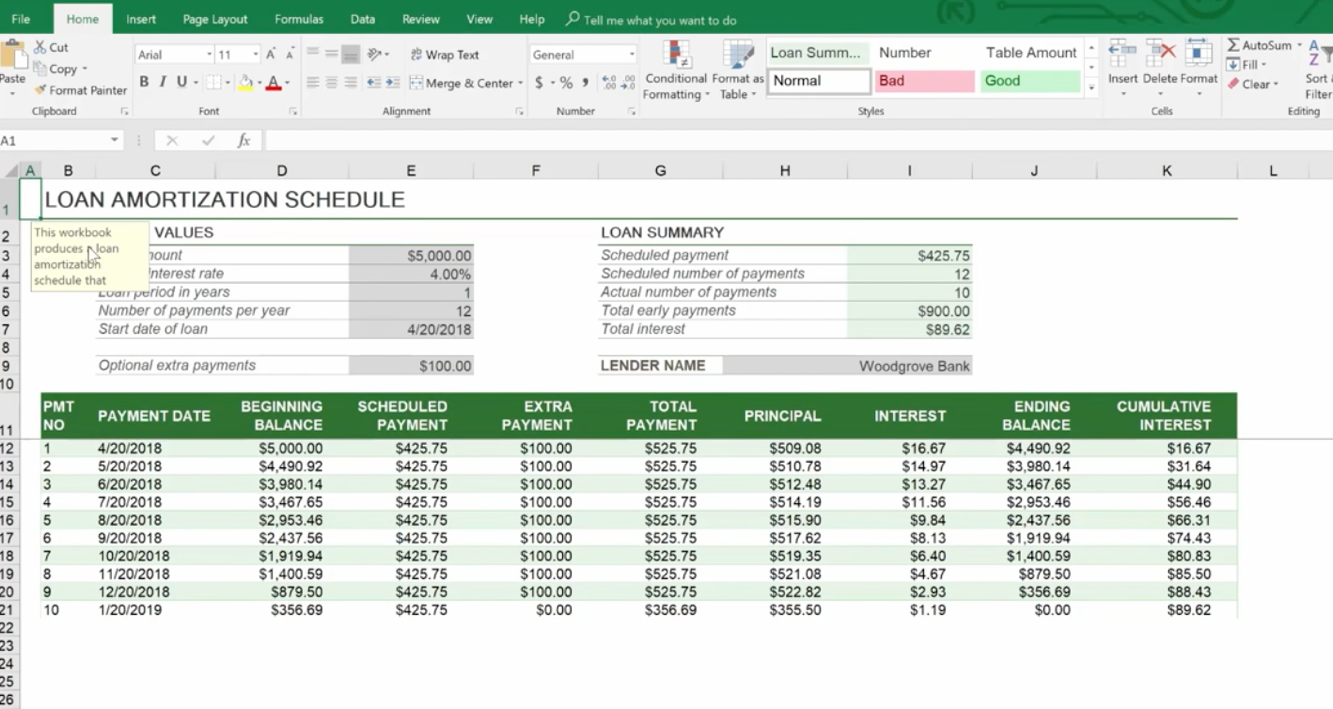
For example, there’s a great Loan Amortization Schedule you can use. Formulas are built in for you. All you need to do is change the numbers.
You can also go online while inside Excel to find more. You don’t want to download templates from outside Excel because they may contain macros that are contaminated with viruses.
On the right side of the page, you have a huge selection to choose from.
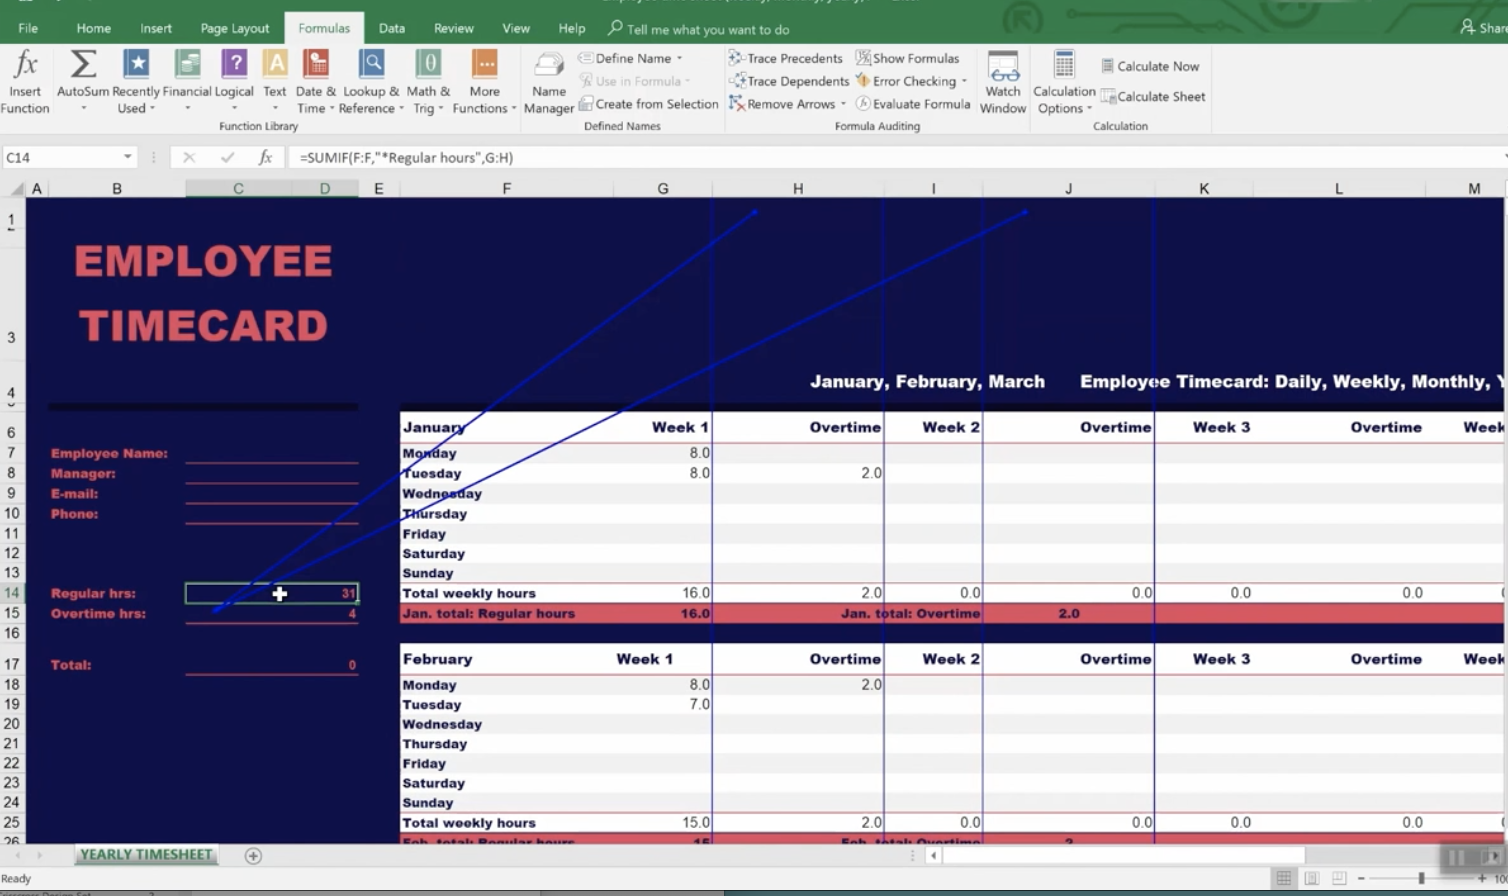
It even provides employee time sheets you can use that can save you so much time trying to figure out formulas.
Creating and Managing Templates
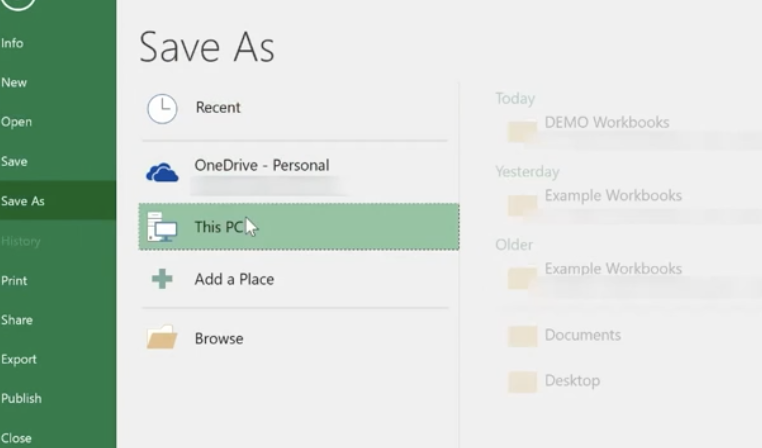
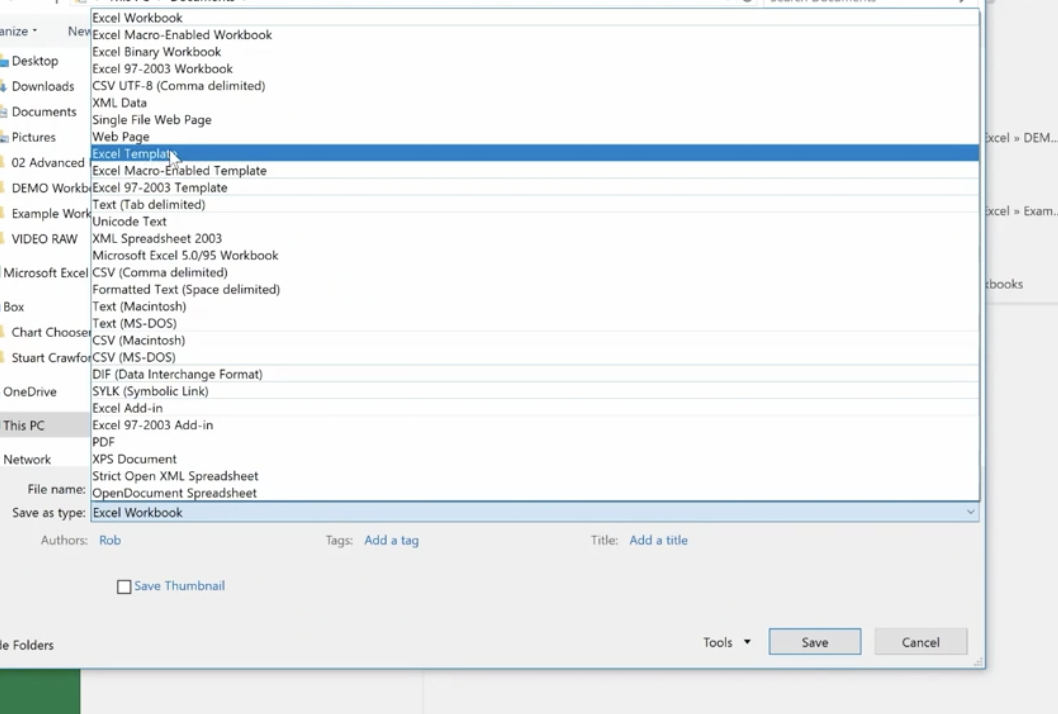
Go to File>Info>Save As and save the template to your location, then save as an Excel Template.
Before you save as a template you want to:
Finalize the look and feel of your template
Use review and auditing tools
Remove unnecessary data and information
Unprotect cells and sheets as appropriate
Create comments as guides
Congratulations! Now you’re an Excel Pro! This completes our Excel Like a Pro Series. If you have any questions or need assistance, feel free to contact our Excel 2016 experts.
Individuals and teams in organizations are always looking to get more things done within the shortest time possible. In this regard, Microsoft Planner comes in handy as a means to quickly get organized and collaborate effortlessly on projects, particularly where remote teams are concerned.
In its drive to make Office 365 ever more useful to its clientele, Microsoft has constantly rolled out new features for its Planner. These features are designed to provide users with greater visibility into project schedules, allow them to receive notifications of upcoming deadlines as well as let users filter and group tasks accordingly.
The latest and one of the most amazing features added to Microsoft Planner enables you to publish tasks to your Outlook calendar.
This feature is really handy if you want to see your personal calendar items alongside the calendar items in your Microsoft Planner. Chances are that you are not already much familiar with this functionality – allow us to show you how it works.
First things first: what you need to know about Microsoft Planner
This is a simple work management app that Microsoft offers as a part of its Office 365 subscriptions – the company’s cloud-based environment that includes different lightweight versions of apps like Word, PowerPoint, Excel and OneNote.
Microsoft Planner lets users organize their projects, assign tasks, share files, publish and view tasks, as well as chat and collaborate with other users. The full functionality of the app is available to premium, business and educational users subscribed to Microsoft Office 365.
Microsoft Planner and Outlook Calendar
You can now view Planner tasks on your Outlook calendar. This feature allows you to import Planner tasks into Outlook via an iCalendar feed. From the My Tasks page, there is the option to pick specific plans to publish, or simply select the Tasks that are assigned to you by a different owner.
Viewing a Planner task in Outlook Calendar
To be able to see your Planner calendar in Outlook, the owner of the plan must first add it to the Outlook calendar using an iCalendar format feed. Adding a plan to the Outlook calendar generates a link that each member can use to add the plan to their own Outlook calendar.
Publishing an iCalendar feed
Supposing that you are the plan owner, to add the plan to the Outlook calendar, tap the ellipsis (…) at the top of your plan, then select the “Add plan to Outlook calendar” option on the dropdown menu that appears.
Notice that you should be able to see the “Add plan to Outlook calendar” option as long as you are the plan owner. If it is missing from the dropdown menu then chances are that your admin has turned off the Outlook calendar sync feature in Planner for your organization.
If the feature is available for your organization however, a dialog box with the Add plan to Outlook calendar with an iCalendar feed title should pop up. In the dialogue box are two options, Unpublish and Publish. The “Unpublish” option is the default state that you’ll find in the dialog box. Select “Publish” to automatically publish your plan’s schedule information to anyone with whom you’ll share the generated iCalendar link.
Anyone you share the iCalendar link with can open up the plan in their own Outlook.
Adding iCalendar link to Outlook
To add your plan to your own Outlook calendar, simply tap the “Add to Outlook” option in the dialog box.
This prompt opens up your own Outlook calendar in Outlook on the web. It also opens a Calendar Subscription dialog with the “Subscribe online and keep up to date” description.
The dialog box also contains the same iCalendar link and the calendar name (which you can change to rename the plan if you so wish).
Notice that you can also copy your iCalendar link and paste it into any calendar app that connects using iCalendar. Anyone who has this link can see your plan’s task information without needing to sign in.
Adding a plan to your Outlook calendar if you are not plan owner
If a plan owner has shared an iCalendar link with you and you wish to add it to your own Outlook calendar, simply tap the ellipsis (…) at the top of your plan then select “Add plan to Outlook calendar” in the dropdown menu that follows.
You will then have the option to review the link and calendar name in the Outlook for Web Calendar Subscription dialog box. Once everything checks out for you, proceed to choose Save at the top of the page.
This imports the details to Outlook. You can then find the name of your plan’s calendar to the left of your calendar, under People’s calendars. If you select it, you will see a new tab above your personal calendar with the plan’s name, along with the plan’s tasks on this calendar.
For more information about getting the most out of your Microsoft solutions, be sure to keep an eye on our blog.
Microsoft Office 365 now has over 60 million active users each month and has become a favorite of large and small business owners. Just about every task that business people complete each day can be accomplished using Office 365. From Excel spreadsheets to professional word processing, users say they get more done with Office 365.
Their flagship email program is Outlook and this program can handle much more than your average email tasks. It integrates perfectly with the other Office 365 programs and it features a similar look and feel. The “Ribbon” that everyone has become so accustomed to has many of the same commands as you might see in Word. That makes it much easier to learn how to become an expert user.
Outlook 2016 features so many good shortcuts and handy tricks to make every project go smoother. However, sometimes users simply want to sort through their emails, answer them and move on to something else. For those times, you can follow a few easy steps to create a much more streamlined Outlook experience.
Simplifying the Home Page
The home page of Outlook 2016 contains six major areas. The ribbon runs across the top, then across the middle are four sections. On the far left is the folder pane, next is the Inbox and then the wider section is your reading pane. On the far right is the calendar. Here’s where you can set appointments. Down below, across the bottom is a new area that Microsoft has recently incorporated in the design called the Navigation Pane. This area contains links for your Mail, Calendar, People, Tasks, and More.
This new area replicates some of the other areas on the page. Therefore, you can just close the whole right-hand section where the traditional calendar is located. To do this, simply click on the small “X” in the upper right-hand corner. This makes the Calendar area disappear. When you’re ready to restore that area, simply click that X again and the pane reappears.
In addition, you can minimize the whole Navigation Pane by clicking on More (represented by dots). Select “Navigation Options” from the drop-down list. A small dialog box appears where you can check the box that says, “Compact Navigation.” This reduces the Navigation Pane to small icons that are barely noticeable. They will still work the same as the original, only now they’re inconspicuous.
Following along that same concept, you can also remove the left-hand pane which contains your folders. Now, you’ve effectively reduced the Home Page from six sections to three. This is a good idea for anyone who just wants to comb through their emails, see what is important and respond. Your attention is no longer drawn away by a busy-looking page. Now things appear much simpler. If you need to look at any of the sections you’ve removed, it’s very easy to restore each section. For the folders, you can click on the word “folders” and they will appear until you click the word again. In many Microsoft programs, hovering over a word or section causes additional information to appear. This is a good way to learn more about a section or get a quick look at what is contained in an area. These pop-outs usually appear when you hover over them and then disappear once you move your cursor.
Working with the Ribbon
The Ribbon in Outlook 2016 contains four major tabs with various tools available. It’s easy to remove the Ribbon if it seems distracting. Simply click on the arrow on the far right side and this collapses the Ribbon. The keyboard shortcut for this action is Control+F1. If you need to quickly show the Ribbon, then click on the View tab and it will appear until you click away. It’s often just that easy to make a section appear or disappear. This makes it fast to remove areas you might not need and it’s a good method of personalizing your Outlook program.
If you’d like to just completely get rid of the Ribbon, there’s an icon in the upper right-hand area next to the question mark. Click on that and you’ll see that they are three options for the Ribbon. You can Auto-Hide, Show Tabs or Show Tabs and Commands. The last one is the most commonly used. The other two allow you to have as much of the Ribbon at the top as you need. If you click on Auto-Hide, the whole Ribbon disappears leaving you with a very clean looking page that deals only with your Inbox and Reading Pane. You can quickly move through emails or read over longer emails that require more attention. When you need to temporarily view the Ribbon, just place your cursor over the colored bar at the very top and the Ribbon will reappear.
Personalizing your Program
Once you get the hang of how easy it is to close and open areas, you can adjust your Outlook email program so that it displays only those things that you work with most often. Microsoft purposely builds software programs that can be easily modified by the user to give each person their own personalized experience.
One thing that many users probably know but may forget is that all Microsoft programs have one thing in common: you can right-click in whatever area you’re working and get a list of options. Often, on this list, you’ll see the action you want to take, thus preventing you from having to completely restore an area of the page. This is a quick, easy way to accomplish almost any task.
Reading Emails
The new Outlook also allows you to click on “Reply” and then start typing your email. There’s no longer a new window that appears. This has proven to be a huge time-saver. Let’s say you’ve clicked reply but you want to add some bolding to your typing or use a larger font. Highlight the text and the font section appears next to your typing. This works exactly the same as it does in Word. You can quickly change fonts, colors, add underlines or bolding, highlight text or even add indenting to your paragraph. If you right-click the Inbox, you’ll see a different set of commands that pertain only to the Inbox.
Attachments can be viewed just by clicking on them. If you’re reading an email that has a Word doc attached, just click it once and it opens in the Outlook program. If you double-click on the attachment, it will open up in Word. This is also true for PDF attachments. This can save lots of time if you only need to take a quick look at an attachment someone sent with their email.
Keyboard Shortcuts
One of the big time savers in all Office 365 programs involves learning the keyboard shortcuts. People who use these daily say that it improves their speed and prevents them from losing focus. If you print them out and keep them handy, you’ll quickly learn the most commonly used ones. Below are a few that everyone uses in Outlook, but there are many more that you could learn if you want to be an over-achiever:
Alt+S: send email
Ctrl+R: reply to email
Ctrl+M: or F9 to Send/Receive all
Alt+R: reply to all in email or switch to work week calendar view
Ctrl+G: open the “Go to date” dialog and jump to any date in the calendar
Alt+W: forward email or switch to weekly calendar view
More Shortcuts
Press Ctrl + [the place number of the item] to switch between email, contacts, calendar and other items in Outlook. This is a quick way to move from one task to the next. Create a reminder by pressing Ctrl + Shift + N. This creates a virtual sticky note that you can drag anywhere on the screen.
When setting appointments go to your calendar and just type a phrase like, “next Thursday” or “one week from now” and your calendar will automatically open there.
You can block annoying emails that you don’t want to receive by going to Home>Junk email options and selecting the sender you wish to block. View long emails as a conversation by clicking on the message and then selecting View>Show as Conversation. Flag a message for further inquiry by pressing the Insert key to toggle the flag off and on.
Learn to Make Outlook Work for You
Outlook 2016 includes so many great time-savers like these. If this is a program you use daily, it’s a good idea to become a pro at using them. You can cut precious minutes from your busy day simply by learning how to streamline and personalize Outlook. As Microsoft continues to update its Office 365 programs, they will build in many more shortcuts. They’re easy to learn and the company offers a number of great video tutorials and training videos to help even a novice learn all the helpful features.
Microsoft Office 365 offers a number of useful tools for today’s busy professionals including some new shortcuts for Outlook 2016. With so many companies now using Outlook as their major email program, Microsoft works to improve its operation with each annual update. A number of the great features in this program are also found in other MS Office programs. For instance, if you’re familiar with Word, then learning how to use Outlook will be much simpler.
New Changes for Outlook 2016
Using Outlook 2016, you can do a lot more than send and receive emails. You can also manage your calendar, set appointments, schedule meetings, and create/manage groups. In addition to being able to set up various types of groups, you can set up groups in Yammer. Yammer has become a central place where teams can exchange files, get updates and have conversations with others.
In Outlook 2016, distribution lists are now known as contact groups. Though the instructions for setting up each type of group vary a bit, they’re very similar. Users can find the instructions for setting up each type of group online or by using the F1 key in Outlook. The new Outlook has many helpful features like this to make your workday go smoother and help you improve efficiency. Below are our top 9 Tips and Tricks for getting the most out of Outlook.
One-Turn Off Notifications
There are several ways to turn off notifications in Outlook. This is an easy way to stop all those interruptions that prevent you from getting your work done each day. Go to the taskbar and click on the triangle. The programs that are already available will show up. Right-click the Outlook icon and you will get a list of things you can do. One of them is turn off notifications. Uncheck the box that says “Show New Mail Desktop Alert”. If you have Outlook open, you can also go to File>Options>Mail. Here, there are many options. Click on, “Turn off notifications”. You can also personalize your mail client here. Most workers report that they’re a great deal more efficient with notifications turned off.
Two-Setting up Meetings Automatically
One of the favorite shortcuts in Outlook 2016 is the one for setting up a meeting. There are actually several good ways to do this. Drag an email from your Inbox to the Calendar icon at the bottom of Outlook. This will automatically set up a meeting. You can turn any email into a meeting by doing this. Another effective method, with your email open, click on “Reply with meeting”. This is found on the ribbon in the “Respond” group. Clicking on “Reply with meeting” will send out an invitation to everyone who was addressed in the email.
Three-Blocking off Some Private Time
We all need private time each day to get special projects finished or just take a breather from a busy day. An easy way to do this is to pull an email into your calendar to block off some time, perhaps an hour or so. You might need to read a proposal or document sent by someone. You might simply want a few moments of peace and quiet. The blocked off time appears as a meeting in your calendar so that coworkers can see that you are busy and will not disturb you.
Note that you can now set the time simply by typing the numbers. You don’t have to type the colon and a.m. or p.m. Type a number, such as “11” and the program fills in the time as 11 a.m. This can be a real time-saver. You can also enter time using military times. For instance, type 800 for 8 a.m. and 1600 for 4 p.m. No matter how you type it, time will automatically update so that it looks correct.
Four-Ignore Button
We all get emails that are not important but they still take valuable time to look over and they can clog up your Inbox with correspondence that isn’t relevant to what you’re doing. Let’s say you’ve been getting emails and reminders about an upcoming luncheon for your department, but you know you will not be able to go on that particular day. So open one of these emails and click on the “Ignore” button. From then on, you will not see any emails about that topic.
Five-Quick Access Toolbar
Customize this toolbar located at the very top left portion of Outlook. You can add the commands that you most often use so that they’re handy. This can be done in any Microsoft Office program. Go up to the very top left portion of the screen where you’ll find the quick access icons. Click on the triangle at the end. This opens a drop-down list. One of the options is “more commands.” Once at this dialog box you can filter commands by clicking on:
Popular commands
Command not in the ribbon
All commands
Macros
Choose whatever commands you most frequently use and add them to your Quick Access Tool Bar. For instance, work offline allows you to work without the constant interruption of emails and notifications from team members. This can be helpful if you are up against a tight deadline and every moment counts. Experiment with various ones and you’ll soon find your favorites.
Six-Instant Messaging a Group
This is a good way to get a fast answer from team members who may be involved in an important project with a fast-arriving due date. Open your last email about this topic or from one of the members of the email. Next, click on IM>Reply All. This will send out a response as an instant message. Team members who are online will get notified immediately via instant message.
Seven-Quick step
Quickstep is a handy way to set up an email message so that several actions are taken in one step. The message can be marked as read, flagged and then moved to a specific folder. Quickstep can be used to set up one or more emails and you can set it up with any combination of steps that you want to be completed with one click.
You can set up certain emails to go into specific folders. You can also set up a folder for a special project and then designate which emails will automatically go into that folder. This is an easy way to organize emails by project title or by the supervisor who is in charge of the project. There are many ways to arrange them.
Begin by clicking on “More”, found in the Ribbon, then “Manage Quick Steps”. You can do this for existing or new emails. To create a new Quick Step, go to the Quick Steps portion of the Ribbon (found in the middle area) and click on “Create New”. In “Edit Quick Steps” you can choose a category and then create a new action. There is almost an endless number of steps you can accomplish with one quick step and that’s the goal of this timesaver. It allows you to take multiple actions with just one click. For instance, copy an email, pre-populate the “Send to” line, and include information that’s constant throughout similar emails. With daily use, you’ll become a whiz at making this timesaver work well for you.
Eight-Set Automatic Replies
Did you ever go on vacation and forget to set up your automatic email for your vacation? This happens to everyone. To avoid this happening, go ahead and set up your Vacation Out of Office email weeks ahead of time. Go to the file menu and click on send automatic replies, then fill in the dates and times when you will be leaving and when you will return. You can set up a message for both external and internal emails. By setting this up in advance so that it’s ready to go when you are, you won’t have to worry about forgetting or having to do it at the last minute.
Nine-Search Mailbox
All email programs now have a search box that allows you to search through your emails using a single word or phrase. It’s much easier to find all your emails pertaining to any name or topic. Once you click on “Search”, this opens a whole menu of Search tools that can be helpful if you know certain things about the email. You may be looking only for emails with an attachment; specify that in search tools. If you know a name and that the email had an attachment, this can filter your results even more.
Getting Help
These are just a few of the many ways that Microsoft Outlook 2016 will help you get all your work done without too much extra labor and stress. Learning these shortcuts, tips, and tricks can help you modify Outlook so that it’s customized just for you. If you take a little extra time each day to learn one Time Saving Tip, you’ll get the most out of the program. In addition to the articles and tutorials found at Microsoft, you can also find hundreds of YouTube videos that will show you exactly how to do something.
Of course, within Outlook or any Microsoft program, you can get help by pressing F1 or clicking on the question mark in the upper right-hand corner. Type a few words about what topic you need to get instructions for, such as how to use Quick Steps and a whole list of helpful instructions will come up. Once you get Outlook 2016 set up and organized especially for your workflow, you’ll find that Outlook can be a great tool to help you get more done each day.
Your relationship with the Internet started out so well! Long before you realized it, sites like Facebook and Google were tracking your every move and keeping records on you to you use against you. Fight back!
It may have started with an American Online disc promising 40 hours of free time, or it may have started with your university email account and use was limited to time spent in the school library. Perhaps it was with odd-duck Juno, connecting to download new email messages and then only dialing back in to re-connect for a quick send-and-receive, and no real time spent “online”. Or it may have started after “AOL” was unlimited and free, and you weren’t among those who had to create a brand-new email address every time you needed to score more free time from a new disc – seriously, those things were everywhere!
No matter how it started, we’re all in the same boat today. Well, unless you’re still connecting from a university library computer anonymously and your home life is spent in a cabin in the mountains somewhere living the life unplugged. Side note: There’s a reason people pay to travel to the most remote locations in the world – unplugged – for a back-to-the-basics experience, sometimes all the way to staying in a tent in a sleeping bag and fishing or foraging for food. It’s ironic how we’ll consider paying for this as a vacation, given the access we have to modern amenities like running water, indoor plumbing, air conditioning, and maybe a Keurig.
Are we on information overload? Are we overwhelmed with data and addicted to being busy? Well, yes to both – but that’s not the real reason we revert to rustic living. It’s the feeling of control over everything in your immediate world and being in charge of your destiny. It’s knowing the unknown doesn’t live in some dark room halfway around the globe, waiting to steal your credit card information or plant malware on your laptop through one innocent but careless action on your part. We’re going to skip the part about possible bears or wild animals on that extreme camping expedition analogy we’re making here.
Back in the real world, where Google and Facebook exist, we now know that those are just two of the major organizations who use the information gathered from us online to benefit them. Yes, the fine print we accept without reading vaguely indicates the information they collect will be used to cater our online experiences to our preferences, etc., but no matter how you look at it, the primary benefactor in that data collection isn’t us. Google collects the data to serve us advertisements, deliver sponsored search results which are really ads that charge the advertiser a premium to show their search result at the top – from which, again, Google benefits. We’re not saying this is a bad thing – oh, no! But at the same time, we need to be incredibly cautious about what information we do share. After all, knowledge is power. We already know Google is in an extremely powerful position, being the exception and the rule, depending on the circumstances.
Now that we’re learning more about the Internet and how organizations are using data to target consumers – us – and we’re learning the unfortunate side effects – for us – about the relationships these organizations have with other major organizations who are willing to pay for our information. All so they, in turn, can then target us with more advertising and messaging. We refer back to the earlier comment about information overload.
The question we face is, what can we do? How can we take back control of life in the world where we connect to the Internet every single day, whether it’s to check email, post a status to Facebook, share an image on Instagram, or use Google to search for a recipe?
We’ll tell you.
There are steps you can take to see what information Google has collected on you. We warn you, before you follow these steps, be prepared to understand Google has far more information than you realize, and it can feel like an intrusion. It may feel like the last time you went to a physical ATM – way back in the day – and were worried about that guy behind you who wasn’t at least 4 feet back, and you were worried he’d see your PIN and rob you.
For Google:
Log into your personal Google Account. You already have one if you’ve read this far. Chances are you’re already signed in. How to know? This is simple: go to https://www.google.com/ and look in the upper right corner. If there is the avatar you’ve chosen or an image you recognize, you’re signed in. If not, there will be a blue rectangle that says “Sign In”.
This pulls up Google Maps and may give you a dialogue box with a brief introduction: “Explore your timeline”, with the text under this that “Only you can see your timeline”.
“What’s Location History?” wants to tell you that you’re about to see a personalized map of all the places you’ve been with your logged-in devices. This is where you’re promised better commute options and improved search results.
You’re next promised control, with the option to delete anything you prefer.
Clicking through will take you to a page where Google tells you what it thinks your home address and work address are. These may be blank.
At the bottom left, there is a blue button: “Manage Location History”.
This is your option to delete the data Google has collected from your usages and stored.
For Facebook:
Log into your personal Facebook Account.
Once logged in, there will be a drop-down menu in the upper right corner that just looks like a triangle pointing down. Click this to see the drop-down menu.
Select “Settings”.
In the left navigation menu, select “General”.
In the center panel, you’ll see a series of items – probably about a half dozen, depending on the latest iteration of Facebook. Underneath these menu items, you’ll see an option to “Download a copy of your Facebook data.”
Depending on your Facebook tenure and activity, this can take a very long time to download. Clicking this text will take you to a page with a green button that reads “Start My Archive”. You will probably be prompted for your password again at this point.
Facebook will happily email you when your archive is complete – it’s ok, they already know your email address, remember?
This is not necessarily related to all those personality quizzes some Facebook users love about “Which Harry Potter Character Are You?” or “What Color Is Your Aura?” or “What Type of Dog Breed Are You?”, and the data that is collected through this – by the way, it’s typically your email address and your list of friends. With the news of Facebook selling information on over 80 million of its users recently, there is a large movement to #DeleteFacebook, but we’re not sure jumping ship is the answer.
Updating activity on Facebook isn’t as straightforward as it is on Google, but at least now you know what is being collected from you now from both and how to handle it. As we mentioned, knowledge is power, and the more power you can take back, the more control you have over your digital destiny.
According to Pew Research, 77 percent of all Americans now carry a smartphone. There has even been a dramatic increase in smartphone usage for those over 50 years old. As Americans realize how many tasks they can get done on their phones, new and completely radical apps are being created.
Today’s smartphones have powerful processors and LTE connectivity. This is more than enough power for meeting apps, calendars, to-do lists, games, and mobile office suites. Depending on what you need to accomplish, you can find an app for just about any task, including scanning, file management, and travel booking. Though iOS is still the preferred platform, more apps are now available for Android as well. Below are our top 12 apps for making the most of your smartphone.
PocketGuard (Android and iOS)
For those who want to know where all your money goes each month, PocketGuard is a budget management app that also allows you to manage your bank account. The app uses encrypted, read-only technology that connects to your credit card and bank accounts. You can view balances, track spending and purchases, and get a quick look at bill payments. PocketGuard shows you what you can safely spend without being overdrawn or over credit card limits. It’s a great way to stay on a tight budget and the app is free.
Adobe Scan (Android and iOS)
This is the favorite mobile scanner app due to its versatility. You can convert paper documents to PDF, then search and edit the document using Adobe Scan. The app uses optical character recognition to transform a document into digital text. Despite its powerful components, this app is free to download. You can save your downloaded documents to the Cloud using a free Adobe Document Cloud account as well.
Files (iOS only)
The Files app was first released by Apple as part of iOS 11. It works well with either iPhone or iPad to provide a higher level of productivity. Using the Files app, you can connect to iCloud, Dropbox and other file storage programs. Browse, organize and search through documents on any Apple device. The app makes file management much easier. You can also connect with other iCloud users in real time. The Files app is free.
Hopper and Hopper Hotels (iOS only)
These two apps have become a favorite of travelers because they save you money on travel expenses. Hopper helps predict the cheapest time to fly. You can also book your airfare ticket. Hopper Hotel gives users the ability to look for the cheapest hotel rates and book those reservations as well. Hopper Hotels is currently only available in major markets including Miami, Los Angeles, and San Francisco, but the developers are working to include many other cities. They’re also planning to roll the app out to Android soon. Both apps are free.
HP Smart (iOS, Android)
HP Smart replaces the HP All-in-One Printer Remote app. You can set up and manage any HP printer or scanner using this app. It integrates well with programs like Google Drive, Dropbox, Instagram, and Facebook. You can share documents via text messaging or email.
IKEA Place (iOS only)
IKEA has tapped into a major market for those who are trying to furnish or remodel their home. The IKEA Place app lets you browse through their furniture and see how certain items would look in any room of your home. You begin by scanning the rooms you want to furnish, then simply look through their virtual store for furniture and accessories. The app provides a higher level of augmented reality to users. This app can help you avoid buying things that won’t fit in your space.
Microsoft Teams (iOS and Android)
Microsoft Teams is a popular chat-based workspace that allows workers to meet online and share files. It integrates well with other Microsoft products and even some programs from outside vendors. You can be more productive using MS Teams. The app is free.
Things 3 (iOS only)
This task management app is the third release from Cultured Code and reportedly took five years to develop. It enables users to connect with other apps in order to set project goals, brainstorm, and schedule appointments. The app includes easy-to-use features like “Collect Your Thoughts”, “Get Organized”, “Plan Your Time”, and “Make the Most of Your Day”. Though it costs $9.99, it does offer a number of valuable productivity features that can help you create and complete any project on time and within budget.
Just Press Record (iOS only)
Just Press Record makes it easy to record anything. With one tap, you can record your kids at play or an important meeting. This mobile audio recorder also features built-in transcription capabilities and it syncs to iCloud so you can transfer files to other devices. Recording can be completed from a lockscreen, making it fast to use. It also has the ability to transcribe speech and supports a number of different languages. The cost is $4.99.
Chefsfeed (Android only)
If you have a hard time choosing a dining spot, the Chefsfeed app can help you decide. This app includes food and restaurant reviews from professional and celebrity chefs. Learn all about the best dishes and the best restaurants in your area. You can even book restaurant reservations. The Chefsfeed website contains articles and videos that would appeal to all foodies. Chefsfeed is free to download.
Gorogoa (iOS only)
This visually stunning iOS puzzle game takes you on a surreal journey to find and stop a magical beast. Using overlay panel elements and objects in the environment, players can combine elements to create a living game world. This unique puzzle game is beautifully hand-drawn and full of surprises. This game is also available on many gaming systems including PlayStation, Nintendo, and Xbox. It has won a number of prestigious awards. The app costs $3.99.
Notion (iOS and Android)
Notion uses artificial intelligence and unique algorithms to help users sort through and organize their email inbox. The Radar feature shows you what messages require an immediate reply. It includes helpful features like swipe controls and customizable notifications. Notion has an Alexa skill that makes it possible to use the app with Amazon’s smart speaker system. Notion is free and supports Gmail, G Suite, Office 365 and IMAP email services.


 Phishing is one of the most dangerous forms of identity theft. It’s usually presented in the form of pop-ups or spam emails. The majority of account takeovers come from simple phishing attacks where someone in an organization gets tricked into releasing private credentials and information.