Microsoft Workplace Analytics For Empowering The Time Management Of Teams
Microsoft Workplace Analytics is a relatively new tool from Microsoft that can give managers and company owners better insights into how their teams are working. It can be used to identify patterns that might be affecting productivity. It works to highlight those teams and employees who are doing a superior job, as well as those who are performing poorly. And, it works in the background so that workflows are unaffected and employees are not aware that performance is being measured.
The Corporate Strategy
Most corporate strategies aimed at developing growth and platforms to support sustainability consider time as a resource. Human resource management departments take account of resources such as time utilization as well. Today’s employers require more sophisticated time management systems to ensure that optimal production is recorded. This has led to organizations applying a variety of technical inputs to ensure that time management and employee engagement are integrated to ensure the highest productivity.
Critical Gap
The critical gap that exists between organizations and their sustainability objectives includes poor employee participation. Many employees come to work each day just to get a paycheck; they aren’t invested in the company or its long-term goals.
To fill this gap, technical tools such as Microsoft Workplace Analytics provide reliable solutions to organizations in the area of their time management needs. However, one of the most important questions is whether these technical inputs are correctly measured in terms of the impact to the business.
Additionally, it is also essential to identify whether competing products provide the same impact on a business. This is significant because one strategy cannot fit all the needs of an organization and therefore, some amendments are called for to sustain and develop the organization’s team management.
Today’s Business Challenges
The critical business challenge today is comprised of the choice of technical inputs that will best suit the business model. Various solutions and other tools available, whether at subscribed rates or for free, all work differently for any organization. The type of teams found in any company will differ in terms of their adaptability, making specific time management tools better for some and not-so-good for others. Microsoft Workplace Analytics solves many of these dilemmas due to its versatility.
Technical Solution
A great technical solution to organizations seeking time management and better team management, the Microsoft Workplace Analytics solution can empower teams of all shapes and sizes. The objective of the solution is to ensure that employees can get more done at the workplace each day while expending less effort. Also, with better time management, employees can achieve a better work/life balance. This can significantly increase job satisfaction. Through the utilization of shared space, shared interests develop into agreeable decisions limiting conflicts within the organization and manifesting collaboration among colleagues.
Competing Products
Competing products to the Microsoft Workplace analytics program include MyAnalytics, which is also known as Delve Analytics. The purpose of this tool is to keep a watchful eye on productivity. It can determine whether specific employees are working hard or hardly working.
Using the same concept as Microsoft Workplace Analytics, the purpose of these products is to limit internal conflicts, while making sure employees are being productive most of the time. However, some managers will not like a style of management that monitors employee activity so closely. Employees may feel that they’re being micro-managed. This can actually hurt instead of help productivity.
Solutions Adaptability
Microsoft Workplace Analytics should be used with willing teams and cooperative management. Once everyone is on board and working toward a common goal, it’s possible to achieve the desired analytics. This can help an organization to make changes where necessary in order to inspire growth and development for the organization. Of course, the outcome can depend significantly on the interaction between conflict management and employee engagement.
Impact on Team Performance
The impact of team management solutions includes increased productivity for the organization, limited conflicts for management, shared goals for the teams, and the sustainability of the whole unit. The technical inputs of time management play a major performance appraisal role that could threaten the retention level of employees.
Companies may benefit from further research in analyzing how well different types of teams can work with technical time management programs like Microsoft Workplace Analytics. In contemporary organizational strategies, the one-size-fits-all attitude concerning organizational decisions is no longer a valid managerial perspective.
Estimating Validity
To estimate validity, organizations require performance auditing. This ensures the corporations can link the effects of a time management program to the overall sustainability of the organization. By tracking the record of performances and number of conflicts, the usefulness of a time management tool can be estimated.
Identifying those departments and teams faced with multiple problems might be a task for a different sort of program. Therefore, irrespective of the advantages associated with the innovative solutions provided by time management programs, a better understanding of the teams and people involved is recommended.
Conclusion
The Microsoft Workplace Analytics suite offers many advantages to contemporary organizations who are searching for a more reliable way to measure employee teamwork. Under the right circumstances, it can provide a number of solid solutions to employee dissatisfaction, while improving workflows and productivity.
Microsoft is always looking for great ways to make your workflow easier. That’s why they continuously update their products. The July 2018 updates to Office 365 are especially unique and should prove to be very helpful to users.
Upgrades To The Ribbon
Microsoft introduced the ribbon in its Office 2007 software. It replaced those traditional menus and toolbars that users were so familiar with. Though the changes did cause somewhat of a stir in the community of users, soon everyone came to appreciate the ribbon. It went over so well that Microsoft continued to update the ribbon each year to include greater functionalities.
Today, no one can imagine Office 365 without the ribbon. With that said, the new updates for Office 365 July 2018 include larger graphical controls on the ribbon that are more visible and grouped in a logical manner. Ribbon functions are more accessible and easier to use. Microsoft’s goal with this update was to make it easier for users to collaborate and connect with others.
The ribbon is also more intuitive now. It puts those commands you’re currently using front and center so they’re available when you need them.
Now there’s only one row of buttons instead of two, which helps to keep the commands you use at the forefront of what you’re working on. This allows more space for your document content. If you’re a big fan of the old ribbon that had two rows of commands, you can easily restore that look with the toggle of a button. Restoring the classic view has been made simple.
The new simplified ribbon is scheduled to be released first in the web version of Word. It will be rolled out to a special group of Office insiders in July. Microsoft will take the feedback from these users, then adjust their updates before rolling out the new Office applications to all users.
Sharepoint Integration
Integration has always been a big thing for Office 365 applications. The Office team has gone one step further with new ways to embed Planner into SharePoint sites. Now the Office 365 productivity solutions that everyone loves are even easier to access. For instance, the SharePoint navigation bar gives all team members the ability to manage tasks directly from SharePoint. Outlook, Calendars, and Microsoft Teams are still available from most applications.
A new button on the SharePoint page allows users to add a plan from Planner. Designing a SharePoint page that has plan details is a breeze. Simply head over to the SharePoint page with the plan details, then click on the Edit button. Locate the area where you want your plan displayed, then click the Plus sign, and select the new Planner web part.
Microsoft Teams Updates
SharePoint integration for Microsoft Teams has been greatly simplified as well. Users can add files directly into the Teams interface right from SharePoint. They can also link an entire SharePoint document library in Microsoft Teams.
Teams have become a favorite meeting application with all the Microsoft apps accessible from the Teams interface. This app took a huge leap forward when Teams was recently updated to allow for links to an entire SharePoint document library. This offers fast, convenient ways to share the SharePoint document library with your whole team. Expect to see more exclusive updates to Microsoft Teams in the future, as it has now become an indispensable part of everyone’s workday. It’s revolutionizing the way people communicate.
New Chat Functions
The Team’s chat experience has been improved to add more flexibility to participants. For instance, if you are involved in a chat that is no longer relevant, you can easily duck out of the meeting. You can also hide a chat if you need to do so or mute a chat if you need to focus on some other task at the moment.
Sway for iOS
Microsoft announced its most extensive update in history on May 30th to Sway for iOS. Now users will find it easier than ever to create a Sway from beginning to end on their iPhone or iPad. Users can quickly toggle between Edit and Preview modes. Add and reorganize text and media in the Edit mode.
Preview lets you see your Sway as others will see it. You can also make easy and fast changes to your Design with the toggle of a button. Edit mode has been simplified to an all-white canvas where users can add photos and videos from the camera or take a new photo. Tap on an image to resize it or add a caption. Photo grouping has been simplified as well. Drag and drop one image onto another to create a new image group.
Sway on iOS allows for the addition of lists, bullets, links, blockquotes, and more with the single tap of a button. Once you have your Sway completed, it’s easy to share or you can invite friends to collaborate. The Sway app for iOS is available from the Apple Store and it’s more fun than ever to use.
Wrap Up
The Office 365 Updates for July 2018 all about ease and convenience. You can do more in less time. It’s well worth it to learn these easy new ways to use Office 365 so you can shave time off your workday and get more done each day.
If you own a small business that deals in offering services to the public, scheduling appointments is often part of your daily routine. You may find yourself playing phone tag so much that you sometimes lose focus on your clients. Being a small business, you may have to double up as the chief administrator and financial officer, as well as the inventory supervisor and janitor on some days.
Microsoft Bookings: empowering clients to handle the appointments part
Microsoft has a solution – Microsoft Bookings – designed to alleviate the burden of booking appointments. Microsoft Bookings is a new online and mobile scheduling tool that is available with the premium subscriptions of Office 365. It provides your business with a unique web page where customers can schedule appointments themselves. First, the customer selects the service they want, chooses a day and time based on the availability you’ve provided, then enters their contact information and proceeds to book the appointment.
First things first: set up your Microsoft Bookings portal
The first step is to sign up for an Office 365 plan that includes the Microsoft Bookings service. Once you do this, the Bookings portal is turned on by default. It’s available as a tile in the MS app launcher. If you check the app launcher page and do not see “Bookings” listed there, then you may not have the right plan.
Bookings are available with an Office 365 Business Premium subscription, as well as for customers with the Office 365 A3 and A5 subscriptions. However, enterprise customers with Office 365 Enterprise E3 and E5 subscriptions can now turn it on and set it up for their clients.
To turn on the Bookings app for Office 365 Enterprise E3 and E5 subscriptions, simply follow these steps:
Step 1: Login to the administrator portal
To configure Microsoft Bookings, start by logging in to the admin center of your subscription by clicking on the Admin icon and entering your administrator username and password. This gives you the admin rights to acquire new services from Office 365.
Step 2: Adding Bookings to your Office 365 Enterprise subscription
Once you’re logged on, select the Billing tab and navigate to the Purchase Services option under it. You should be able to see a whole selection of options that include a Business App (free) with a Buy Now button that shows up when you hover over it. Click on this button to add the app to your subscription free of charge.
You will then have the option to add the amount corresponding to the licenses that you want. Ensure that this amount matches the total number of users in your organization (preferably). You will want to enable this service for these users during setup.
When this is complete and you have assigned licences to the users that you want the service enabled for, the users will now see the Bookings app as a new addition to the multiple apps on Office 365.
Moving onto setup
To set up the Microsoft Bookings site for your small business, click on the Bookings icon to open the Microsoft Bookings app. This action should open the welcome screen on the Microsoft Bookings website.
Tap the “Get it now” button to begin the setup process. This should lead you to a new window where you can enter your new Bookings calendar name and add it by clicking the “Add a booking calendar” tab.
You will then see a new window that requests more information about your business. This is where you enter your business name and type (from a predefined list). Ensure that the name you provide is unique since it is what will be used as the email address from which meeting notifications are sent.
When you’re done, select the “Continue” button and give it a moment to build the site. Your new Microsoft Bookings site eventually appears, ready for customizing.
Click on the different options to add more details about your business, staff, and services. Take your time to explore the various settings, one by one to ensure that you customize everything correctly. Of course, you can go back and tweak things if you need to.
At the end, you’ll have a Home Page from which you can monitor Bookings, add activities, modify the services you offer, manage your staff by adding, removing, and/or setting them up in terms of, say, working hours and days of the week – with respective color codes for each staff member.
Wrap-up
With Microsoft Bookings, you can spend far less time scheduling appointments with your customers and instead concentrate more on actually serving them. The tool simplifies how customers schedule and manage appointments. It takes care of the appointment-booking side of your business management so you can focus on the service side.
This tool was built for small businesses that depend on scheduling appointments with customers. It’s great for companies such as an auto mechanic shop, insurance agent, accounting office, a dog groomer, hair stylist, a dentist’s office, and many more. Now customers can set up their own appointments and do it at their convenience. This frees up your staff for other tasks. Microsoft Bookings boosts customer satisfaction, plus it reduces the number of missed appointments.
A foolproof guide for increasing efficiency in Excel
Excel often gets a bad rap. It is misunderstood as the groan-inducing, spreadsheet monster with tricky-to-navigate features. However, the truth about Excel lies in the user’s commitment to making the most out of the feature-rich platform. If we put aside Excel’s tedious reputation, creating step-by-step guides for mastering Excel efficiency really is a no-brainer.
The Marvelous Macro: How Macros Make Your Life Easier
What better place to start than by creating a macro in Excel. Creating a macro is hands-down the best possible way for users to automate repetitive tasks and get tedious work done more efficiently. Can you think of something that you or one of your team members does repeatedly in Excel? Whether it’s data entry or calculations, creating a macro can help streamline team processes and seriously boost productivity.
Basically, a macro lets you record an action or series of actions that can then be run repeatedly as needed. The creation of a macro is essentially a duplication of some specific set of mouse clicks and keystrokes, which gets recorded and saved to help you work smarter not harder. The best part about macros? They’re completely customizable. Once you’ve created your macro, you can make tweaks and edits to ensure they work just the way you want them to.
Productivity Game Changer: Working Smarter Not Harder with Excel
When you think about it, this is a game-changer that’s super easy to implement. Consider this. Perhaps one of your team members creates daily, weekly or monthly reports for managers, customers or other staff members. The creation of these reports, on a repetitive basis, can be extremely tedious when done manually each time. This results in long completion times and a huge decline in morale for your tied-up workers.
Creating an Excel macro for projects like these helps keep your team moving forward while still staying on top of boring, yet mission-critical reports. An Excel macro can be tailored to help workers format names, color-coded report data, and customize formatting and presentation. The macro can then be run and applied to any selected cells, meaning monotonous tasks really do become as easy as the click-of-a-mouse.
How to Create a Macro in Excel – A Fool-Proof Guide
Alright, ready to cut to the chase? How exactly can you and your team start taking advantage of the Excel macro feature in hopes of improving productivity, efficiency, and morale? Check out the fool-proof step-by-step guide below.
Creating a Macro in Excel
Initial Steps
Before you record a macro, you must ensure the Developer tab is visible on the ribbon. As a default, Excel keeps the Developer tab hidden. In order to get it front and center, complete the following steps:
Go to Excel > Preferences > Ribbon & Toolbar
Under the Main Tabs list, select the Customize the Ribbon
Then, select the check box beside Developer and then click
Record Your Macro
You’re now ready to record your series of actions to create your macro. With your desired keystrokes and mouse-clicks in mind, follow these steps to record your macro:
Under the Developer tab, select Record Macro.
If you wish, enter a name for the macro in the Macro Name
Enter a shortcut key in the Shortcut Key
Enter a description in the Description
Select OK to start recording.
Carefully perform the series of actions you wish to automate.
Once you’ve finished the sequential actions, select the Developer tab from the Code group and select Stop Recording.
Fine Tuning Your Macro
In order to make the most out of your creation, be sure to check out the different ways you can customize and edit your macro. To edit a recorded macro, follow these steps:
Under the Developer tab, click
Select the name of the macro you wish to customize and choose
This will open the Visual Basic Editor. Here, you can witness how your recorded actions play out as macro code.
This is where the creativity comes in. Experiment with your code, then close the editor to run your macro again. Tweak and customize as much as you wish until the macro is running just as you envisioned.
Back to Basics: Reaping the Productivity Benefits Already Built into Your Infrastructure
It’s that simple! Suddenly, your team members have a more streamlined and efficient way of completing even the most tedious of Excel tasks. This means increased productivity, a boost in morale and a more efficient team overall. By keeping your team moving and productive, you keep your team occupied and happy, which can only have positive impacts on your day-to-day operations and ultimately, on your bottom line.
In an increasingly crowded marketplace of digital productivity solutions, it can become easy to get lost in the shuffle and postpone the mastering of your operational pains. However, when professionals remember to get back to basics, a world of difference can be discovered.
By paying attention to what your existing digital infrastructure can do for your business, professionals can save time, money, and frustration. Good leaders understand the trials their employees endure each day. Any organization can make solid improvements without subscribing to new or trending efficiency solutions.
IT experts know that helping professionals make better use of their existing infrastructure is a core part of the managed-service mission. Professionals don’t need all the very latest tools and gadgets to help their team navigate technology more productively. They simply need to learn how to maximize those tools they’re already using.
With a humble and level-headed approach, a strategic IT partner will be committed to helping every client make better use of what they have and become the masters of their own tech infrastructure.
If you’re looking to get a better handle on the tech resources your team uses daily, don’t hesitate to reach out to a team of IT experts for advice and consultation. One phone call can put your company on the path to revamping your existing infrastructure and mastering operational needs.
Quickbooks offers users at every level, an enterprise-grade accounting program to track income and expenses. This software package was designed to enable businesses to track financial expenditures and income with the level of detail necessary for complete control of company finances. It is somewhat like a soft copy of accounting book. Some people may find it a bit hard to navigate using the mouse or the navigation pad of a computer while working on a given document. The good news is that there are alternatives to achieving the same results by using the keyboard.
You may find that your mouse gets lost under a heap of paperwork. Wireless mice are great for today’s busy professionals but they often fall off a table and land in the floor. You may have urgent financial reports due and need a quick fix for these issues. You don’t need to worry because there’s a way to get your accounting work done using some keyboard shortcuts.
Below are a few Control key combinations to make your work not only easier but more efficient while working in QuickBooks Online:
To do this in QuickBooks:
Press these keys together:
View a list of Shortcuts
CTRL + ALT +?
Create an Invoice
CTRL+ ALT + I
Create a check
CTRL + ALT + W
Enter an expense
CTRL + ALT + X
Open the Customer list
CTRL + ALT + C
Open the Vendor list
CTRL + ALT + V
Open the Help window
CTRL + ALT + H
Find transactions
CTRL+ ALT + F
Save and go to a new transaction
CTRL+ ALT + S
To close any window
Click Esc
Create an Invoice
CTRL+ I
Create a check
CTRL + W
Display Help in context
F1
Open the Customer list
CTRL + J
Find the History of any transaction
CTRL +H (with transaction open)
Open the Memorized transaction list
CTRL+T
Find Transactions
CTRL+F
Delete Transactions or list Items
CTRL+D
Create new list item
CTRL+N (with list open)
Some of these shortcuts will work differently when using various browsers as explained below.
To open the second window in:
Internet Express: Press Ctrl + N (You will be logged into existing company on both windows.)
Firefox: Press Ctrl + N (You won’t be logged into the second window, but will remain logged into the first one. The second window will allow you to log into the existing company so that you may work using both screens.)
Chrome: Press Ctrl + N (If you go to QBO in that window, you will be logged into the existing company.)
Split Your Screen
There is a way to split your screen by using shortcut keys on your keyboard. This allows you to have all your information on one page for easy reference while working. Just press the windows key and the left arrow for the screen you want on the left, plus the windows key and the right arrow for the screen you want to appear on the right side. If you want to resume normal screen view, simply press the windows key and the up arrow.
Duplicate Your Screen Tabs
Press the Alt+D to copy the address then press Alt+Enter to open a new tab with the URL. All you need to remember is to keep your thumb on the Alt key. Press Alt key down and then hit D and Enter almost simultaneously in order to duplicate the current tab. This works almost like magic! You get to open your tab twice instead of going back to the browser.
Sending Reminders
You can send invoices reminding clients to pay their bills using your QuickBooks Online and the Navigation Bar. Select Overdue Invoices to view and then finally click on the Send Reminders. You can even track the sent invoices and learn whether the client has viewed them. This also allows you to see how many times the customer has viewed them and whether they have ever viewed your email. If not, you may want to check to make sure you have the right email address for this customer.
Choose items in drop-down lists:
Press Tab until you reach the field.
Press Alt + down arrow to open the list.
Press up arrow or down arrow to move through the items in the list.
Press Tab to select the item you want and move to the next field.
If you don’t want to open the whole list, but just want to scroll through the items in the text box, press Ctrl + down arrow or Ctrl + up arrow.
Wrap up
Using Shortcuts in QuickBooks Online can be less time consuming because navigating through your accounting books is much easier when you use simple clicks on your keyboard. Plus, you never have to search around under a table for your mouse again. Shortcuts are a quick, easy method of accomplishing any task. That can help you shave valuable time off your workday so you can get home a bit faster and who doesn’t like the sound of that?
Northcentral Technical College (NTC) in Wisconsin has experienced a crippling cyber attack that shut down most of its classes from Monday through Wednesday. The cyber attack triggered system outages all over the school causing school officials to issue a public notice on the homepage of the college website that read:
“We apologize for the inconvenience but we are continuing to experience IT system outages. NTC’s Information Technology team is working diligently to bring information systems back online. We will continue to post updates to this page as they are available.”
Cyber forensics investigation underway
The college would not release any specific information about the data that was lost, but they did reassure their students and faculty that no one’s personal data was stolen. They have since hired a cyber forensics team who will perform a thorough investigation of the cyber intrusion. School officials want to know what type of information was targeted and whether any data was lost or compromised.
Marketing and public relations director, Kelsi Seubert, commented saying, “NTC’s Information Technology team is working extremely hard to bring information systems back online and we will communicate additional updates to students and staff as they are available.”
Seubert also sent an email out to students and faculty that reassured everyone that an investigation was underway but would require some time to complete. She also mentioned that the initial attempted hack occurred on June 4th.
The school has stated that all classes will be resumed on Thursday and that campus life would soon return to normal. A few classes that were not impacted by the breach were carried out as usual.
Summer school
The summer class schedule had just begun on Monday with students showing up to take advantage of Northcentral’s summer learning programs. The school offers a unique array of subjects ranging from technical diplomas to Information Technology training. Students can take summer courses to get additional credits so they can graduate sooner, or they can catch up on classes they may have missed.
The school has a flexible curriculum that includes virtual educational opportunities, online classes, late-start classes, winter enrollments, and many others. They offer associate’s degrees, certifications, and technical diplomas. In the accelerated credits program, students can get three credits in three weeks by taking augmented versions of the class.
Cyber breaches on the rise
Security breaches and cyber-attacks have become common in the news. Though it seems like everyone should know by now what it takes to prevent them, cyber thieves are escalating their tactics with each new attack.
In over 90 percent of these events, human error is to blame. A school official or teacher may have inadvertently clicked on a suspicious link. The latest phishing attacks include emails that look almost identical to what you might get from a bank or credit card company. Often, the email will say that something is wrong with your account. Cybercriminals use fear to gain access to your personal log-in information. An email might say something like:
“Alert! You have been locked out of your ABC Credit Card account due to suspicious activity. Click the link below to sign in and change your password.”
Once you click that link, you may be redirected to a phony website where the hackers will steal your password and username. Now they have legitimate access to your credit card account. They can go online and buy the merchandise having it shipped to an address overseas.
In this situation, never click on the link that’s embedded in the email. Instead, open a fresh page in your browser and navigate to your credit card account the way you normally would. Log in and check your messages. In most cases, there’s absolutely nothing wrong with the account; it was just a ruse to get you, the consumer, to give away your password and username to cyber thieves on the other side of the world.
Third party vendors
Colleges and schools do business with a wide number of third-party vendors. If these vendors have access to any of your important data, then they should be thoroughly vetted in advance. Though a school or business cannot control the activities of third-party vendors, it’s important to make every effort to ensure that they are observing stringent security regulations.
Faculty training
All school faculty should attend regular security meetings to learn about the latest cyber threats and how to avoid them. Training employees and teachers have proven to reduce the number of cyber breaches. Training should include facts about how security breaches occur and what to do to stop them. Faculty should understand the difference between ransomware and malware. They should be familiar with the many types of phishing and spear phishing attacks. These are just a few of the many ways an organization can protect itself against cyber- attacks.
Northcentral Technical College life returning to normal
Though school administrators have reassured everyone that no financial, personal, or confidential information was stolen, the investigation into what happened is only just beginning. It often takes months for an organization to realize the full extent of a cyber-breach. It can be years before the true cost of the security breach is fully understood.
Northcentral Technical College located in Wausau, Wisconsin, is a community college and member of 16 schools in the Wisconsin Technical College System.
The new features in Outlook are designed to help users save time and be more productive. Since we spend so much time writing and answering emails, this is one area where most of us would love to be able to get done faster. Microsoft designed Outlook with lots of thought and effort. In addition, they add exciting features every year or so. They do plenty of solid research when designing all their products because they believe in finding out what users are asking for and providing that.
Intuitive design
You can see the planning that went into developing this version of Outlook. Most people will pick up how the new features are used pretty quickly though since this version is similar-looking to older ones. All Office 365 products share a similar look and feel in their design. The Ribbon contains many of the same features whether you’re using Word, Powerpoint, or Outlook.
Outlook’s new design is so streamlined that the new features transform the way you connect to your people and technology. It will infuse power into every productivity task. It comes with better security to ward off hackers. Keeping your email safe and secure is an important job. Today’s software programs and apps must contain higher level security features in order to address the growing number of data breaches going on all over the world. Microsoft does a good job of incorporating better security measures than many other companies.
There are a lot more new things to see and do in the new Outlook 2018. It can be configured to give users the convenience they’re looking for in an email program. Once you learn the ins and outs of the program, you can fly through otherwise boring tasks.
Below, we check out 5 of the coolest new features in Outlook. They should help you get your work done each day with time to spare.
Multiple time zones
Traveling around the world? Trying to sync appointments with people on various continents? Whether you’re just flying to Chicago or going to Tanzania, you can configure Outlook to set up meetings based on whatever time zone you choose. Appointment times will sync up depending on where everyone is. Each person is given the meeting time in their own time zone so no one will be late for the meeting. This is a super convenient feature that everyone will appreciate since the business world is now a global affair.
It’s easy to set this feature up. Open the Windows version of Outlook, then add an event by selecting File > Options > Calendar Time Zones. Now choose the option, “Show a second-time-zone.” If you’re using Outlook on the web, you should click on the drop-down arrow called “Time Zone.” This item can be found in your Calendar. If using a Mac, you can add extra time zones by navigating to Outlook > Preferences > Calendar Time Zones. With a little practice, you can become a pro at setting up various meetings with customers and team members around the world.
RSVP
Invite the whole crew to a picnic at the lake. After all, fun outdoor events are a good way to build camaraderie. Outlook makes it easy to send invitations, whether it’s a party, picnic, big meeting with the boss or just a lunch date. RSVP keeps track of who is coming (Tracking Option) and whether RSVP’s have been replied to. You’ll get reminders about the event based on how you set it up. You can get daily or weekly reminders. This feature is offered for both the meeting organizer and attendees.
Office Lens for Android
This is a really simple but helpful feature that lets you integrate the Microsoft Office Lens into your Outlook email program. It only works for Android though. It’s easy to use but very useful. Simply open an email that you want to send to someone. Next, tap the photo icon while creating your message. Now you can take a pic of anything and embed it in the document. You might want to include a photo of a colleague sitting across from you. You could snap a photo of a whiteboard or even a document. Outlook optimizes the photo, then embeds it into your email. There are countless uses for this handy feature.
BCC warning
We’ve all accidentally sent emails to the wrong person. Sometimes, it can be quite embarrassing. This is often the case if you get “BCC’d” on an email and decide to reply. Often people use BCC because they do not want the other people included in the email to know that a specific person got a copy of it. In the new Outlook, if you should hit “Reply All” to an email where you were BCC’d, you will get a warning message. It may say something like, “You were bcc’d on this email. Are you sure you want to reply to all?” We all need someone around to double check our actions from time to time and this feature might save you some embarrassment one day.
Bill-pay reminders
What if an email program could remind you when bills are due? Wouldn’t that be convenient? Outlook has the ability to identify the bills in your inbox, then put together a summary of them each day. This will appear at the top of your email when you first turn it on. Two days before the due date for each bill, you’ll get a reminder. The email program automatically adds an event to your calendar for the actual day the bill is due. Now there’s no excuse for forgetting to pay the light bill.
Conclusion
Outlook has many more really helpful features designed to make your life a little easier. Once you learn all the tips and tricks, you’ll cut time off your work day and get things done more efficiently. If you’d like to learn more about the new Outlook 2018 features, please visit this article.
This is the final of a three-part series about using Microsoft Excel 2016. It will cover some of the more advanced topics. If you aren’t great with numbers, don’t worry. Excel does the work for you. With the 2016 version of Excel, Microsoft really upped its game. Excel’s easy one-click access can be customized to provide the functionality you need.
If you haven’t read Part I and Part II of this series, it’s suggested that you do so. The webinar versions can also be found on our site or on YouTube.
This session will discuss the following:
More with Functions and Formulas
Naming Cells and Cell Ranges
Statistical Functions
Lookup and Reference Functions
Text Functions
Documenting and Auditing
Commenting
Auditing Features
Protection
Using Templates
Built-In Templates
Creating and Managing Templates
More With Functions And Formulas
Naming Cells And Cell Ranges
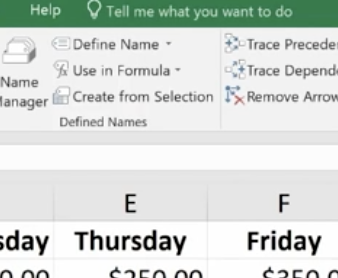
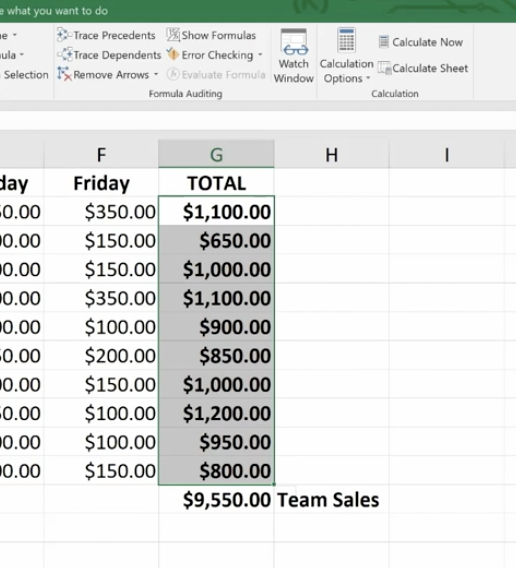
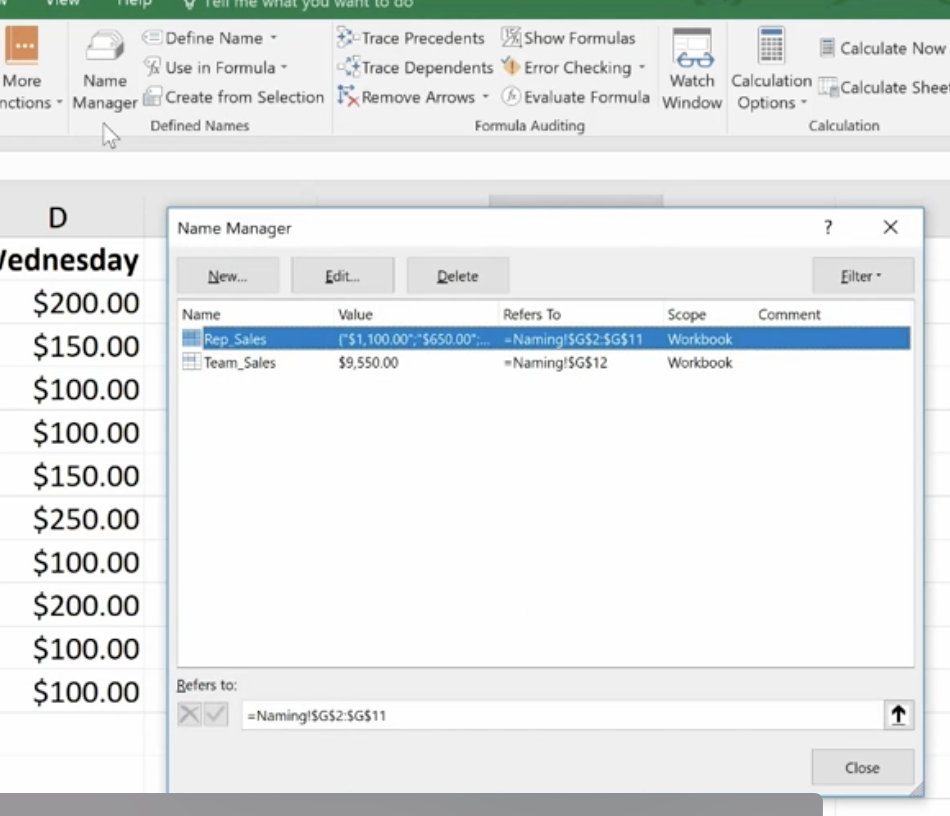
How do you name a cell? You do so by the cell’s coordinates, such as A2 or B3, etc. When you write formulas using Excel’s coordinates and ranges you are “speaking” Excel’s language. However, this can be cumbersome. For example, here G12 is significant because it refers to our Team Sales.
You can teach Excel to speak your language by naming the G12 cell Team Sales. This will have more meaning to you and your teammates. The benefits of naming cells in this fashion are that they are easier to remember, reduce the likelihood of errors, and use absolute references (by default).
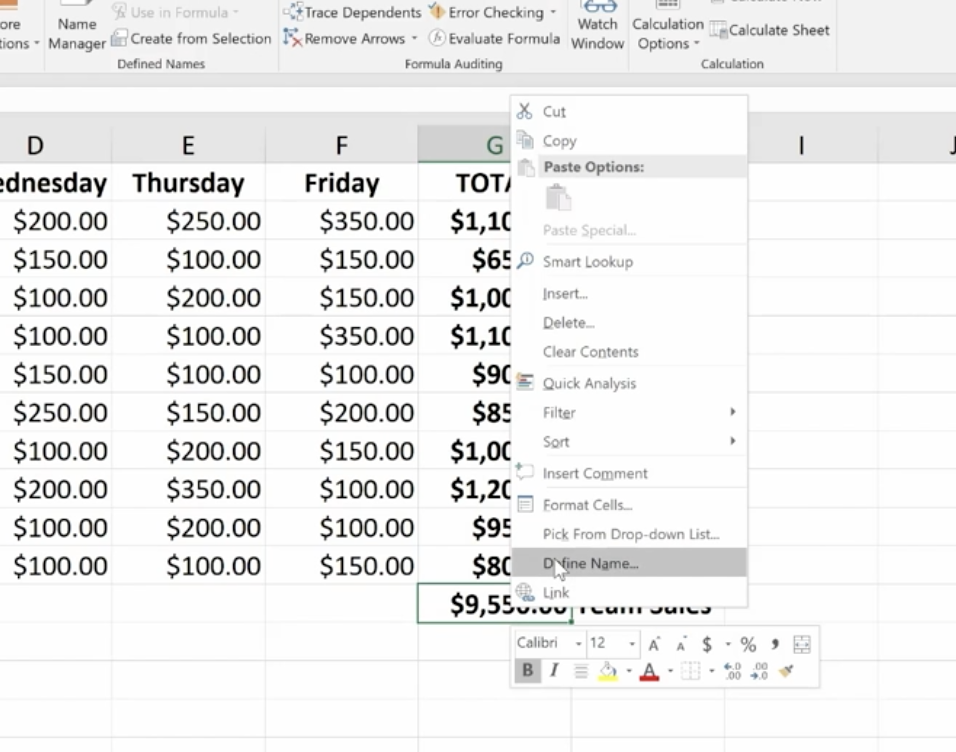
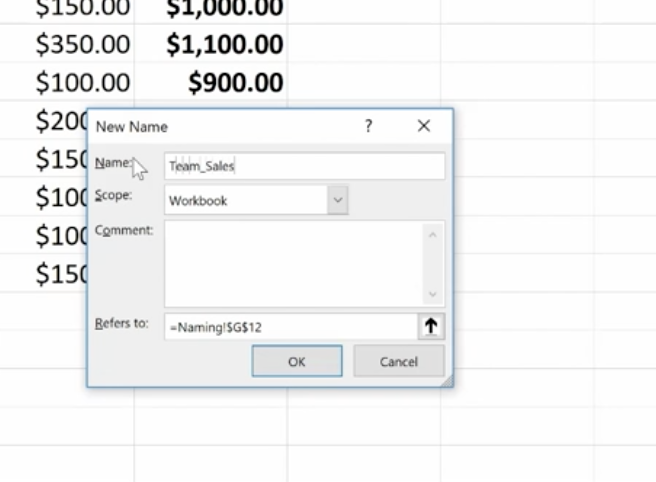
To name our G12 cell Team Sales, right-click on the cell, choose Define Name, and type “Team Sales” into the dialog box. You can also add any comments you want here. Then click Ok.
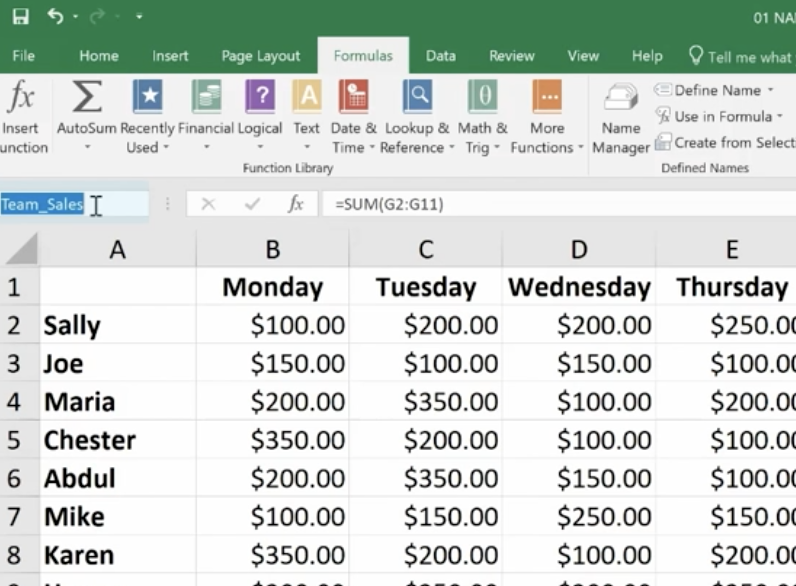
Another way to do this is to click on the G12 cell and go up to the Name Box next to the Formula Bar, then type your name there.
And, there’s a third option at the top of the page called “Define Cells” that you can use.
Notice that there’s an underscore between Team and Sales (Team_Sales). There are some rules around naming cells:
You’re capped at 255 characters.
The names must start with a letter, underscore or a backslash (\).
You can only use letters, numbers, underscores or periods.
Strings that are the same as a cell reference, for example B1, or have any of the following single letters (C,c,R,r) cannot be used as names.
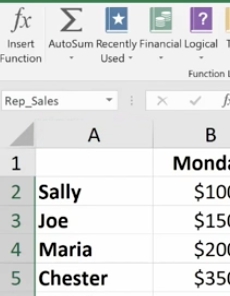
How To Name A Range
Highlight an entire range of cells and name your range (we’re doing this in the upper left-hand corner).
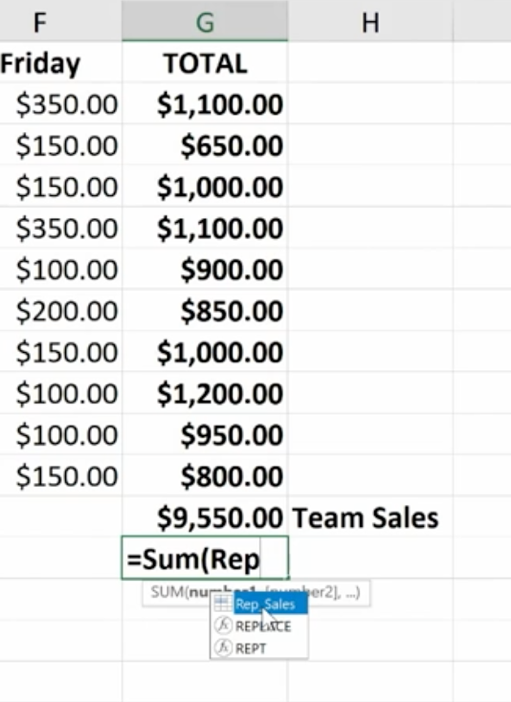
Then you can easily use the name to produce the sum you need:
You won’t have to go back and forth from spreadsheet to spreadsheet clicking on specific cells to calculate your formula. You simply key in the name of the cell range you want to add. Just be sure to remember the names as you build your spreadsheets over time.
If you ever make a mistake or want to change names, you can go to Name Manager to do this.
Remember that if you move the cells, the name goes with it.
Statistical Functions
The three statistical functions are:
Average If
Count If
Sum If
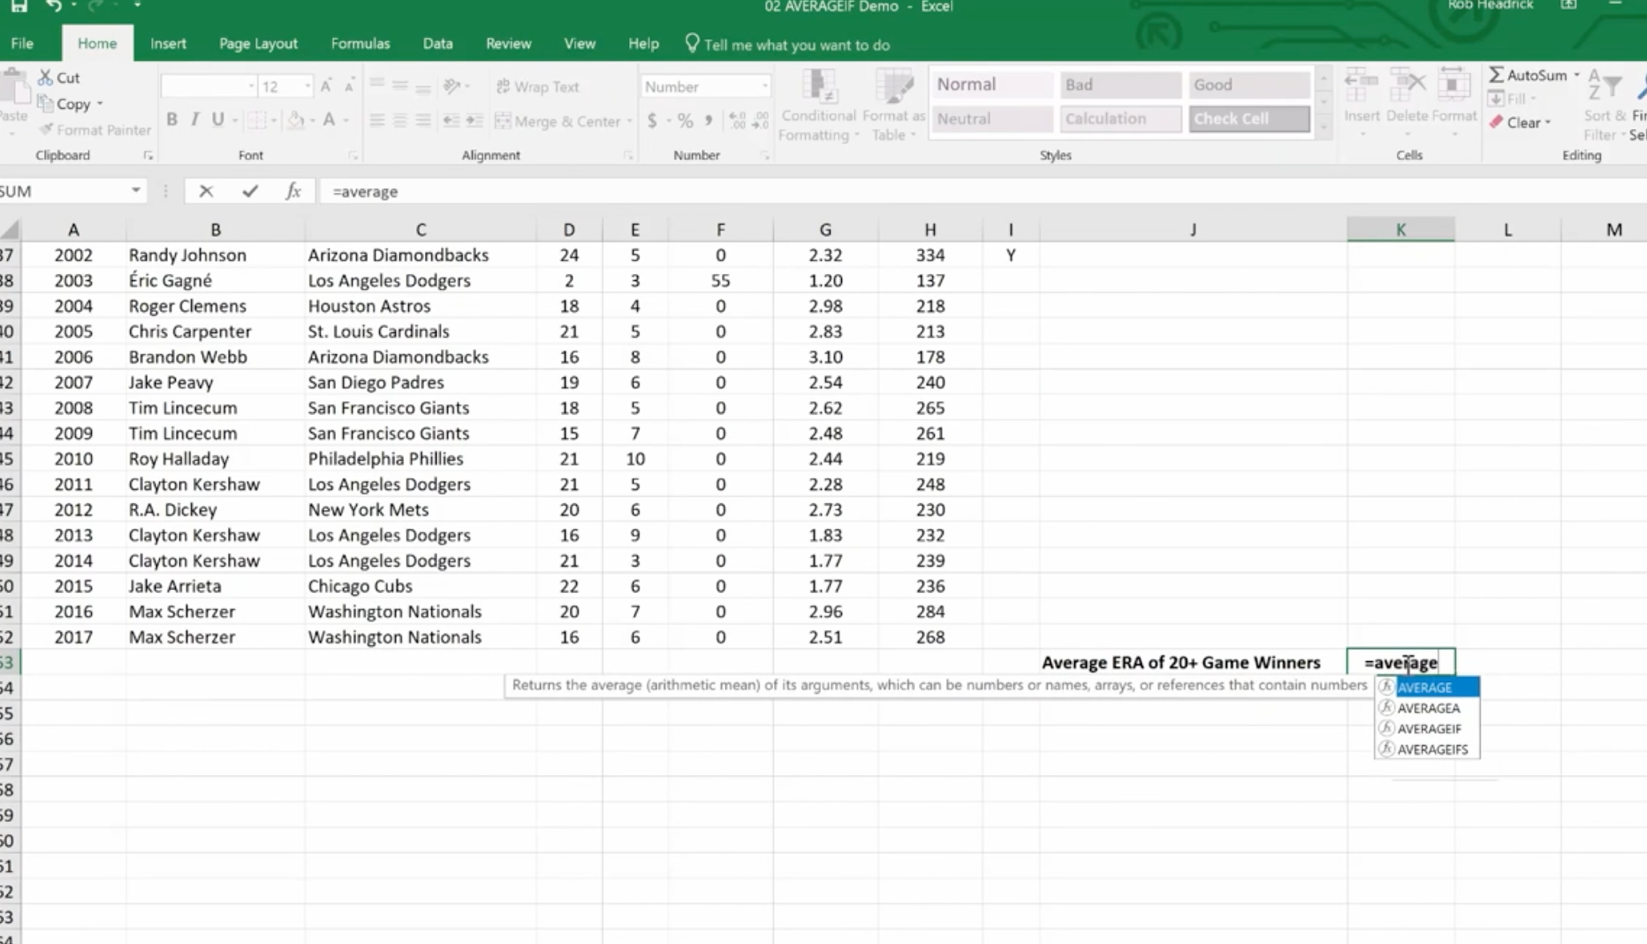
The Average If can be used to figure out the average of a range based on certain criteria. Here we’re going calculate the Average If of the ERA of 20+ Game Winners from the spreadsheet we developed in our last session.
We’ve already named some of our cell ranges (wins, era). And we want to know the average greater than 19.
Hit Enter and you have the average.
You can use this feature across a wide variety of scenarios. For example, if you wanted to know the average sales of orders above a certain quantity – or units sold by a particular region, or the average profit by a distinct quarter.
Count If is used for finding answers to questions like, “How many orders did client x place?” “How many sales reps had sales of $1,000 or more this week?” or “How many times have the pitchers of the Philadelphia Phillies won the Cy Young Award?”
As you can imagine, it’s essential that you type in the text exactly the way you named that particular cell.
Hit Enter and you get your answer
Now we’re going to use the Sum If function to calculate the number of strikeouts by the pitchers on this list who are in the Baseball Hall of Fame.
Sum If is a good way to perform a number of real-world statistical analyses. For example, total commissions on sales above a certain price, or total bonuses due to reps who met a target goal, or total earnings in a particular quarter year-over-year.
Lookup and Reference Functions
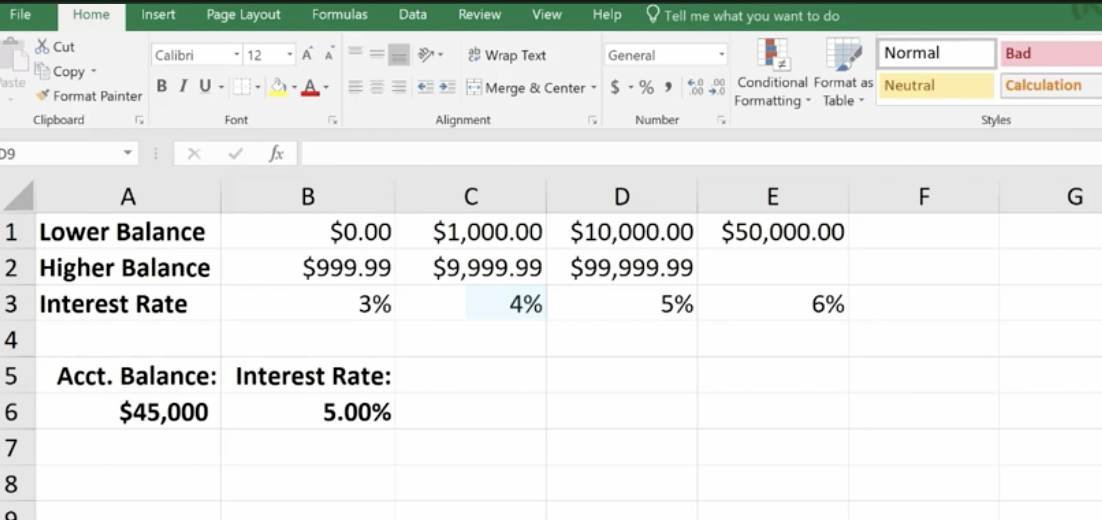
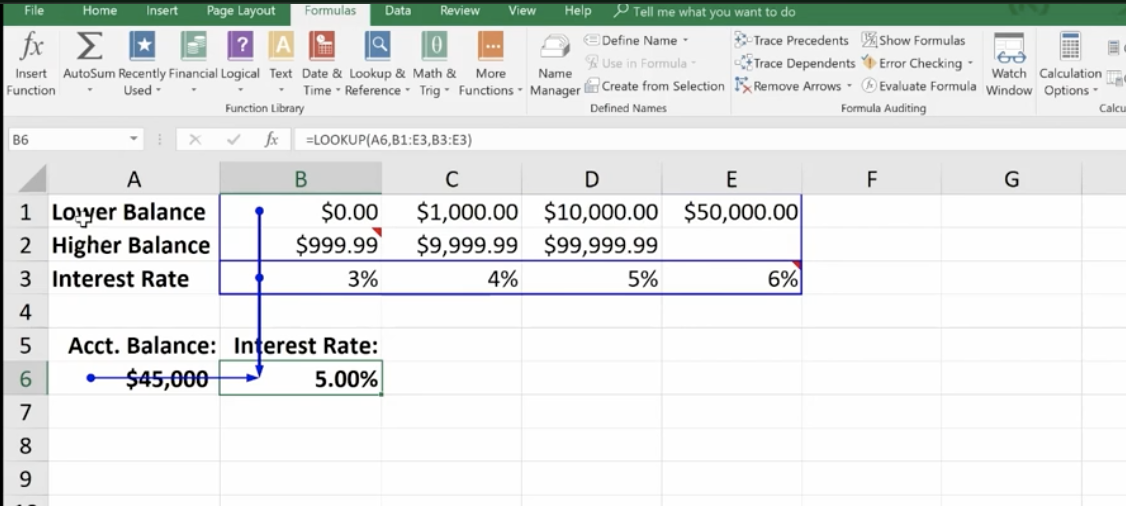
These are designed to ease the finding and referencing of data, especially in large tables. Here, cells A1 and E3 relate to a variable interest rate that is paid on a bank account. For balances under $1,000, the interest rate is 3% – between $1,000 and $10,000, the interest rate is 4%, etc.
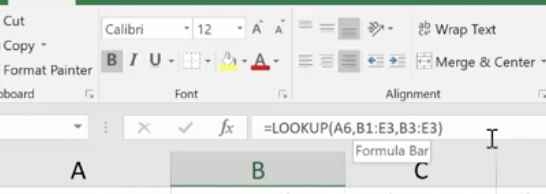
Cell A6 shows the balance of a specific account. The Lookup Function is used in B6. It looks up the interest rate and applies it to the account balance of $45,000. This is what the formula looks like in the bar at the top:
The vector form of the Excel Lookup Function can be used with any two arrays of data that have one-to-one matching values. For example, two columns of data, two rows of data, or even a column and a row would work, as long as the Lookup Vector is ordered (alphabetically or numerically), and the two data sets are the same length.
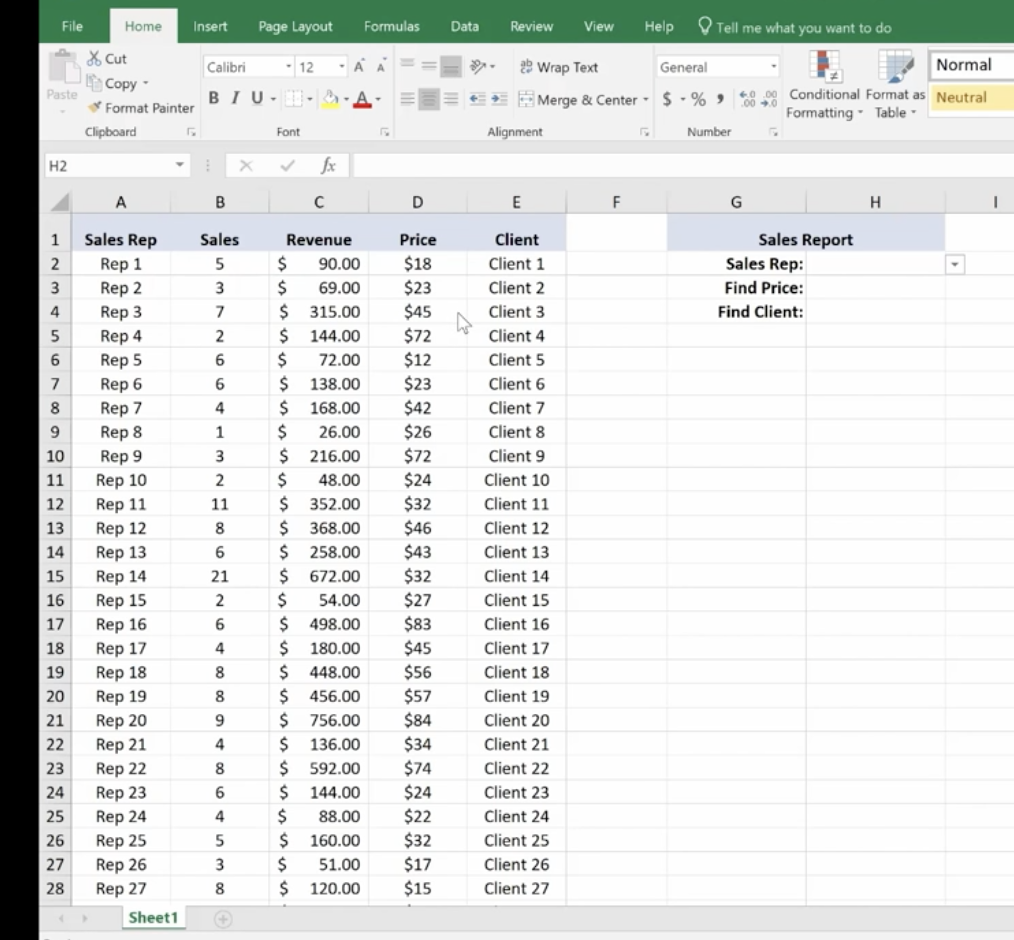
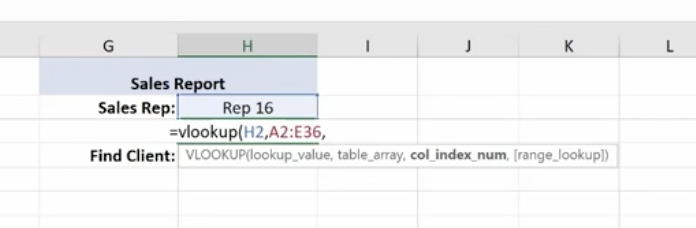
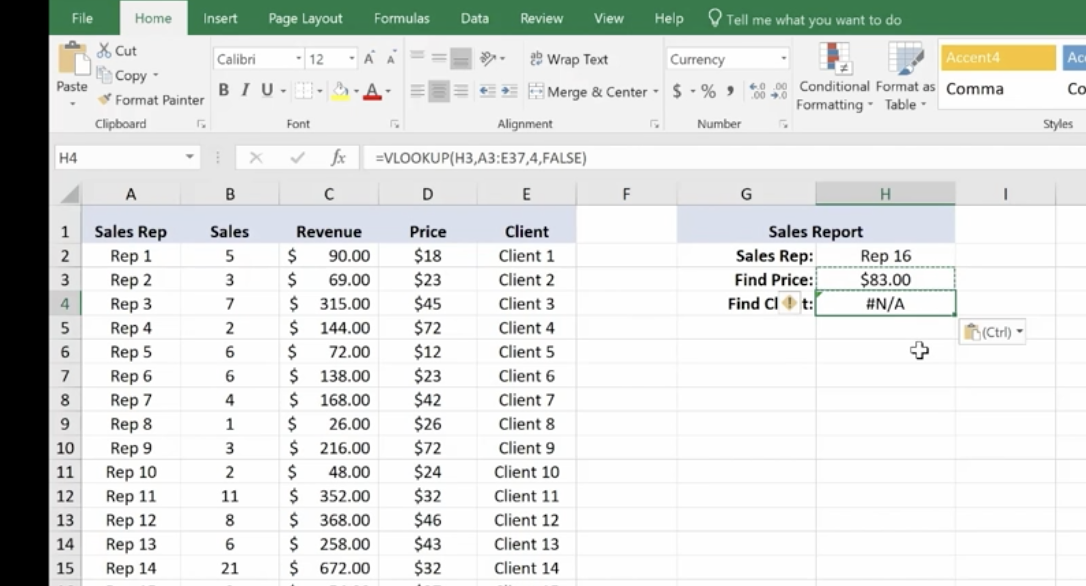
V Lookup and H Lookup are used to pull information into reports. We’re going to use Report Setup. Here, we have a worksheet that references salespeople, sales data, pricing, revenue, and the clients that they sold to. You’ll see on the top right where we set up a report with names referencing sales data.
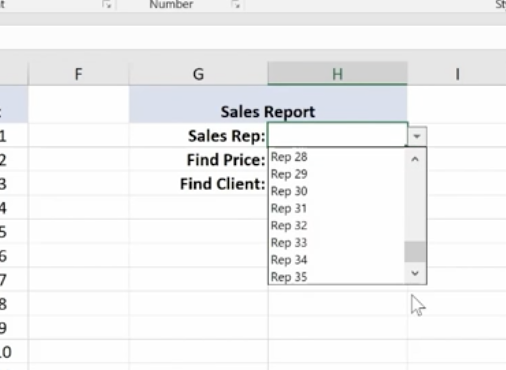
You can access the sales reps in the drop-down menu. Pick a rep and use the V Lookup Function to find the price.
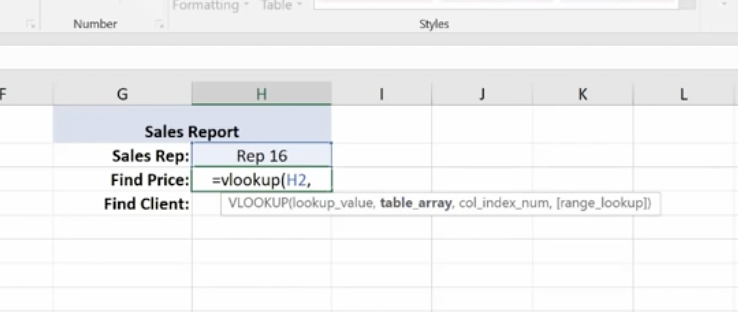
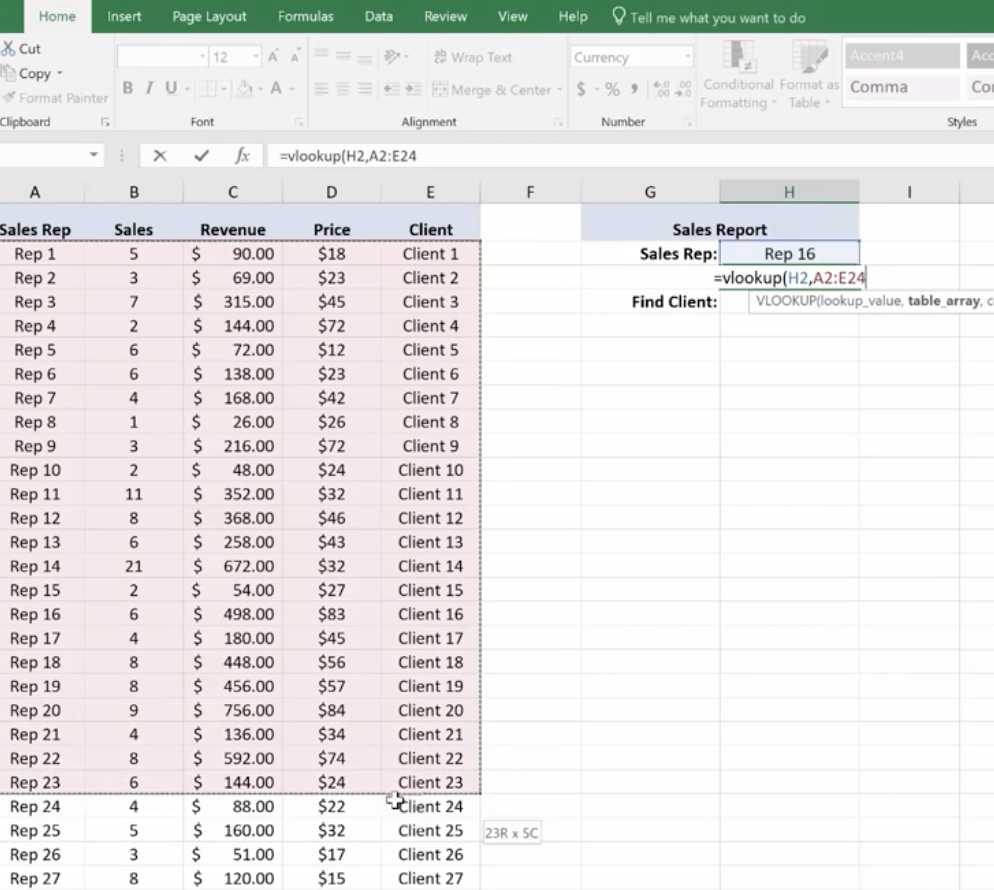
To Find Price, key in =vlookup and the corresponding cell number for Rep 16, plus the table array which is the entire table not including the header at the top.
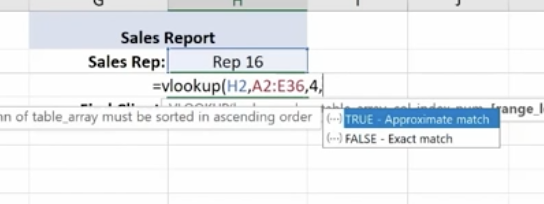
Then you need the column index number. This is the number of columns to the right of your lookup value column, which is column A. It’s the 4th column from column A (Price).
Enter 4,
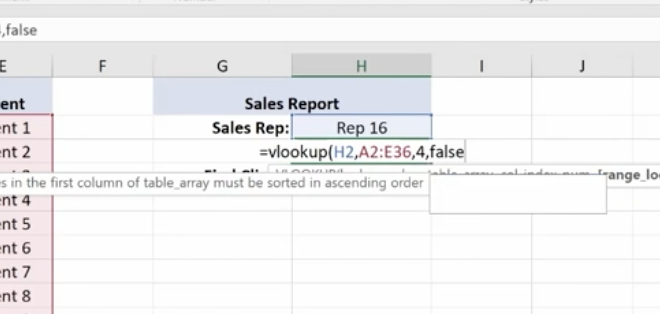
For range lookup we’re using true or false. We are entering false here.
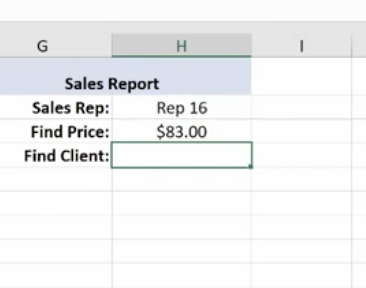
Hit Enter and this is what you have for your Find Price value.
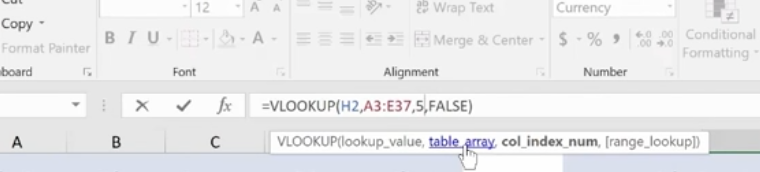
Now we’ll do a similar V Lookup for the Client. Copy and Paste:
Make the necessary changes in your formula:
Client 16 goes with Rep 16.
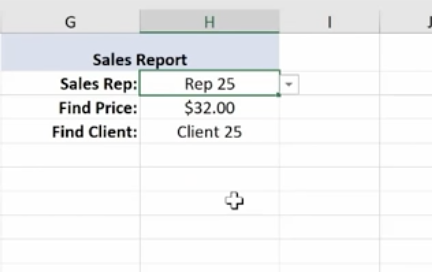
Note: If you change the Sales Rep, all the corresponding values will change.
If you have a lot of data and long tables, V Lookup helps you find information easily. The V stands for Vertical (or by column), because columns are vertical. H Lookup is for Horizontal-like column headers.
Text Functions
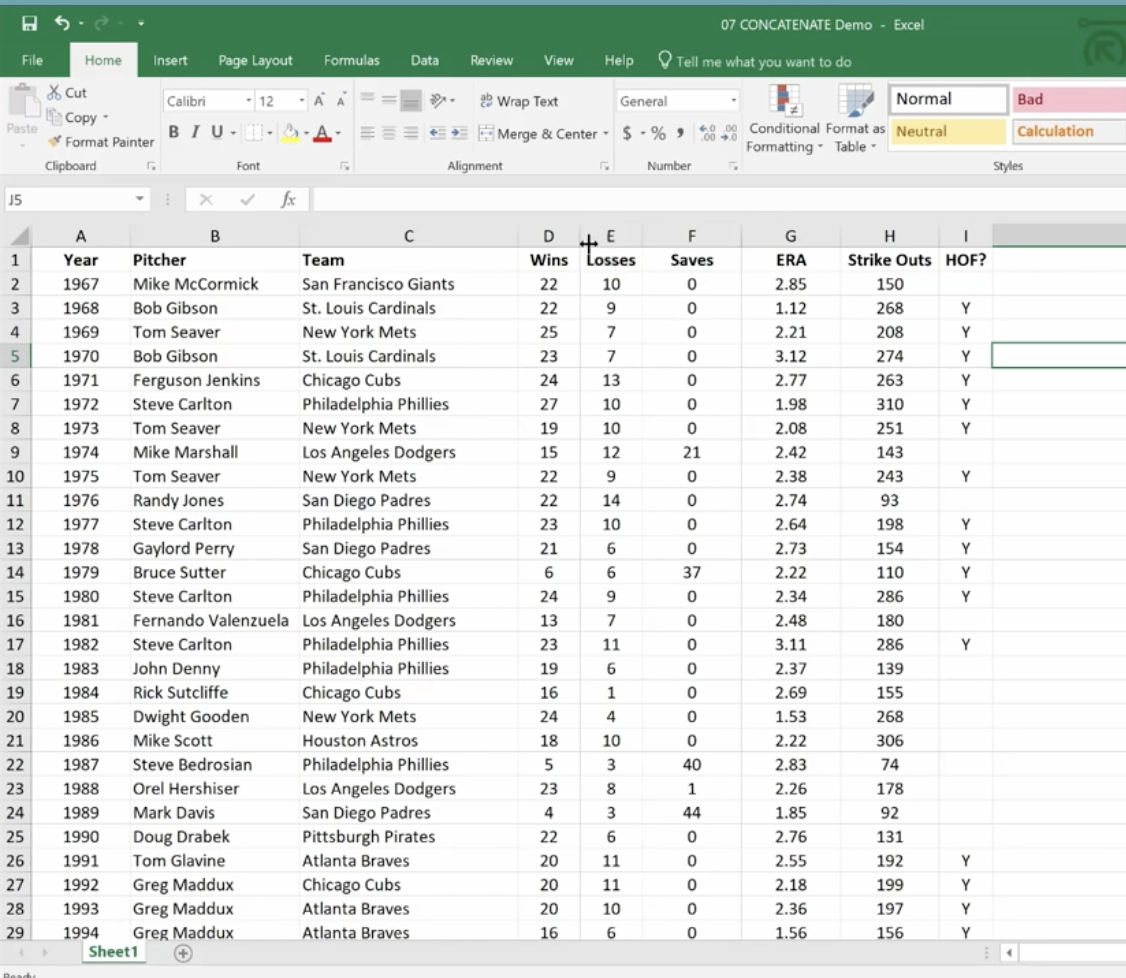
Text Functions contain some very powerful tools to adjust, rearrange and even combine data. These functions are used for worksheets that contain information and function as a database such as mailing lists, product catalogs, or even Cy Young Award Winners.
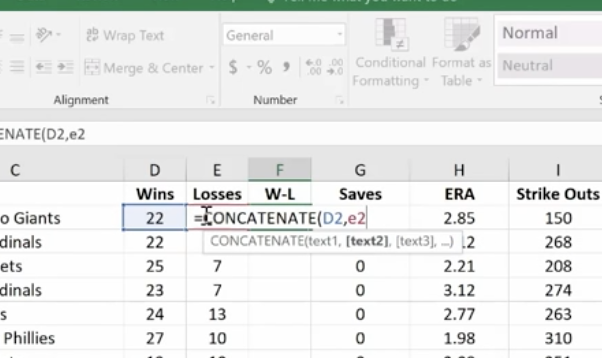
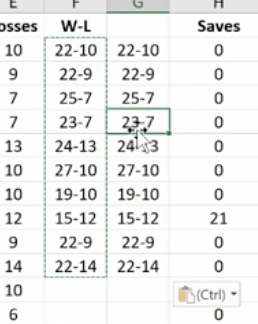
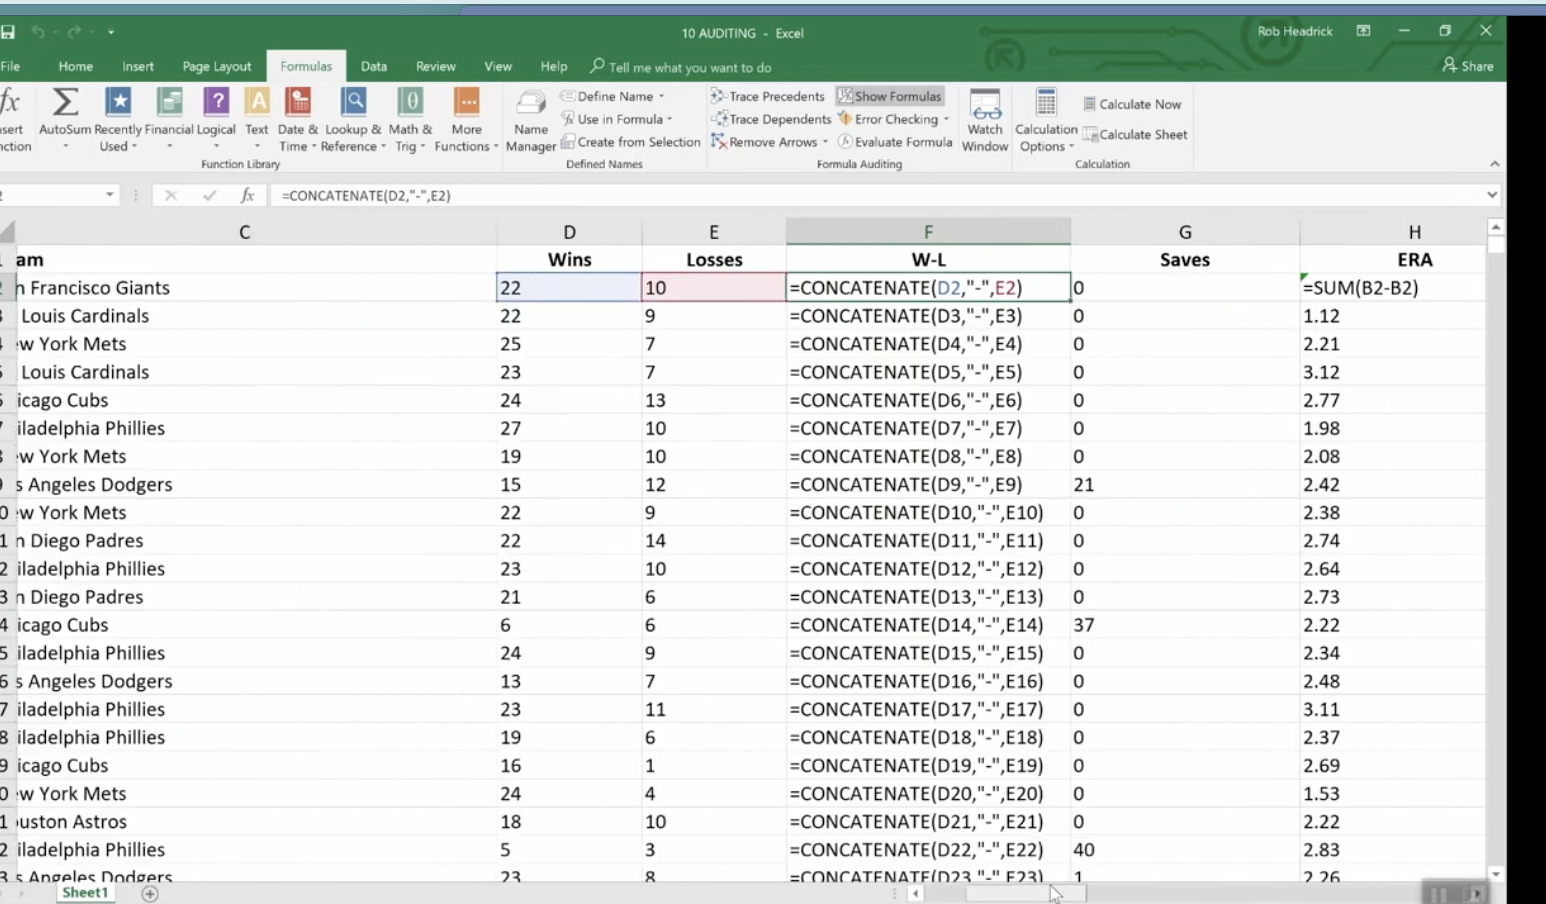
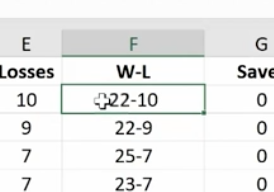
The first text function we’ll show you is concatenate. It links things together in a chain or series. Here, we have our Cy Young list. But we no longer need to see our Wins and Losses in a separate column.
To do this easily rather than manually, create a new column where your data will reside.
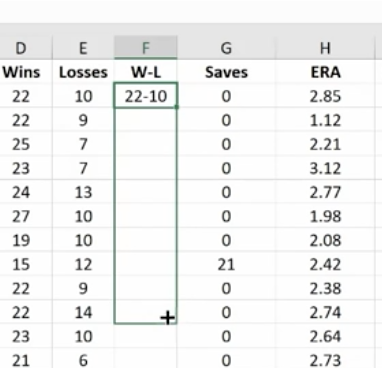
Hit Enter
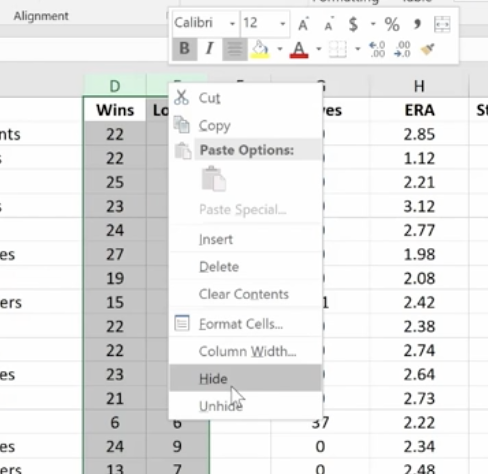
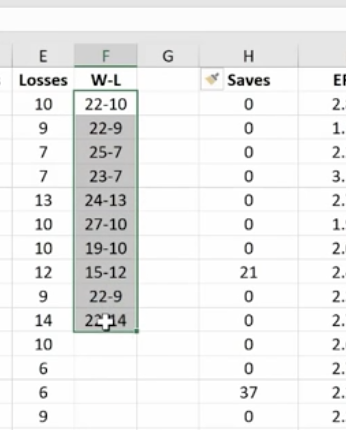
Now, just go in and hide the Wins and Losses columns. Don’t delete them or your new column will have a reference error.
If you do want to delete the Wins and Losses columns, you must first make a new column. Copy the W-L numbers and Paste Value in the new column. This way you’ve moved from a formula to the new information. If you delete your source information without taking this step you’ll be left with nothing.
Combine as many columns as you need with the concatenate function to make the data appear as you need it to.
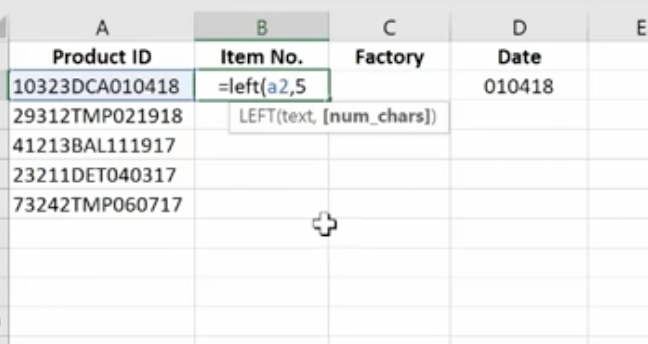
The Left Mid and Right Functions
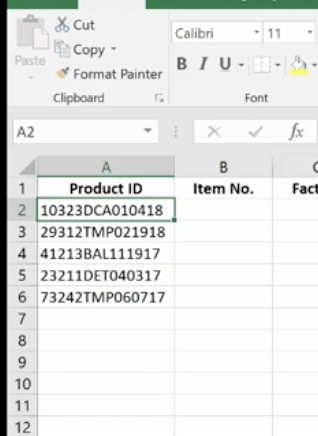
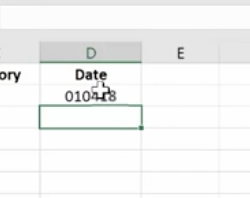
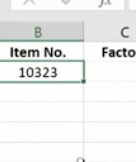
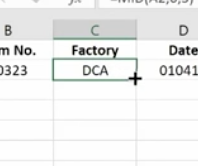
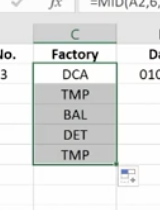
These are used to tell Excel that you only want part of a text string in a particular cell. Here, we have a product list and product IDs that tell us the date of manufacturer, the item number, and the factory where it was made. We’re going to pull the data out so we can put it in columns to use in different ways.
We use the Mid Function here.
This works because each of the product IDs are the same length. If they were different lengths you’d have to do something more creative.
Documenting and Auditing
You want to make your Excel files easy to understand for both yourself and others who need to use them – and this includes auditors. An organized worksheet results in clear error-free data and functions.
Commenting
The purpose of commenting is to provide notes to yourself or especially to others. Comments can include reminders, explanations or suggestions.
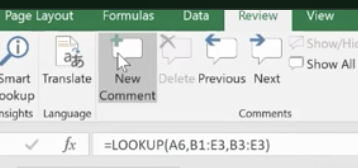
You’ll find the New Comment button at the top under the Review Menu. Simply click the cell where you want the comment to go and click New Comment. Then type your comment and click outside the box to close it. The comment will disappear but it’s still there. Anywhere you see a red flag, there’s a comment.
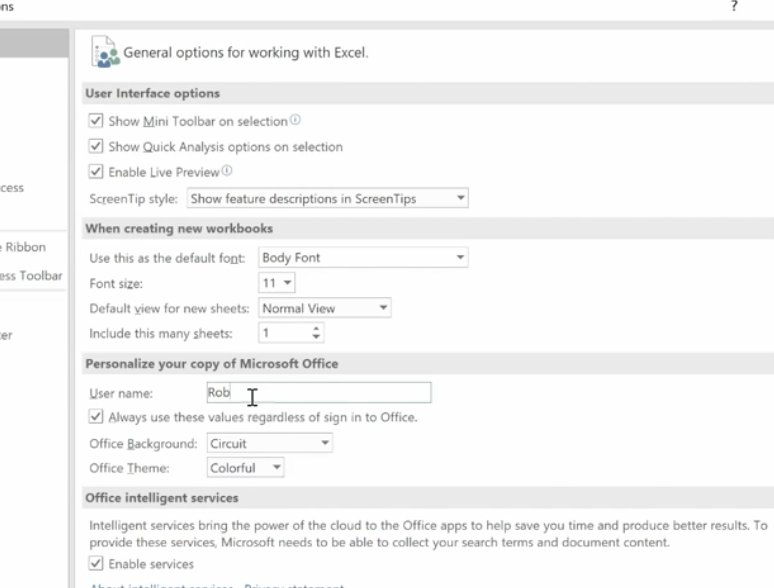
If your name doesn’t appear in the comment, go to File>Options>General and personalize your copy of Excel (in this case Microsoft Office) under the User Name. You won’t need to go back and change each comment; Excel will do this for you.
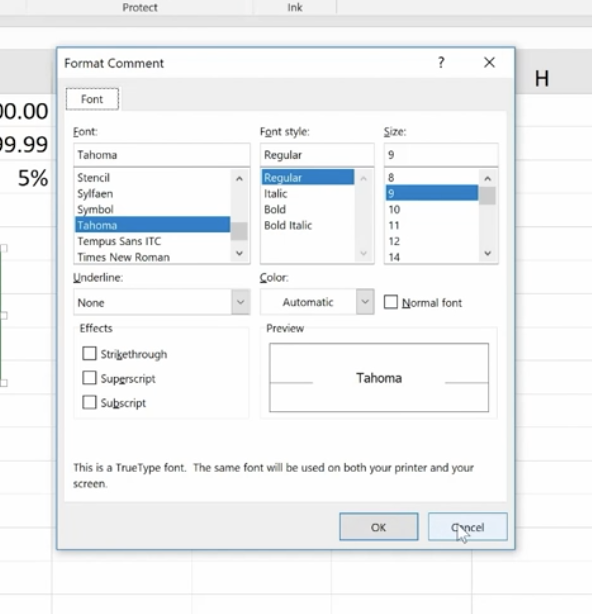
To format a comment, click inside the comment box and a drop down will come up where you can format the text.
You can change the color of the box and lines around the box. Some managers have different colors for members of their teams.
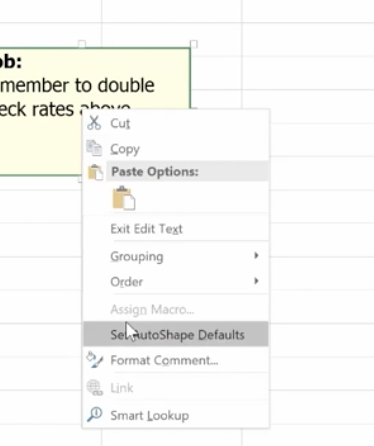
If you change the default color, it will change that for all your Microsoft products.
To delete a comment, go to the cell that hosts it, then go up and hit delete.
If you have a lot of comments, grab the handle on the box and resize it.
Auditing
What we really mean is formula auditing. This is an advanced way to check your work.
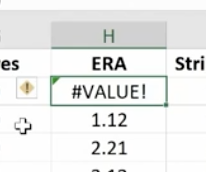
The yellow diamond on the left of this cell indicates that there’s an error.
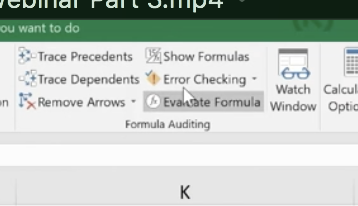
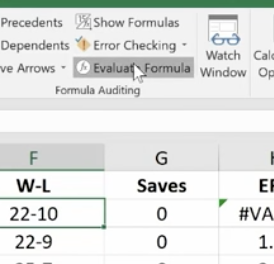
Or to find any errors, go to Formula Auditing in the top menu.
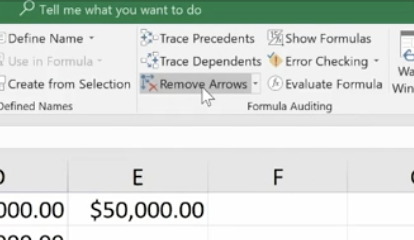
You have a number of helpful tools here. Trace Precedents shows where the formula looks for information. Click the formula you want and click Trace Precedents. It will display where your data came from.
Here’s a more complex formula and trace auditing:
To hide the arrows, click “Remove Arrows.”
Show Formulas
This expands all of your columns and shows all of them in a bigger way. You can go in and check your formulas on the fly very easily. Click Show Formulas again and the worksheet goes back to the way it was before.
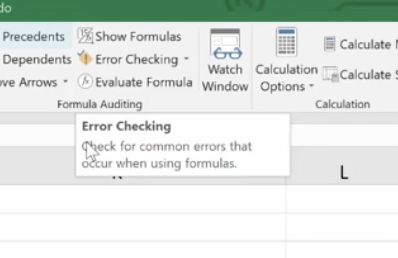
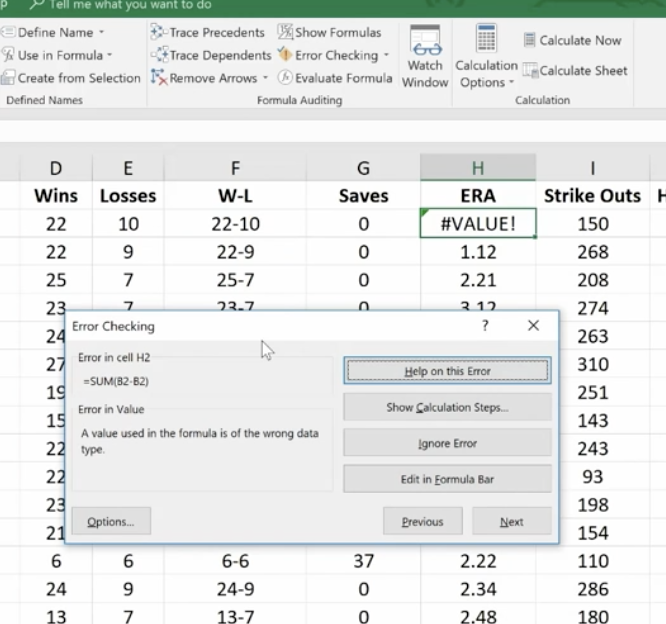
Error Checking
This feature lets you check all formulas at once.
This makes it easy to find errors and correct them.
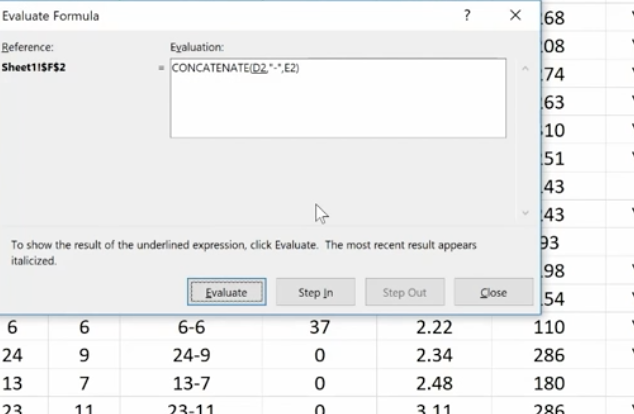
Evaluate Formula
This feature allows you to check a formula step-by-step. It shows the results of each individual part. It’s another great way to de-bug a formula that isn’t working for you. Click the formula you want to evaluate. Click Evaluate Formula and you’ll get a dialog box.
Click Evaluate and it will change the formula to the actual value that you can review. Each time you click Evaluate, it will take you through the steps of how you got to the final formula. You can trace your way through to see if you made any errors.
Protection
With protection you can lock in your changes in individual cells, spreadsheets, and entire workbooks. You can also protect comments from being moved or edited.
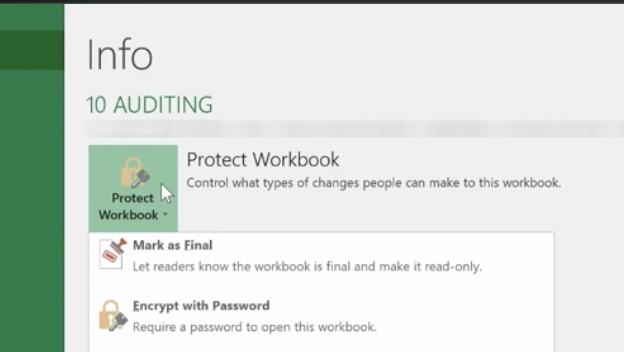
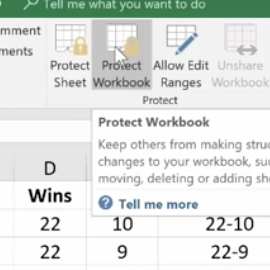
This is how to protect an entire workbook. It’s the highest level of protection.
You’ll want to do this if your workbook contains confidential information like:
Pre-released quarterly results
Employee salary tables
Staff member evaluations
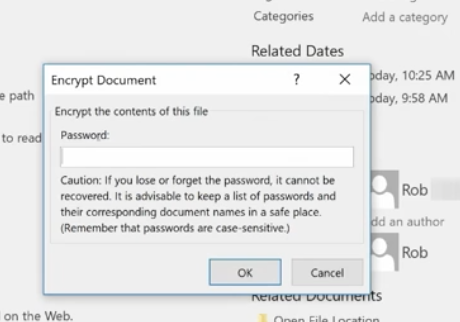
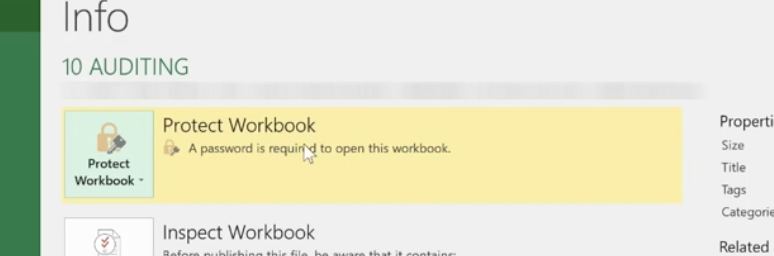
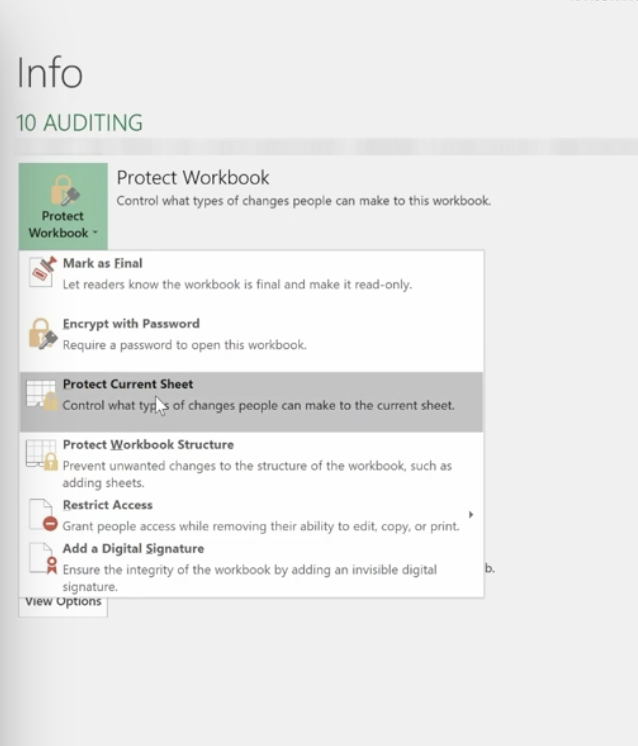
Click File>Info>Protect Workbook>Encrypt with Password.
Enter your password and be sure to make note of it because it can’t be recovered if you lose it. You can use password management software to keep track of your passwords.
Once complete, click OK and your Protect Workbook function turns yellow indicating that you’ve protected your workbook.
To take off protection, retrace your steps.
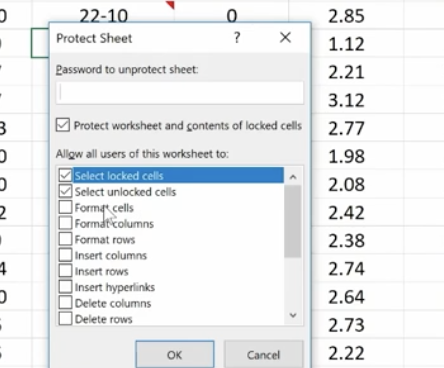
You can also protect a current sheet you’re working on. It will take you back to your worksheet where you’ll be presented with a variety of options.
You can also protect cells and comments from this option.
In the same way you protected the worksheet, you can protect your workbook.
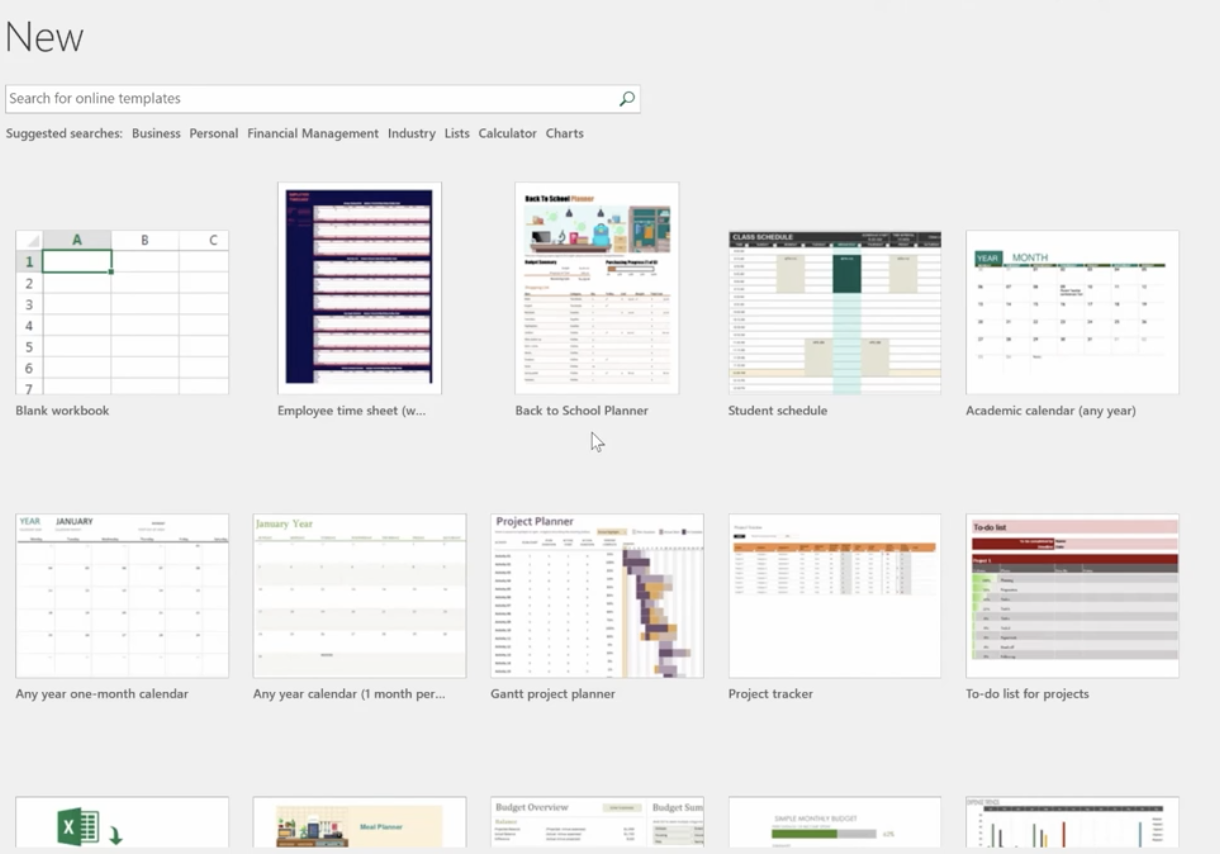
Using Templates
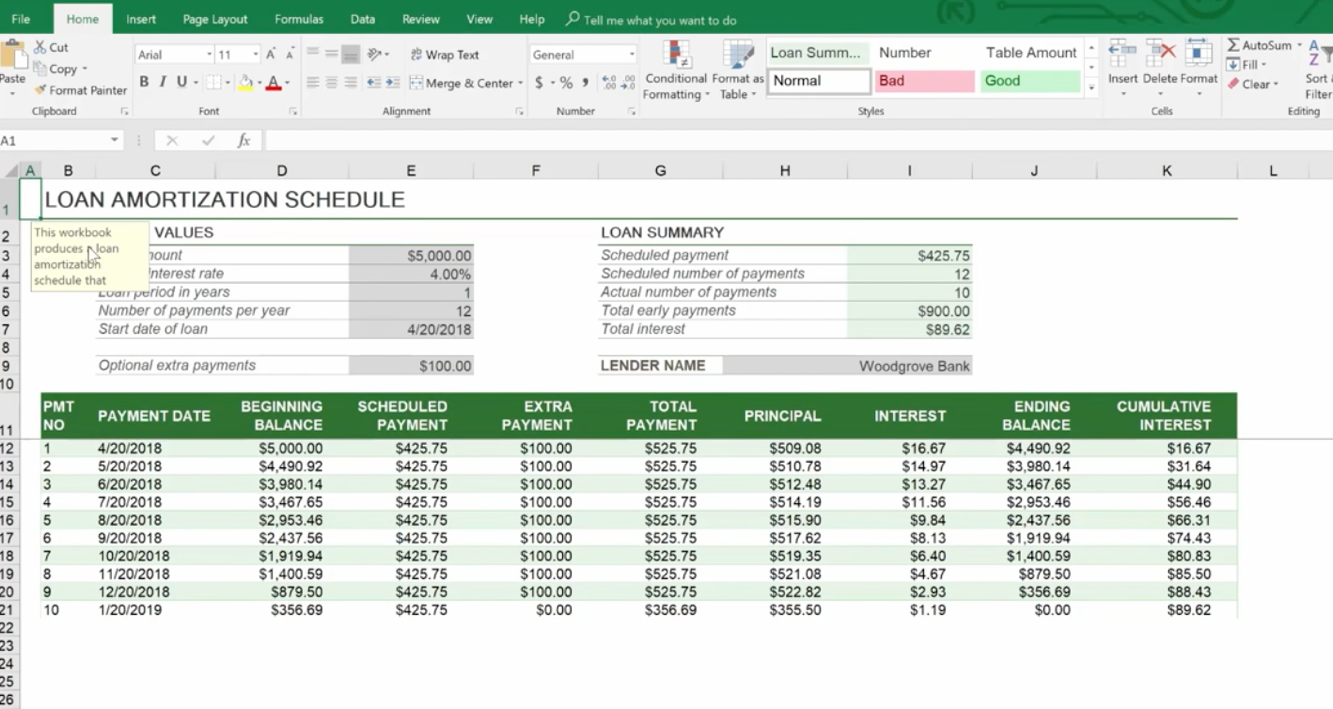
To see the variety of templates you can use in Excel, click File>New and you’ll be presented with a collection of 25 templates you can choose from.
For example, there’s a great Loan Amortization Schedule you can use. Formulas are built in for you. All you need to do is change the numbers.
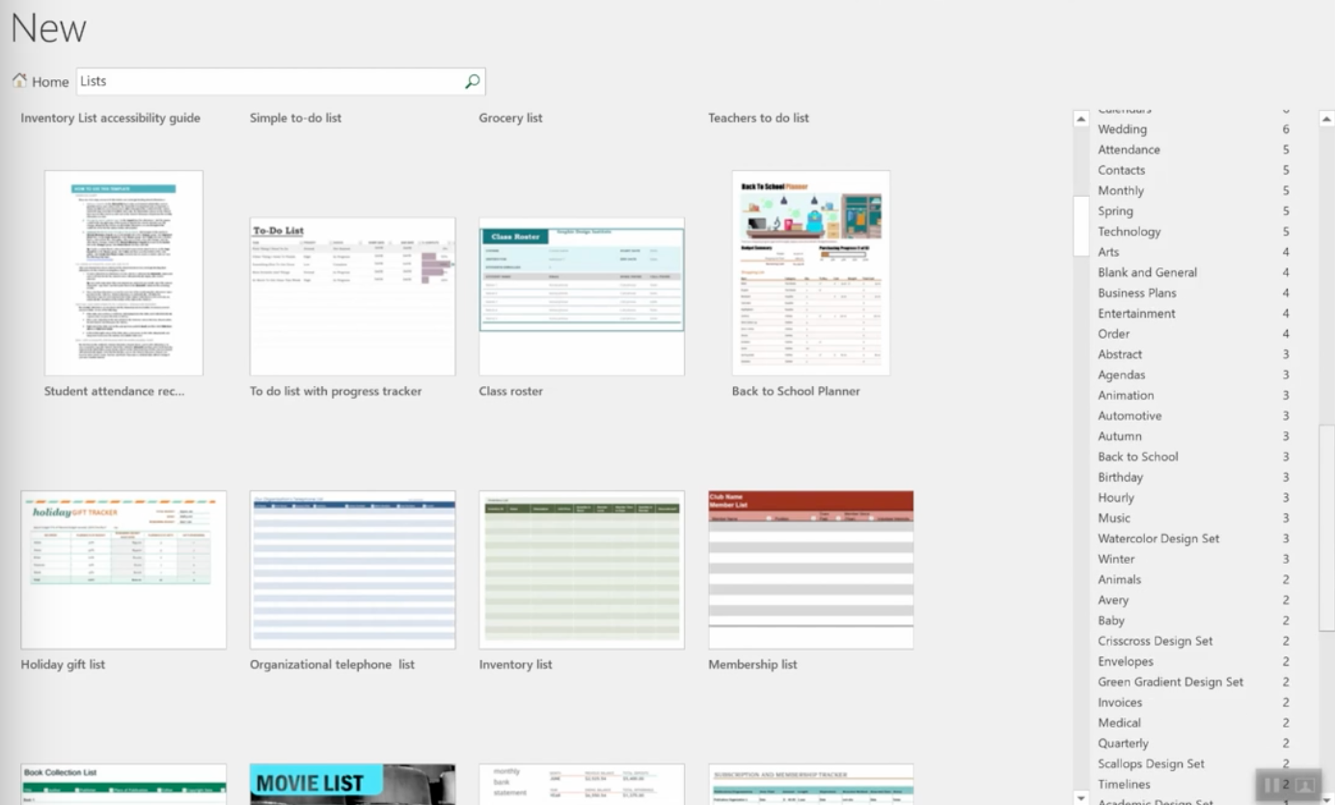
You can also go online while inside Excel to find more. You don’t want to download templates from outside Excel because they may contain macros that are contaminated with viruses.
On the right side of the page, you have a huge selection to choose from.
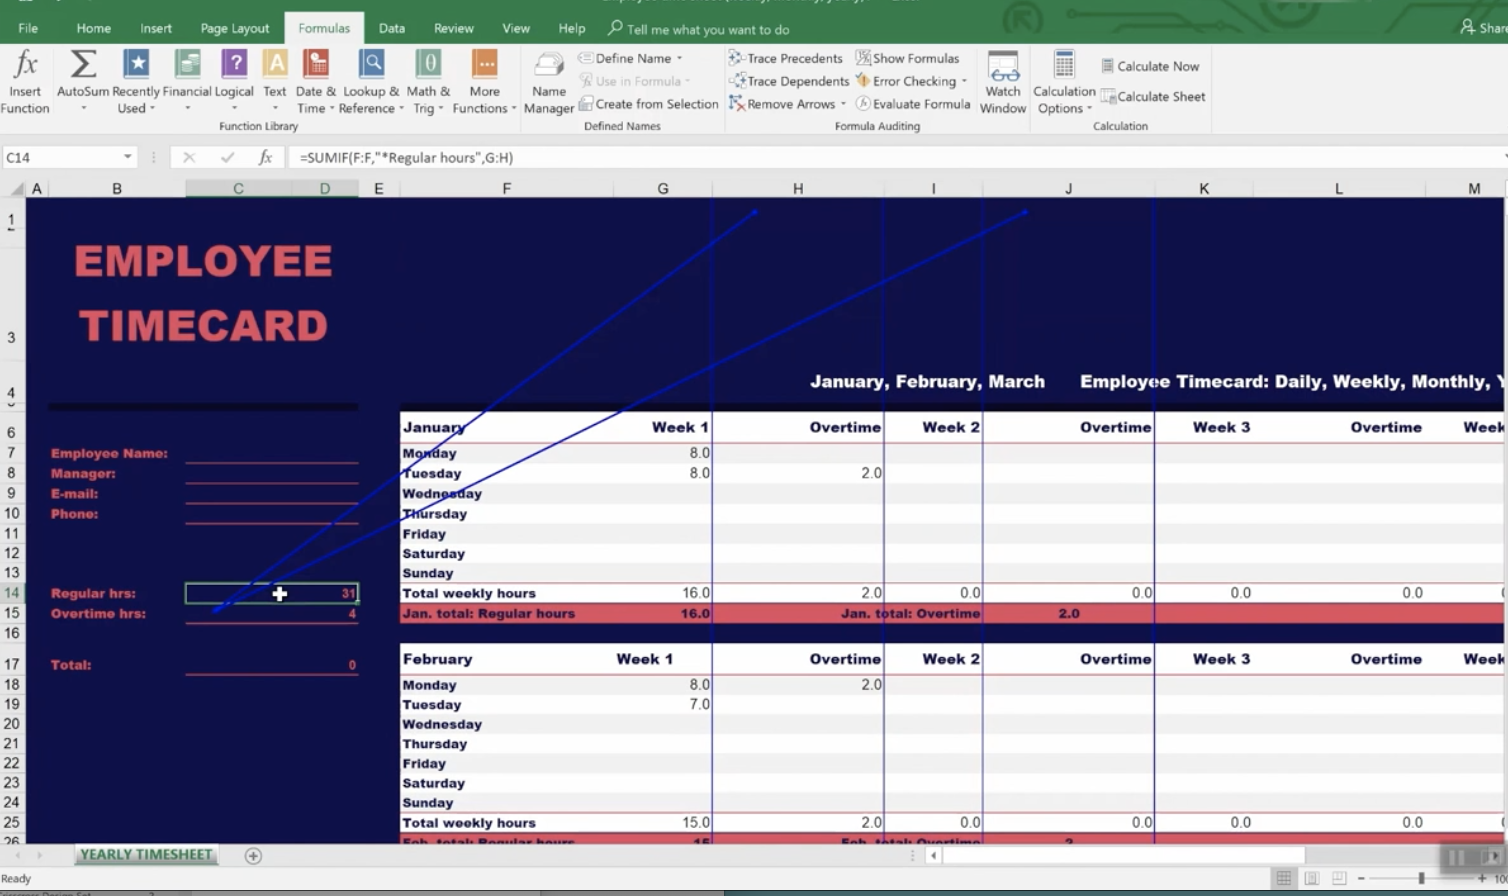
It even provides employee time sheets you can use that can save you so much time trying to figure out formulas.
Creating and Managing Templates
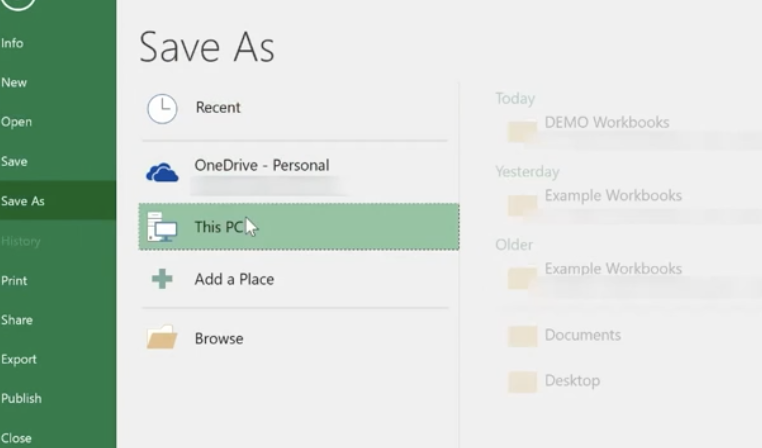
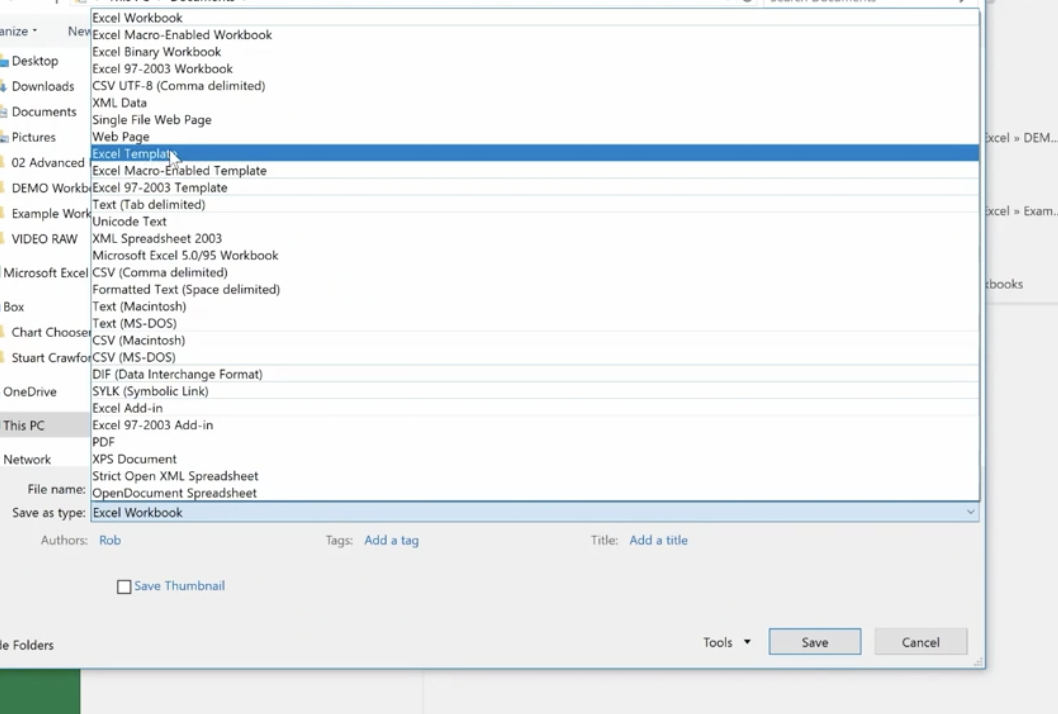
Go to File>Info>Save As and save the template to your location, then save as an Excel Template.
Before you save as a template you want to:
Finalize the look and feel of your template
Use review and auditing tools
Remove unnecessary data and information
Unprotect cells and sheets as appropriate
Create comments as guides
Congratulations! Now you’re an Excel Pro! This completes our Excel Like a Pro Series. If you have any questions or need assistance, feel free to contact our Excel 2016 experts.
Today’s internet has literally changed the way businesses function. It has redrawn the boundaries and changed the rules of competition in today’s business climate. The Internet has allowed business owners to create much closer relationships with their customers. In addition, it has given consumers more power through access to unlimited information.
Regardless of the size of your business, you probably have a website and a pretty decent one at that. In fact, websites are not as costly as they once were to build and manage. Thanks to the increase in the number of web developers and online sites that host websites, almost anyone can have a website if they want it.
For savvy business owners, their website is the key to greater sales and stronger relationships with customers. A successful website is constantly adding new content that offers value to consumers. They update the site regularly with the latest security and technology. A company with an amazing website almost always excels in the marketplace over competitors who don’t. Why? Because they understand that their business website is the voice of their company online.
Websites have become a valuable commodity to business owners. They are the first stop of prospective clients who want to find more information about your business. Current clients also rely on websites to find product information and updates. Your website is the place where all the action takes place each day. Your website can make or break your business. Knowing how important websites are, most business owners are interested in learning how they can get the most out of their site.
Allow your website to communicate your story to clients
With the understanding that websites do speak to your customers, you should ask yourself the question, “What do you want your website to say to customers?”
Each day, you must make sure that the information you provide is important to your customers and that it’s accurate. Does it resonate well with them? Will it make them want to purchase your products or services? Image is everything in a business. Since your website represents the first image that people have concerning your business, it’s important to make a good first impression. As it is commonly said, first impressions matter. What story do you want the website to tell?
The best websites always tell a compelling story. Sometimes your story is all about why you started your business and sometimes it’s more about your roots, your background. Great businesses have a unique reason for their existence. Bill Gates got the idea for Microsoft when a friend, Paul Allen, showed him the 1975 issue of Popular Electronics. This issue featured a story on the Altair 8800, one of the first microcomputers. Both Gates and Allen saw the potential for developing a programming language for the computer. The rest is history.
In putting together the story behind your business, it may be necessary to hire a good writer to help craft the message. This expense is well worth it. Once you create a great story that customers can relate to, your next job is to write professional content for your site. Though your budget may initially be small, you can go back and redo this once you have the time and money to do so. Usually, your website is a work in progress anyway. It is constantly evolving and changing as your business grows.
Good content will make customers feel that they need your goods and services to meet a need in their lives. You should include information about how these goods or services are better than those offered by others in the same industry. Many of today’s most successful brands have become indispensable to their customers. Think about how Prada and Louis Vuitton have changed the handbag industry. Their customers feel a strong urge to own one of these exclusive handbags and many are priced in the thousands of dollars.
Provide contact information
Imagine locating a website online, and the information given therein is attractive. You read through their homepage and look at what they offer. In your mind, you are convinced that this is it. They are exactly what you need. You pick up your phone while scrolling down, looking for the contacts page and you find nothing. No phone number, no email address, no physical address, nothing. This can be frustrating, right? In fact, most people will get disheartened immediately. They will look elsewhere for other products. Consumers feel that if there’s no contact information, then the business must be shady. So it’s important to include your physical location, email address and phone number. This degree of transparency tells consumers that you have nothing to hide.
Collect lead information
If you have been in business long enough, you know that some clients will visit your website more than once before they decide to make a purchase. Do not despair, this does not mean that your website is not fulfilling its mandate. It simply means that many customers enjoy doing lots of shopping before they make a purchase. In the meantime, you can collect lead information using a lead capture form. This will give you the opportunity to send them regular email updates about specials you might have. Often, if a prospective customer gets an email telling them they can get a discount by making a purchase right away, they will do so. Everyone loves to get a great deal.
User friendly navigation
The whole science behind user experience has grown tremendously in the past ten years. A site must be intuitive, responsive and user friendly. You cannot afford to hide things or make it hard for customers to get information. Websites that are difficult to understand end up chasing customers away. Try to get regular feedback from users. Find out what people are saying about your site. Correct any issues you may have right away.
Final thoughts
All in all, if you maximize each component of your website, you will discover the magic that a great site can offer. Customers will visit often. They will tell their friends about your site. An amazing website truly is priceless.
You probably use a number of personal identification numbers (PINs), passwords, and passphrases to get money from ATMs, to use your debit card when shopping, or to log in to your personal or business email. Hackers represent a real threat to both your personal and business password security and confidential information. Now, these criminals are using a technique called Password Spraying to steal your information.
According to information derived from FBI investigations, malicious cyber actors are increasingly using password spraying against organizations in the United States and abroad. In February 2018, the Department of Justice in the Southern District of New York indicted nine Iranian nationals, who were associated with the Mabna Institute, for computer intrusion offenses. However, password spraying isn’t limited to this group. Other hackers are using it to gain access to both personal and business confidential information.
Manhattan U.S. Attorney Geoffrey S. Berman said: “Today, in one of the largest state-sponsored hacking campaigns ever prosecuted by the Department of Justice, we have unmasked criminals who normally hide behind the ones and zeros of computer code. As alleged, this massive and brazen cyber-assault on the computer systems of hundreds of universities in 22 countries, including the United States, and dozens of private sector companies and governmental organizations was conducted on behalf of Iran’s Islamic Revolutionary Guard. The hackers targeted innovations and intellectual property from our country’s greatest minds. These defendants are now fugitives from American justice, no longer free to travel outside Iran without risk of arrest. The only way they will see the outside world is through their computer screens, but stripped of their greatest asset – anonymity.”
How Does Password Spraying Work?
Password spraying is a type of brute force attack where hackers use a username with multiple passwords to gain access to your IT system. With traditional brute force attacks, the criminal uses one username with multiple passwords. Employing a lockout functionality, which locks the criminal out after a set number of login attempts, is an effective means of dealing with traditional brute force attacks.
However, with a password-spray attack (also known as the “low-and-slow” method), the malicious cyber actors use a single password against many accounts before moving on to another password. They continue this process until they find one that works. This strategy works for them because they can avoid account lockouts. It circumvents lockout functionality by using the most common passwords against multiple user accounts until they find one that works.
Password spraying targets single sign-on (SSO) and cloud-based applications using federated authentication. A federated authentication identity provides single access to multiple systems across different enterprises. Criminals target federated authentication protocols because it disguises their activities and ensures their anonymity.
Attackers use password spraying in environments that don’t use multi-factor authentication (MFA), rely on easy-to-guess passwords, or use SSO with a federated authentication method.
Your Email Is Also At Risk
Hackers also prey on email accounts that use inbox synchronization (which pulls emails from the Cloud to inboxes on remote devices). Malicious actors use inbox synchronization to obtain unauthorized access to your organization’s email directly from the Cloud. Then they download email to locally stored files, identify your company’s email address list, and secretly apply inbox rules to forward your sent and received messages to them.
The United States Computer Emergency Readiness Team (US-CERT) details how hackers use password spraying, what you should watch out for, who is at risk, and the impact this type of attack can have on your organization.
Your Technology Service Provider can explain this to you and your employees in plain language, and help you protect your organization against password spraying and other attacks.
Traditional Tactics Techniques & Procedures
Using social engineering tactics to perform online research (i.e., Google search, LinkedIn, etc.) to identify target organizations and specific user accounts for initial password spray
Using easy-to-guess passwords (e.g., “Winter2018”, “Password123!”) and publicly available tools, execute a password spray attack against targeted accounts by utilizing the identified SSO or web-based application and federated authentication method
Leveraging the initial group of compromised accounts, downloading the Global Address List (GAL) from a target’s email client, and performing a larger password spray against legitimate accounts
Using the compromised access, attempting to expand laterally (e.g., via Remote Desktop Protocol) within the network, and performing mass data exfiltration using File Transfer Protocol tools such as FileZilla
Indicators That You’ve Been Attacked
A massive spike in attempted logins against the enterprise SSO portal or web-based application;
Using automated tools, malicious actors attempt thousands of logons, in rapid succession, against multiple user accounts at a victim enterprise, originating from a single IP address and computer (e.g., a common User Agent String).
Attacks have been seen to run for over two hours.
Employee logins from IP addresses resolving to locations inconsistent with their normal locations.
Typical Victim Environment
The vast majority of known password spray victims share some of the following characteristics:
Use SSO or web-based applications with the federated authentication method
Use inbox synchronization, allowing email to be pulled from cloud environments to remote devices
Allow email forwarding to be set up at the user level
Limited logging setup creating difficulty during post-event investigations
The Impact
A successful network intrusion can have severe impacts, particularly if the compromise becomes public and sensitive information is exposed. Possible impacts include:
Temporary or permanent loss of sensitive or proprietary information;
Disruption of regular operations;
Financial losses incurred to restore systems and files; and
Potential harm to an organization’s reputation.
7 Steps You Can Take To Mitigate Password Spraying Attacks
Enable MFA and review MFA settings to ensure coverage overall active, internet facing protocols.
Review password policies to ensure they align with the latest NIST guidelines and deter the use of easy-to-guess passwords.
Review IT helpdesk password management related to initial passwords, password resets for user lockouts, and shared accounts. IT helpdesk password procedures may not align with company policy, creating an exploitable security gap.
Many companies offer additional assistance and tools that can help detect and prevent password spray attacks, such as the
Make sure your employees change their corporate passwords every 60 days.
Establish a password policy that prohibits easy-to-guess passwords. Enable multi-factor authentication (MFA) for all web-based applications. If MFA practice is already in place, review current protocols thoroughly to ensure it is maintained well
Ask your Technology Solutions Provider to conduct Security Awareness Training for your employees at all levels.
The FBI Reporting Notice
The FBI would like you to report any suspicious or criminal activity to your FBI field office or the FBI’s 24/7 Cyber Watch (CyWatch). Field office contacts can be identified at www.fbi.gov/contact-us/field. CyWatch can be contacted by phone at (855) 292-3937 or by e-mail at CyWatch@ic.fbi.gov.