How To Restore Files With Microsoft OneDrive

Microsoft OneDrive


Accidentally deleting a file or folder was once something that could ruin your entire day, week, or month even — maybe even your career. All that work put into it. Countless hours put into it. And then: gone. Fortunately for those of you using Microsoft OneDrive for professional, personal, or academic reasons, there may be a way to retrieve and restore files or folders that were deleted. The same is true if your files or folders were overwritten, corrupted, or infected by a virus or malware. Depending on your subscription, you may have two methods to recover files: (1) restore files from the Settings page; or (2) restore files from the Recycling bin.

Files or Folders Recovered Using Settings

From your OneDrive website, you will want to follow the next steps in order.

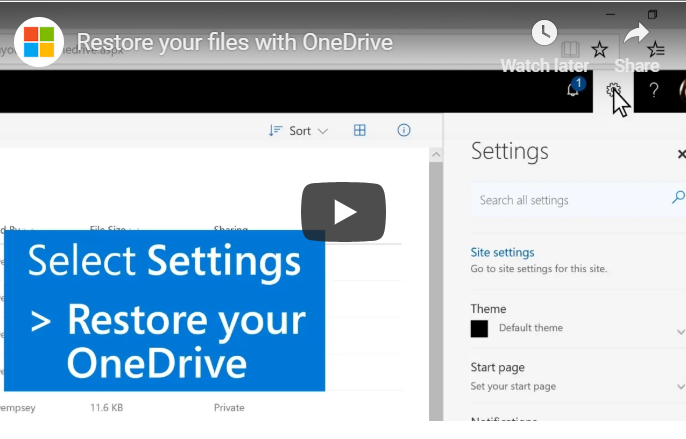
  1. Select Settings, which is the gear symbol in the upper right corner of the page — usually between the bell indicating notifications and the question mark for help.
  2. From the Settings sidebar, scroll down until you see Restore your OneDrive.
  3. The Restore your OneDrive page will open. Under Select a date, use the dropdown menu to select your option: (1) One week ago; (2) Three weeks ago; or (3) Custom date and time. If you choose Custom date and time, you will be provided with a chart. Simply slide the bar to indicate the days.
  4. Click the Restore button.
  5. All your files and documents from that time period will be restored.

If this option does not seem to work, there is another way to recover deleted files or folders.

Files or Folders Recovered Using the Recycling Bin

From your OneDrive website, follow these steps.

  1. In the navigation pane, select Recycle bin.
  2. The Recycle bin will generate a list of files and folders. If you use a work account, you have only one option for file recovery, but if you use a personal account for work, you have two options.
  3. For work and personal accounts, simply select the circle checkbox to the left of each entry you want to restore. When you select the circle check box, the header will change. Once all entries are selected, click on the Restore button in the new header.
  4. For personal accounts, you can also restore all items at once by clicking on the Restore all items button in the original header.

Things to Consider about Recovery of Files or Folders

Keep in mind that you can only recover files or folders in the Recycle bin so long as the files or folders have not been permanently deleted. Typically, files only live in the Recycle bin for 30 days for personal accounts or 93 days for business accounts — unless the administrator for business accounts changed the setting for a shorter or longer period. Once the time limit is reached, the files are automatically deleted. Files can also be automatically deleted within three days if the Recycle bin is full, at which time the oldest items are deleted first.

It is also important to note that if you want to restore a file to a specific version, File Restore cannot do so if version history was turned off. It is a good idea to always keep version history on while you work.

In summary, when using OneDrive, you have the potential to restore a file or folder that has been accidentally (or in some cases, intentionally) lost. The key is knowing the functions of your Microsoft subscription. Need more tech tips? Return to this blog. New tips for your OneDrive subscriptions and other tech needs are posted regularly.

How To Open A Shared Mailbox Using Microsoft Outlook 2016

Shared Mailbox In Outlook

Shared Mailbox In Outlook

A shared mailbox in Microsoft Outlook will prove invaluable if your team is collaborating on a project, as they can exchange messages from a central platform. A communal email center is also an asset if your employees are responsible for responding to customer inquiries. Outlook Calendar allows members to create events or let others know when they’ll be out of the office. When you create a shared mailbox in Outlook, members can monitor messages via a public email alias, which usually appears as info@companyname.com. The sender appears under this alias, too, rather than by name.  Group members can now communicate without logging into the mailbox or conveying personal information. If you’re new to using shared mail in Outlook, here are some “how-to” tips to help you get started.

Creating a Shared Mailbox in Outlook

Before you use the mailbox, you will need to have an office 365 admin for your company or organization set it up and add you as a member. If you are the admin, follow these steps:

  1. Sign into Office 365 and select admin.
  2. Go to Groups and choose Shared Mailbox.
  3. Choose Add a mailbox and type in the name you want it to have. Many addresses begin with “support”, “info”, or “contact.” Then click Add.
  4. When the wizard continues to Next Steps, choose Add members. It may take a few minutes to reach this step after you add the mailbox.
  5. Add members by searching for them or selecting them from a list. When you’re finished, click Save, then Close.
  6. If you want to make changes or updates at any point, select the new mailbox and click on Edit next to the information you want to modify.

Using a Shared Outlook Mailbox: Getting Started

Once the admin has created the public mailbox, close Outlook and restart it. The mailbox should appear automatically in the Folder pane. Note that it may take a few minutes to display after the admin added it, so if you don’t see it, wait a bit, then close and restart Outlook again. If you still cannot locate the shared mailbox, you will have to add it manually.

  1. Once you’ve opened Outlook, select File.
  2. Select Account Settings and then choose the Email tab.
  3. Be sure that the correct account is highlighted, then select Change.
  4. Select More Settings. From there, choose Advanced, then click Add.
  5. Type the name of the shared email address, choose Ok and Next followed by Finish and Close.

Using the Shared Calendar

If you want to access the calendar right after the admin created the shared mailbox, you will need to close and restart Outlook to gain access to it. The shared calendar connected with the public mailbox is added to your Calendars list automatically. To use the shared calendar in Outlook, navigate to calendar view and choose the shared mailbox. From there, you can manage schedules and appointments. This feature allows all team members to be on the same page about schedules and appointments.

Using Shared Contact Lists in Outlook

When the mailbox has been created, the corresponding Contacts list is automatically added. To access it with Outlook:

  1. Select People.
  2. Look under My contacts to select the contacts folder for the shared contacts list.

Using a Shared Mailbox with a Mobile Device

If you or your team members need to take work on-the-go, you can access the shared mailbox from a smartphone or tablet, too. Unfortunately, the Outlook app on your mobile device won’t allow you to use the shared mailbox, but there is a workaround. Follow these steps to use your primary mailbox and the shared one simultaneously:

  1. Right-click on the name of your primary mailbox in the left-hand pane, then select Add shared folder.
  2. In the dialog box, type the email address or name of someone who has shared a mailbox with you, then click Add. Another option is to enter the name of the shared mailbox you are a member of.

In Outlook on the web, you should see the mailbox in your Folder list. Just as you can do with your primary folders, you can expand or collapse the shared mailbox folders. If you want to remove the shared mailbox from the Folders list, right-click Shared mailbox and choose Remove shared folder.

How to Use the Shared Calendar with Outlook on the Web

As a member of a shared mailbox, you also have access to the shared calendar. This feature allows you to create, edit and delete events (that you or someone else created) and make the information available to all members. To use the calendar from a mobile device:

  1. Sign in using Outlook on the web, then select Calendar.
  2. Right-click Other calendars, then select Open Calendar.
  3. Use the from directory option to search for the shared calendar you need to access and click Open. You should see the shared calendar on your Calendar folder list.

A Few Things to Know About Shared Mailboxes in Outlook

With a shared mailbox, you can send, receive and reply to messages just as you do with your primary mailbox. However, if you want to send automatic replies, only the admin is authorized to set this up. You cannot give anyone outside your organization access to your shared mailboxes. If you want to include people outside your business in your group correspondence, you can create a Group in Outlook instead.

Creating a shared mailbox is a helpful way to ensure that your team stays up-to-date on appointments, schedule changes and group messages. It’s also a critical tool for connecting with customers and vendors. Keeping members “in the know” improves communication, employee performance and morale.

2019 Best Practices For Keeping Your Password Secure

Best Practices Password Security 2019

Best Practices Password Security 2019

Every account you have is protected by a password or a PIN of some kind. A PIN is a personal identification number that is unique to the account it is attached to. In some cases, you are allowed to choose your own PIN. For other accounts, you must use the PIN or password that is provided by the creator of the account. Memorizing PINs and passwords is essential if you want to maintain your privacy and keep your accounts fully protected. It’s also vital that you use a few “best practices” when it comes to managing your passwords.

Avoid the Obvious

Avoid using the most obvious choices like your children’s names or notable dates. Choose passwords that would be difficult to trace back to someone or something that is important to you. Choose random numbers and words that can be easily remembered. Hackers who break into accounts will often look through your information to try and find patterns. Random words and phrases are less likely to be picked up within the pattern.

Two-Factor Authentication

Two-factor authentication can involve the use of a PIN and a password, or a PIN/password and a series of security questions. It can also include the use of a security key ( a card that is coded with personal information) and a PIN. The only way to access the account is to have both pieces of the puzzle to unlock the code. If one of the pieces is wrong, you may be locked out of your account until a system reset can be performed.

Separate Numbers and Symbols

Numbers and symbols that are used together may indicate a date or account number. Separate your numbers and symbols to remove any type of familiar sequencing. Alternate numbers, letters, and symbols so that it is difficult to identify any type of common pattern or series.

Use Your Fingerprint to Secure Mobile Devices

One of the best ways to protect your information is through the use of your fingerprint. iPhones can now identify your eye by scanning your cornea. Both of these methods use body parts that are unique to you. No one can duplicate them or alter them in any way. By using a fingerprint or eye-scan to protect your mobile devices, the information stored on that device is protected. You should still, however, change your passwords frequently.

Don’t Use the Same Password for Multiple Accounts

Avoid using the same password for multiple accounts. Choose a new and unique password for each account you have. While it may be difficult to remember multiple passwords, the alternative could mean devastating financial losses. Choose several password and PIN options that can be used effectively. In some cases, you may be able to rotate them. This must be done randomly and without a pattern to maintain the highest level of security possible.

There are ways to protect your passwords and PINs so that you can maintain your accounts and keep them secure. Using a password manager is just one way to secure your accounts. Determine which type of measures work best for you and use them effectively so that all of your information remains protected from outside predators and hackers.

5 Tips To Boost The Performance Of Your Business WiFi Network

Boost The Performance Of Your Business WiFi

Boost The Performance Of Your Business WiFi

It’s difficult to imagine a modern business that doesn’t have Wi-Fi. The internet is one of the most powerful tools in the world right now, and every level of every business typically needs it on demand. For most business locations, that access is determined by the integrity of the Wi-Fi network. There are a lot of components to even the simplest networks, and some things can make performance great or drag it into the ground. If you follow just five simple tips, you can solve the most common problems and have a faster, more reliable Wi-Fi experience.

Find the Right Spot

Wi-Fi coverage starts with placing the central router. Two things determine the right spot for your router: range and interference. The first thing you want to do is find a central room that will allow the router to reach the whole building. If you have multiple floors, the router needs to be in the middle. Standard business equipment will have a range between 100 and 200 feet. That’s a good rule of thumb to help you find the best place to keep it.

Interference is often a bigger problem than simple range. Thick walls or ceilings can eat a lot of the radio signal that Wi-Fi uses. The adobe and stucco styles that are popular in the Southwest and California are particularly rough on signal strength. Basically, any wall that isn’t hollow is going to be trouble. By that same philosophy, you want to avoid putting the router in cabinets or other obstructions that add to the effective thickness of material the signal needs to penetrate.

Even worse than thick obstacles are metals and electronics. Any sufficiently large metal container or siding can act as a Faraday cage and ultimately kill the signal. Large electronic devices and heavy-current wires can also create large sources of interference.

When you put it all together, you want a location for your router that is as central as possible and clear of obstruction. Empty space should surround the device for the best signal strength.

Boost Your Range

Even when you manage to find the perfect spot, you still might not have the coverage you want or need. Many buildings are just too big for a single router. Additionally, floor plans aren’t made with Wi-Fi in mind, so there might be a frustrating nook or corner that isn’t getting signal. This is more easily overcome than it might seem. A repeater or range extender will usually solve the problem. They attach to the signal of the central router and act as an extension hub to give your Wi-Fi a more extensive range.

When you place a repeater, follow the same rules you did for your router. The repeater can fall victim to the same interference as any Wi-Fi device.

Save Bandwidth

In the end, you only have access to so much data per second. Sometimes finding a provider with a more significant data stream is necessary, but there are things to check before going that route. In general, there are two sources of bandwidth hogs that you can manage: users and apps.

Managing users starts with security. Your Wi-Fi needs a strong password and encryption to ensure that unauthorized users are off the network. Piggybacking is often the source of internet slowdowns for businesses everywhere. It doesn’t take effective security measures to plug that leak.

If your business offers Wi-Fi access to customers, the issue is a little trickier. Usually, the best practice is to have at least two completely separate networks. Guest access can be segregated from business-critical functions. That way having too many guests at once won’t impact your ability to function as a business.

Managing apps is also pretty easy. The biggest bandwidth hogs are applications that involve video. Higher definition video adds to demand, so your best bet is to try and schedule use of these apps around moments when Wi-Fi is in less demand. If necessary, you can use administrative software that will automatically throttle apps that use too much bandwidth, but keep in mind that this can impact the performance of those apps.

Try Different Channels

There’s a good chance that your business is surrounded by other buildings. There’s another good chance that those buildings also have their own Wi-Fi networks. Those adjacent networks can interfere with each other, and it is usually inconsistent and frustrating when it happens. There’s an easy fix.

Cycle through different channels on your Wi-Fi router and network. Considering the standard range of routers, you should be able to find an unused channel. That will eliminate the interference problem and help your overall performance.

Check Your Service

After all is said and done, most businesses don’t provide their own internet access. Best practices can do wonders for your Wi-Fi, but you’re still at the mercy of your internet plan. If it doesn’t pack enough power, optimizing your other resources won’t solve the problem. Make sure that your data pipeline is sufficient for your business needs. It may be that spending a little more on internet access is an investment that can generate positive returns.

Sometimes the simple stuff won’t cut it. It’s worth remembering that IT experts exist, and many can offer a competitive means to solve your internet issues. If the DIY approach isn’t enough, look for an IT services company that can get you what you need for a price you like.

Top 5 Cybersecurity Predictions For 2019

2019 Cyber Security Predictions

Cyber threats are a genuine danger for businesses, no matter their size or industry. Companies that face data breaches are likely to fail within months after the attack, according to the National Cyber Security Alliance. Security issues can ruin your reputation and cause expensive damage to your company.

2019 Cyber Security Predictions

In 2019, we are already predicting increased cyber crimes to steal more data and resources. The FBI reported that over $1.4 billion in losses were experienced by companies and individuals in 2017. These expenses come from increasing security, losing information, losing physical resources, ransomware payouts, scams and more. The most significant sources of cybercrime included:

  • Email compromise
  • Confidence fraud
  • Non-payment or non-delivery scams
  • Corporate data breach
  • Investment scams
  • Identity theft
  • Advance fee scams
  • Personal data breach
  • Real estate/rental fraud
  • Credit card fraud

Looking forward into 2019, we are preparing to face some of the biggest and hardest attacks yet. Hackers are working to build faster and smarter tools that get around the security systems and regulations that organizations and companies have in place. Companies have to be prepared for cybercrimes that could wreak havoc on their customers or business. Most industries have strict compliance and regulations to keep data safe and can face fines or even jail time if they are not diligent in their cybersecurity efforts. Here are the five major cybersecurity trends we expect to see in 2019:

Multi-Factor Passwords

The password alone is becoming increasingly easy for hacker entry. Fingerprints, ear scans and even social security numbers are all increased measures of security to help battle cybercrime. Using multi-factor passwords is going to be a crucial part of security for 2019 for both personal data and organizational strategies. A large amount of data breach occurs due to human error or negligence so multi-factor passwords can help decrease some of those occurrences.

Data Privacy and GDPR

The EU pushed businesses everywhere when they required the adaptation of the General Data Protection Regulation (GDPR). Many companies and organizations that didn’t have dealings in the EU started making changes to prepare for the level of modifications expected so they wouldn’t be scrambling to catch up later. The regulations that went into effect this past May are still going to have a significant impact on 2019.

The Rise of Cryptojacking

Last year, ransomware cost over $1billion in damage, but we see a shift towards crypto jacking as the more popular attack. Ransomware takes a lot of research, social engineering and development. In many cases, the payments have gotten smaller because companies, educational institutions and organizations are refusing to pay the ransom at all. Cryptojacking is stealing cryptocurrencies by leveraging the computers of an unsuspected user without their knowledge or permission.

When a cyber criminal puts the crypto mining program into effect (often in a JavaScript), the system will slow it’s processing power as it also operates the mining efforts. This can cause whole systems to falter, leading to sluggishness or downtime for businesses. Best case means lost productivity, but a worst case might bean major blackouts if the attack occurs on electrical utility computers or huge issues for patients if the attack is happening to a hospital. This method of cybercrime is less time consuming to set up, more accessible for the hacker to implement, provides a higher payout and often is harder to track.

AI Attacks

We are seeing a heightened increase in artificial intelligence (AI) and machine learning (ML) that cybercriminals are using to focus their attacks. Hackers are using these systems to train and fine-tune their own programs with malicious intent while maintaining a strategic distance.

IoT Regulation

The Internet of Things (IoT) is a grouping of intelligently connected systems that might include vehicles, devices, appliances, electronics, software, connectivity and actuators. These primarily are unregulated and we expect 2019 to be the year when the security issues here may finally be addressed. This may require certifications or a governmental agency to step in and formulate laws. With increased connectivity, the threat of IoT security breaches are genuine public safety concerns and shouldn’t be taken so lightly. Companies that produce these connective devices and software should already be carefully considering these concerns and how to best keep the users protected.

We know tech threats are a genuine issue for your business. Outsourcing tech support or tech help is one way to ensure you have all of your bases covered. If you need help implementing security, contact us today. We offer the strategies, technology and expertise to keep you protected!

How Can You Stay Safe From Phishing Attempts? Try These 7 Tips

phishing

In this article, we’ll be going over the top seven ways to protect yourself and your business from email phishing attempts. But first, what is phishing?

phishing

Phishing Defined

Although it may sound like a recreational sport, phishing is not a virtuous practice. It is, instead, the deceitful and illegal practice of trying to obtain personal information by way of fraudulent emails.

Most of the time, phishing emails purporting to be from a legitimate business, like a store, bank, or online service. Frequently, these are establishments where you actually hold an account, so receiving them, at first, may seem reasonable. It’s when you look at the details of such emails that things become troublesome.

The goal of phishing emails is to appear legitimate while luring personal information, like the following, out of you:

  • Login information (usernames and/or passwords)
  • Social security number
  • Credit card or financial information
  • Date of birth
  • And other (usually financially related) information

If you end up giving the fraudsters this data, their ultimate goal is to use it to hack into your life in some way — often by getting access to your bank accounts, credit cards, and more.

If you’re concerned about phishing, here are seven tips for catching fraudulent emails and staying away from phishing attempts altogether.

1. Don’t send personal information.

Be on the lookout for emails that ask for your personal information. Whether you hold an account with the purported sender or not, nearly all establishments avoid asking for personal information by email.

Therefore, if you get an email like this, it’s likely a scam. This is especially true if the email specifies that the issue is urgent and if you don’t send the information right away, your account will be cancelled or other repercussions will ensue.

2. Try hovering over links and/or buttons.

If you receive an email where there is a web address or link, there’s a way to check if the address is legitimate or not. To do this, hover your mouse over the link (or button). A small box should appear showing the website. If this website is legitimate, it will be the actual establishment’s website. If it looks unusually long or has a different name, do not click the link.

3. Always type web addresses in directly.

As a rule, never use links directly from emails. If you receive an email from your bank stating that you need to update personal information, this may worry you. So, to double check, type your bank’s actual website into the search bar and see if they still ask you for this information when you login from there.

4. Only use secure websites.

There are ways to check that a website is secure. You’ll know when these two key features are present:

– “https” will be present at the start of the web address

– There will be a security lock icon (usually to the left of the web address)

5. Double check the security certificate by double-clicking the security lock icon.

By double-clicking the lock icon, you’ll be able to see the security certificate for the website. If, when you click the lock, you receive a warning message or there is no certificate available, stay away from that website.

6. Avoid using public WiFi.

At all costs, avoid using public WiFi — especially when banking, shopping, and entering personal information. It’s always better to use your phone’s cell phone connection.

7. Watch for “personalization” … with one caveat.

It’s always a better sign if emails use your actual name instead of “user” or “sir or madame,” but also keep in mind that even phishing emails can be crafty enough to know your actual name. In the end, if you receive an email addressed to your name, that’s not enough to signify that the email is legitimate. Look for other factors too.

Remember to always … be cautious and suspicious!

How to Use the Windows 10 Anniversary Update to Get Access From Anywhere

Windows 10 Anniversary Update

When the Windows 10 Anniversary Update came out, Microsoft continued the process to improve connectivity between devices, including a new feature, Project to this PC. Though it’s similar to a remote desktop, it allows the remote device to establish the connection through the Connect app. This allows you to project your phone or remote PC to your computer either through the use of Miracast technology or using a local network without having to bother with usernames and passwords. Here’s a look at how to use Project to this PC to keep up with your business.

Windows 10 Anniversary Update

How to Use the Windows 10 Anniversary Update to Get Access From Anywhere

Setting Up Your Devices for Project to this PC

Setting up your devices is a simple process. You’ll need to open Settings, click on the System option and then select Projecting to this PC. However, you’ll also need to make the device you’re viewing on discoverable by the device you’re attempting to project. This requires customizing a specific option, “Some Windows and Android devices can project to this PC when you say it’s OK”. You have the option of choosing Always Off, Available anywhere or Available anywhere on secure networks. You’ll also be able to select whether to “Ask to project to this PC” for First time only or for Every time a connection is requested. You can use an option to Require PIN for pairing to provide additional security, but if it isn’t enabled, you can simply connect without any additional steps taken. To save power, you can also make your laptop discoverable only when plugged in. Some users find that renaming their PC makes discovery easier on a remote host.

How to Use Project to this PC with Your Devices

After you’ve adapted your settings, you simply need to open the Connect app on the device you’re projecting. On the remote device, you’ll need to open the Action Center, hit the Connect button, then select the name of the device that you’re projecting. You’ll need to check the box for Allow Input from a keyboard or mouse connected to this display if needed. You’ll then be able to control the remote screen, but your experience may vary based on the device being used and network speeds.

Other Options for Project to this PC

One area that not a lot of techs are talking about is the ability to use your computer as a second monitor for another PC. If you’re working on a project that takes up a lot of real estate, this allows you to quickly add a second monitor. When you connect, you can use the Change projection mode for a range of Windows Project options, such as Disconnect, Duplicate, Extend and Second Screen solely. The Extend option allows you to treat the projected screen as a secondary monitor.

Projecting to this PC is being pushed as a business feature to help share documents with a group, but it can serve almost any purpose. Devices used with the Connect app don’t have to be using the Anniversary update, provided that it’s been updated during or after November 2015. It can also work with Windows 10 mobile devices with the Continuum experience.

The Benefits of Layered Security and How It Can Improve Your Business

Cyber Security

Professionals who specialize in cybersecurity realized long ago that there was no single way to protect a business from malicious attacks from hackers who were seeking to access their confidential information. While there are many different ways to protect your information, no one technique has ever been entirely successful. The key to providing the most effective cybersecurity protocols is to layer different types of security measures so that the gaps and loopholes between each one are significantly smaller, allowing hackers less time to do their dirty work.

Check out the video below to learn some quick ABCs to better cybersecurity.


The Increased Risk of Cyber Attacks

Billions of cyber attacks are blocked each year by cybersecurity professionals who have developed programs that use a layered system. Each layer of security is more intricate than the next, reducing a hacker’s ability to maneuver as they work their way through the levels of defense mechanisms. It’s estimated that a hacker can remain embedded in a network’s system for up to 100 days or more. This is 100 days too long, especially if they can maintain their access long enough to find their way around the roadblocks that have been put up by cybersecurity programs.

Why Layers Are So Beneficial

Layers are beneficial for many reasons. Just put each layer provides an additional level of defense so that with each extra layer of security that can be added, there is less and less access making it more challenging to find ways to infiltrate the system. While each layer in and of itself is not an adequate defense mechanism, layering them together improves each one’s efficiency until the last layer completely blocks out the hacker’s ability to gain entry. Instead of trying to rely on just one or two lines of defense, like access cards and two-step identification, multiple layers of security will lower your risk of a breach and make it easier to respond to legitimate inquiries and requests.

The Right Defense At the Right Time

With a layered defense approach, several things happen. First, threats that are detected early are eliminated so that they won’t pose a threat or be able to block authentic attempts to enter the system. The next thing to happen is that if an email enters the system and is picked up as a threat, but clarification is needed, it is sent to an area where it can be easily verified. This rapid capture and validate process means less downtime and allows your team to continue to be productive. It also eliminates the need for a person to have to go into the system to clear an item. The right defense at the right time within a layered cybersecurity program offers your company a chance to continue to work at full speed while your defense mechanisms are in place and taking care of business.

Improving Your Cyber Security’s Effectiveness

If you are trying to prevent financial loss and improve the overall value of your network, then layering your security protocols is your best whole line of defense. It will reduce the false positives that prevent your company from maintaining interaction with legitimate contacts, while at the same time helping you improve your visibility. By establishing a verified pathway that goes from the network to the server following a defined set of points that lie in between, any type of threat is detected much easier and eliminated without slowing down your system’s operation. The layered security concept creates an interwoven network of protection that prevents unwanted intruders from accessing (or even lingering for long periods of time) within your system.

If you need a cybersecurity program that is both effective and efficient, go for the layered approach. It provides multi-levels of defense that both identifies and eliminates threats on many different levels. With each added layer you compound your level of protection until you have a wall of security that is almost impenetrable. The increased risk of loss associated with cyber-attacks cannot be denied, so it’s vital that you use a security approach that takes many different types of threats into consideration and deals with each one quickly and efficiently.

Cyber Security

How to Insert or Remove a Page Break in Microsoft Word 2016

Microsoft Word Page Break

Page breaks are incredibly useful when it comes to formatting your Microsoft Word documents so that they look exactly the way you want them to. The page breaks tool allows you to determine where a page begins and ends. Here is some information about how to insert and remove page breaks in Microsoft Word 2016 as well as the types of page breaks that exist.

How to Add a Page Break

When a page can no longer fit additional content, Word automatically adds a page break. However, in some cases, you may want to add page breaks elsewhere. For example, if you’re working on a lengthy document, you may want to create to add a page break to create a new section. Page breaks are also useful when it comes to adding space around images and other graphics.

Fortunately, the process of creating a page break is incredibly simple.

1. Move your cursor where you want to begin a new page. For example, if you want to add a page break between two paragraphs, you should place the cursor before the first character of the second paragraph.

2. Navigate to Insert > Pages > Page Break. Microsoft Word will then create a new page where you placed your cursor.

You can also the keyboard shortcut CTRL + Enter to add a page break quickly.

Other Kinds of Page Breaks

In Microsoft Word, there are many different types of breaks that you can add.

  • Column Break: If you have multiple columns in your document, you can use a column break to start adding content to a new column. Using a column break is far better than simply pressing the Enter key to move to the next column. Even if you make changes to the text or change the font size, you won’t have to worry about formatting as long as you use a column break instead of pressing the Enter key.
  • Text Wrapping: Another type of page break is text wrapping. If you have an image or in your document, you can use a text wrapping break to ensure the rest of the content flows around the image and the caption.
  • Next Page: The Next Page feature works similarly to the Page Break feature. The main difference is that it creates a new section and gives you the option to use formatting that is different from the prior sections. For example, you can use the Next Page feature to rotate a section to portrait or landscape mode. You can also use different footers or headers or add columns to the next section without impacting the formatting of the rest of the document.
  • Continuous Break: The Continuous Break feature creates a new section but doesn’t have you begin on a new page.
  • Even and Odd Page Breaks: This feature allows you to add a section break. You will begin on the next odd or even page, depending on the type of break you pick. You can also format the even and odd pages of a document differently.

Microsoft Word Page Break

How to Remove Page Breaks

It is just as easy to remove page breaks from a document in Microsoft Word 2016.

1. Click on the symbol for Show/Hide.

2. Double-click on the page break you want to get rid of.

3. Click on “Delete”.

Keep in mind that you can’t remove page breaks automatically added by Microsoft Word, However, you can change where these automatic page breaks land so that you can keep certain lines or paragraphs together.

What are the Top 13 Respond to a Meeting Request Tips in Outlook?

Microsoft Outlook Meeting Requests

Microsoft Outlook makes it easy. If you are in an email, then click on the Message tab and Reply With Meeting. Then go ahead and update the invitation like you would any other meeting. Don’t forget about adding the attendees, time, location, then Send. It’s as simple as that. But wait! There’s more to meeting requests then reply and send.


What we’ve done is scoured our archives and brought you 13 quick tips most Outlook users want to know. Our list is not exhaustive. But what we’ve put together for you and your team are the most common meeting requests we hear, and we’d like to share them with you today and test them for yourself.

1) How can I respond to a new meeting request in Outlook?

Open the meeting request and click Accept. Click Send the response now if you wish to respond or select Do not send a response. Then click OK. You may want to choose Edit the answer before sending to include a comment such as: “I will be arriving late.”

2) How can I see who has accepted a meeting in Outlook?

When you need to review, who accepted or declined your meeting invite, in Microsoft Outlook here’s what you do:

  1. Choose the “Calendar” icon in the “Navigation Pane“
  2. Double-click the meeting you want to review
  3. Under the “Meeting Occurrence” tab, select the “Tracking” button

3) How do I accept a declined meeting in Outlook?

This is for Outlook 2016 for Mac or Outlook 2016/2013 for Windows

  1. Open the meeting request from the Deleted Items folder, and then click Accept or Tentative. If the Deleted Items folder got emptied, this option is not available.
  2. Request the meeting organizer resend you a new meeting request update.

4) How do you send a meeting update without response required?

When you initially send the meeting request, if you didn’t turn off the response option, you can change the option at any time.

  1. Open the meeting
  2. On the Meeting Ribbon
  3. In the Attendees group, click Responses
  4. Uncheck Request Responses

5) How do I accept a meeting in Outlook that I declined?

  1. Go ahead and open the Deleted Items folder and find the declined meeting request you refused.
  2. Now go ahead and double-click to open the meeting request. Next, click the Accept button in the Respond group under the Meeting tab.
  3. When the prompt box pops up, choose an option you want, and then click the OK button.

6) How do I accept a meeting in Outlook?

Here you will double-click the meeting request to open. Now click one of the buttons in the “Respond” button group, on the “Meeting” tab on the Ribbon. You can click either the Decline, Tentative or Accept or if allowed by your meeting organizer, “Propose New Time” buttons.

7) How do I see who is not attending a meeting in Outlook?

If you want to review who declined your meeting invite in Outlook, here’s what to do.

  1. Choose the “Calendar” icon in the “Navigation Pane“
  2. Double-click the meeting you want to check
  3. Under the “Meeting Occurrence” tab, select the “Tracking” button
  4. Can you recall meeting invite outlook?
  5. When you want to cancel your meeting, open Outlook, then locate the event in your calendar. Choose the meeting, but do not open the meeting details. Choose the “Meeting” icon in the top navigation ribbon, then click the “Cancel Meeting” option. Type an optional message, then click “Send Cancellation.”

8) Can you un-decline a meeting in Outlook?

Show a declined meeting on my calendar. If a meeting request gets refused, the session does not get saved to your schedule, and the meeting request message gets moved to the Deleted Items folder. You can only show accepted or tentative meetings on your calendar. To request this feature, go to Outlook UserVoice.

9) How do I view Cancelled meetings in Outlook?

To hide or don’t show canceled meetings in your Calendar in Outlook, do this:

Step 1: Move to the Calendar view, and open the Calendar that you want to hide canceled meetings Step 2: Click the View Settings button on the View tab

Step 3: In the popping up dialog box, please click the Filter button

Step 4: Then the Filter dialog box comes out. Please go to the Advanced tab, and:

(a) Click the Field > All Appointment fields > Subject;

(b) Click the Condition box and select the doesn’t contain from the drop-down list

(c) Enter the text of “Canceled:” in the Value box;

(d) Click the Add to List button

Step 5: Click both OK buttons in two dialog boxes.

10) How do I send a meeting update in Outlook?

Update a recurring meeting is easy

  1. Go ahead and double-click the meeting on your calendar. It will open. To update all instances of a recurring meeting, on the Organizer Meeting or Meeting Series tab, click Edit Series.
  2. Change the options that you want.
  3. On the Organizer Meeting or Meeting tab, click Send Update.

11) How do you delete a meeting in Outlook without sending a cancellation?

  1. Choose the “Send/Receive” tab
  2. Now the “Work Offline” button
  3. Make your changes or delete your calendar appointment
  4. Now choose to Send cancellation
  5. Head over to the “Outbox” and delete all of the cancellation messages
  6. Now go back to “Send/Receive” and choose “Work Offline” again to turn it off

12. How do you change a meeting response in Outlook?

Change meeting request: Outlook 2010 and 2013

In your calendar double click on the meeting to open the Meeting dialogue window. Note: You have two options of opening: one occurrence or the entire series if you are changing a recurring meeting.

In the main Meeting dialogue window, make your meeting changes. When you get finished, click on the Send Update icon.

13. How do I recover a deleted meeting in Outlook?

  1. Recovering deleted mail items: Outlook 2010 and 2013
  2. Choose the folder where you want to retrieve the missing item.
  3. Click on the Folder tab, and then click Recover Deleted Items.
  4. In the Recover Deleted Items dialog box, select the item(s) you would like to restore.
  5. Click Recover Selected Items.

Did you find this article informative? If you liked this one, check out our other content we think you’ll find interesting.